Rustic Side Table Roadkill Rescue
As an Amazon Associate, I earn from qualifying purchases.
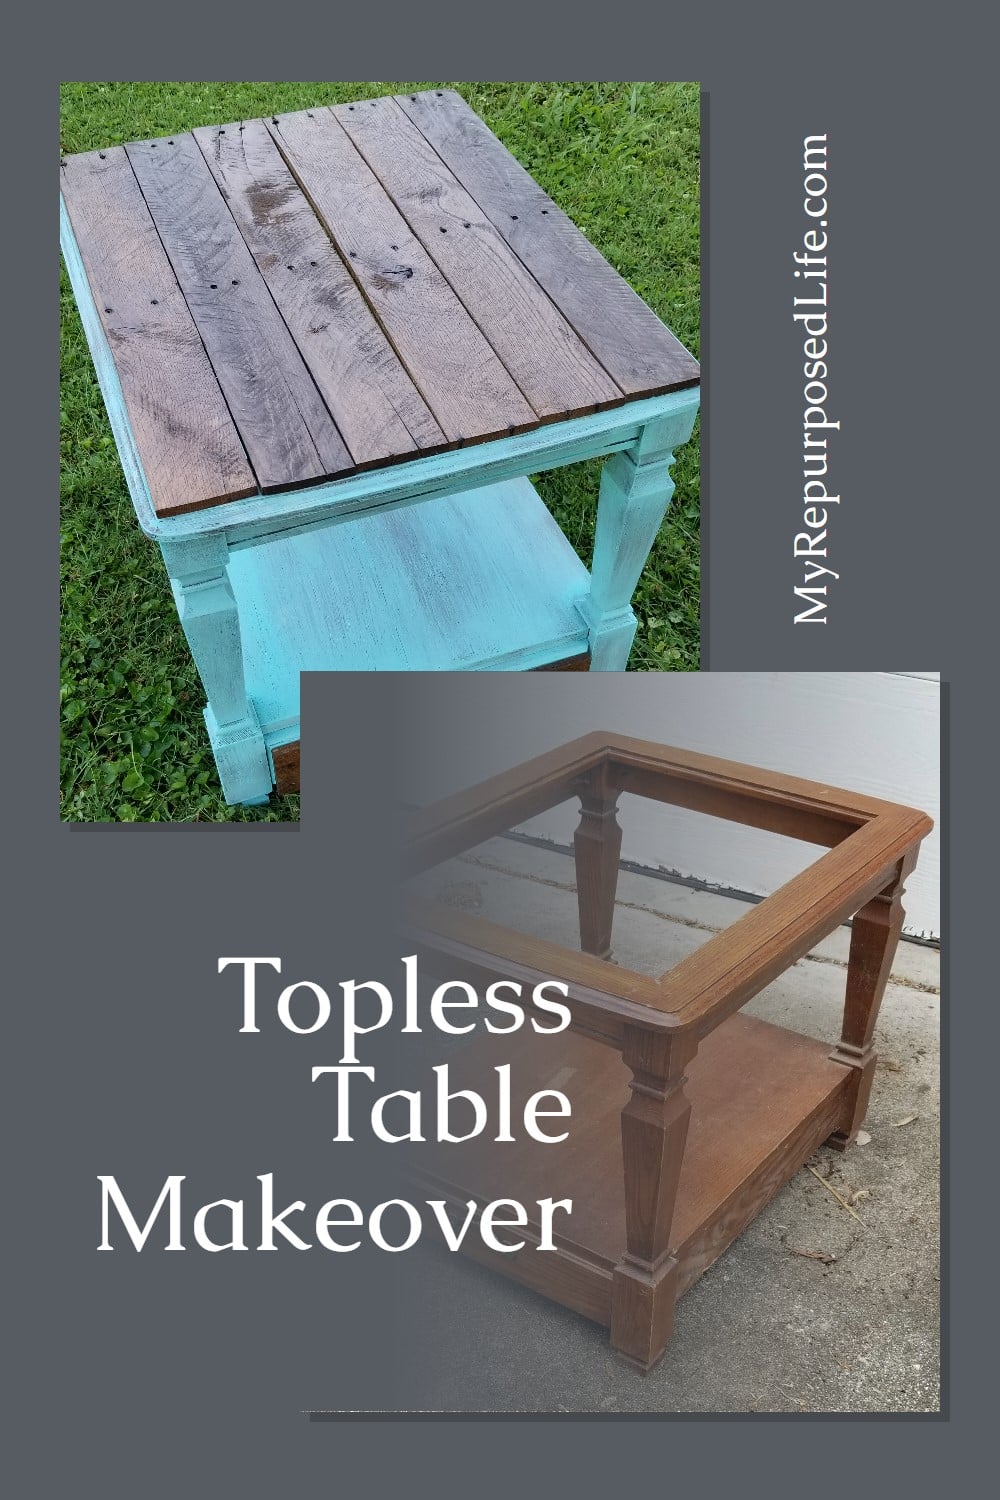
When I got this roadkill rescue piece, I didn’t know it was going to be a rustic side table. Even now that it’s done, I’m sure it’s not for everyone. But that’s what DIY is all about. I show you how you “can” do something and that inspires you to have your aha moment to make it your own!

My neighbor Rodney found this little lady on the side of the road. Many side tables of the 80’s had glass tops. Once those tops are broken, people deem the table useless. There are many ways you can add a table top to a broken side table.
*this post contains affiliate links, read more here*
What’s the first thing to do on a furniture makeover?

The very first thing you should do when you’re doing furniture rehab is inspect and repair. There were some veneer trim pieces that were coming loose. I used Gorilla Wood Glue and a silicone glue brush to make these repairs.
Repair Loose Veneer
 This longer piece of veneer needed considerably more help. I like to use painter’s tape on scrap wood in order to clamp and repair veneer. The painter’s tape prevents the scrap wood from becoming part of the project.
 ![]()

Thoroughly Clean Furniture before Painting

I like to use TSP for cleaning my projects like this rustic side table. You never should paint over dirt, grime and nicotine. This is a concentrate, so I dilute it a little in water.

It’s best to wear latex gloves and apply the tsp with a rag. You can see how dirty this side table was. Allow the project to dry thoroughly before painting.
Paint rustic side table

I went to my stash in the basement shop and selected this “Paradise” texture chalk paint from Folk Art.

Because I didn’t want a heavy coverage, I painted with a light dry brush technique. This allowed some of the dark details of the original color to show through.
Use pallet boards for broken rustic side table top

I went to the wood shed to try to find some options for a new table top.

Instead of using any of the reclaimed wood I already had harvested, I opted for the wood on this pallet.

I used my favorite duckbill deck wrecker to dismantle this pallet. You can read more details about how easy it is to use this tool in my post Pallet Projects Plus Tips for Dismantling Pallets.
Sand and Stain Pallet Boards

Using my orbital sander to sand all the pallet boards gave them a smoother look and feel. After sanding, they were cut to size on my miter saw.

I prefer using a rag to apply stain, then I can throw it away instead of cleaning a paint brush. Minwax special walnut looked like it would be the best color of stain to compliment the aqua blue table with it’s dark highlights.
Apply Wipe-On Poly

For a little protection and shine, I used a rag and gloves to add Wipe-on Poly. It doesn’t get any easier than this!
Attach Pallet Top to Rustic Side Table
 I used my trusty Gorilla Wood Glue to attach the pallet boards to the original top of the topless side table.

Assorted clamps help hold all the pallet boards in place atop the rustic side table.
Secure pallet boards with screws

After allowing the glue to set up, a small drill bit was used to drill pilot holes in order to secure each board with screws.

To make sure the 1 1/4” screws didn’t protrude through the pallet boards, I inserted them on a slight angle.
Add Pallet Board to Drawer Front

Oops! I forgot to take pictures of this step. Using a pallet board, I cut a small piece to make a new front for the drawer on the rustic side table. I attached a bin pull I picked up at Hobby Lobby last year.


As I said, it may not be to your liking. If not, please share in a comment below what you would have done differently. If you have any questions, don’t hesitate to ask.
gail
I really like the natural wood combined with painted pieces. Nice job.
Thanks Stephanie. It’s my favorite look, adding painted pieces and stained wood!
gail
I probably would have cut the boards smaller and figured a way to set them in the recess left from the missing glass. I think the contrast between the brown pallett boards and the blue table edge would have tied it together with the bottom drawer front. It also wouldn’t have that oddish drop off the edge on the top. Other than that I think it’s great looking and functional- love the color choices you made on this project. I appreciate all the details about the prep repairs and the cleaning tips. That is so essential to making a lasting piece of furniture and not being sad later that you wasted your time. That is a great tip! Thank you! Awesome job!
Danyle
Danyle,
I considered doing as you suggested, but the pallet boards were much thicker and would have left their own drop-off around the edge of the table, making drinks teeter if not rested properly. 🙂
Thanks for your oh so sweet comment and I’m so happy you appreciate my tips. Wasting time is NOT fun.
I played around with the idea of doing a blue wash over the dark stained pallet boards. I’m glad I didn’t do that.
thanks agian,
gail
Nice! Thanks to you, I’ve become a fan of painted wood bottom with stained wood tops. The more important question; what are you going to do with that amazing metal chair? I remember we had two like that was I was a kid.
Jennifer,
That’s awesome! I’m so happy to have inspired you to do the two toned furniture look. (It’s my favorite)
That chair? hmmmm I dunno. I think it wants to be a planter. lol What would you do with it?
gail
it is quirky, which i love! thanks for saving it for someone to love!
ohhh, you’re so sweet! Thanks for appreciating what I do!
gail
Very cute-good for the front porch or patio?
Yep! great idea! Thanks Kathleen!
gail
It’s a great answer to the problem. I love the color. I might have covered the bottom shelf with pallet boards too. I love that the top isn’t perfect you can peek through in a couple of places. If you had stuck a board where the glass had been first, you’d have lost that charm. It’s really darling.
This small pallet barely had enough good boards for the top and the drawer…. or I may have considered doing the bottom as well. It’s been so hot and humid that I was miserable while working on this little table makeover. I did it in small doses over several days. lol
I debated on cutting the boards smaller and filling in the area just where the glass had been. That’s why I love sharing with others, so I can get YOUR juices flowing on what you would have done!
Thanks Jennie!
Nice job neighbor.You always make magic happen.You have a gift that some people don’t see.You are a true DIYer.I always keep an eye out for roadkill as you call it👍✌️
Thanks for bringing this little table to me neighbor! It was a fun project to work on. (although I could do without the heat)
gail