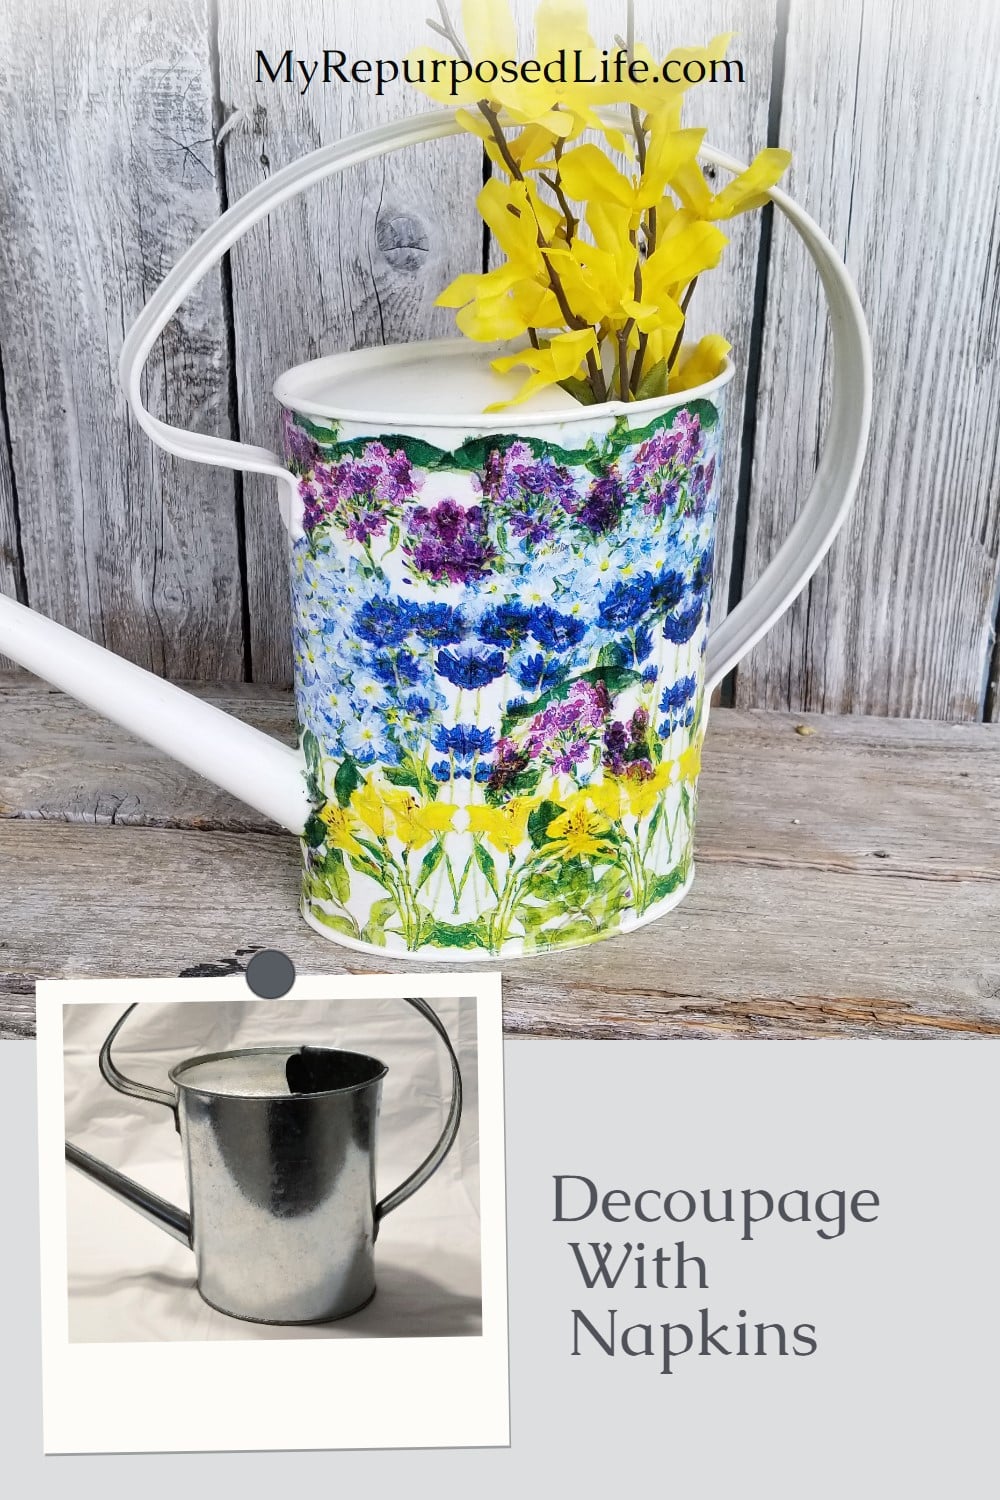
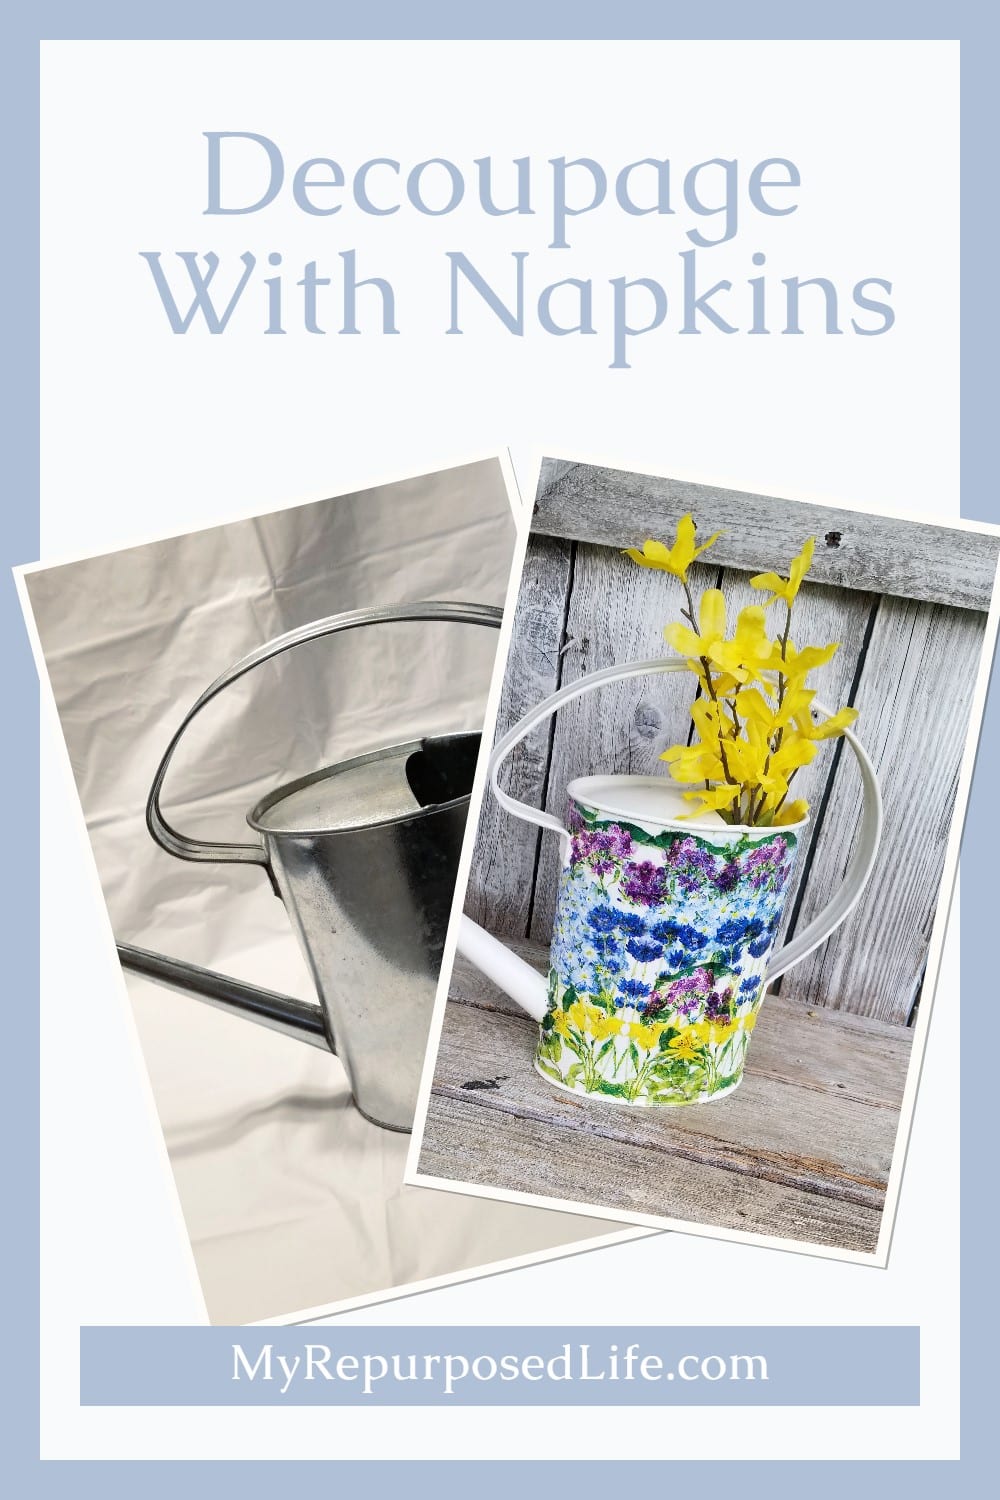
Simple Decoupage Watering Can Project
As an Amazon Associate, I earn from qualifying purchases.
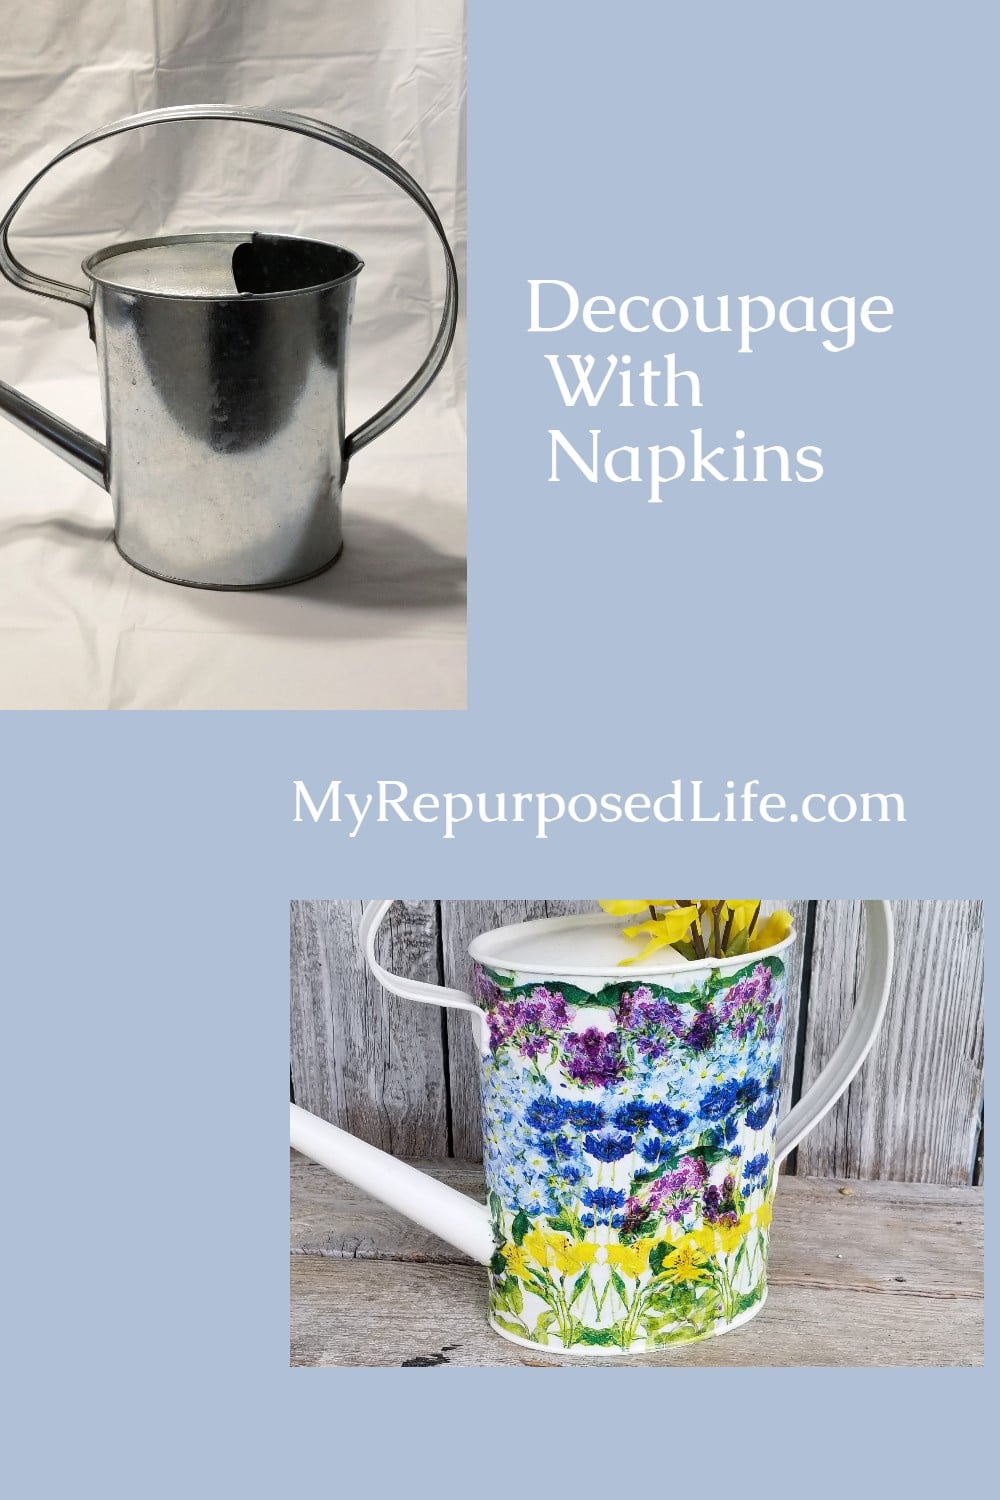
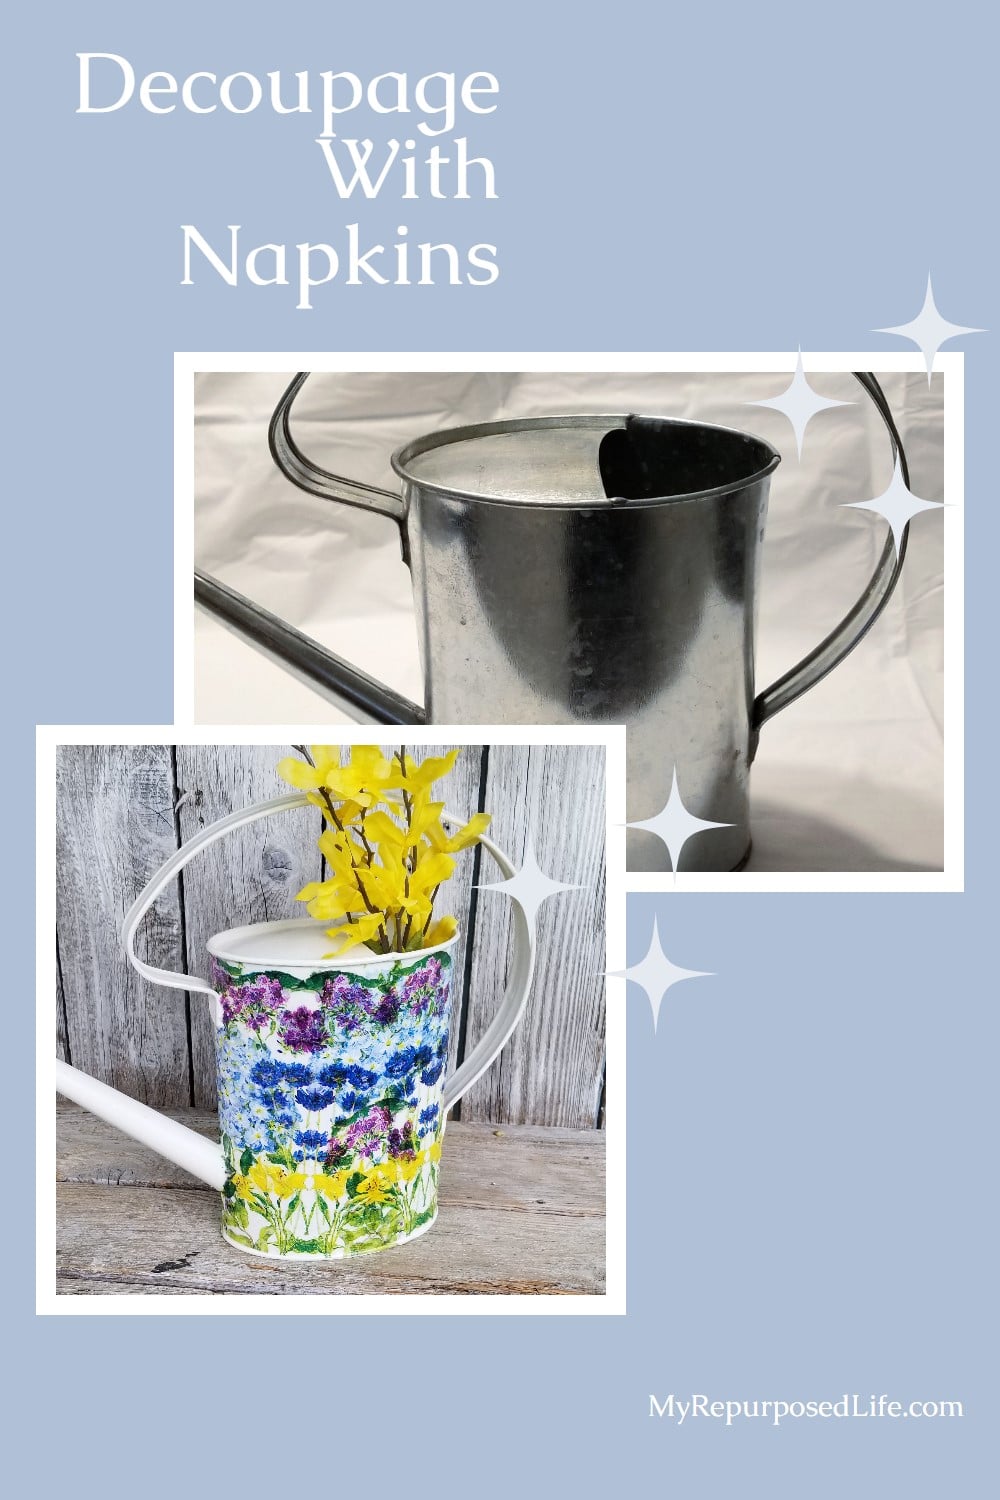
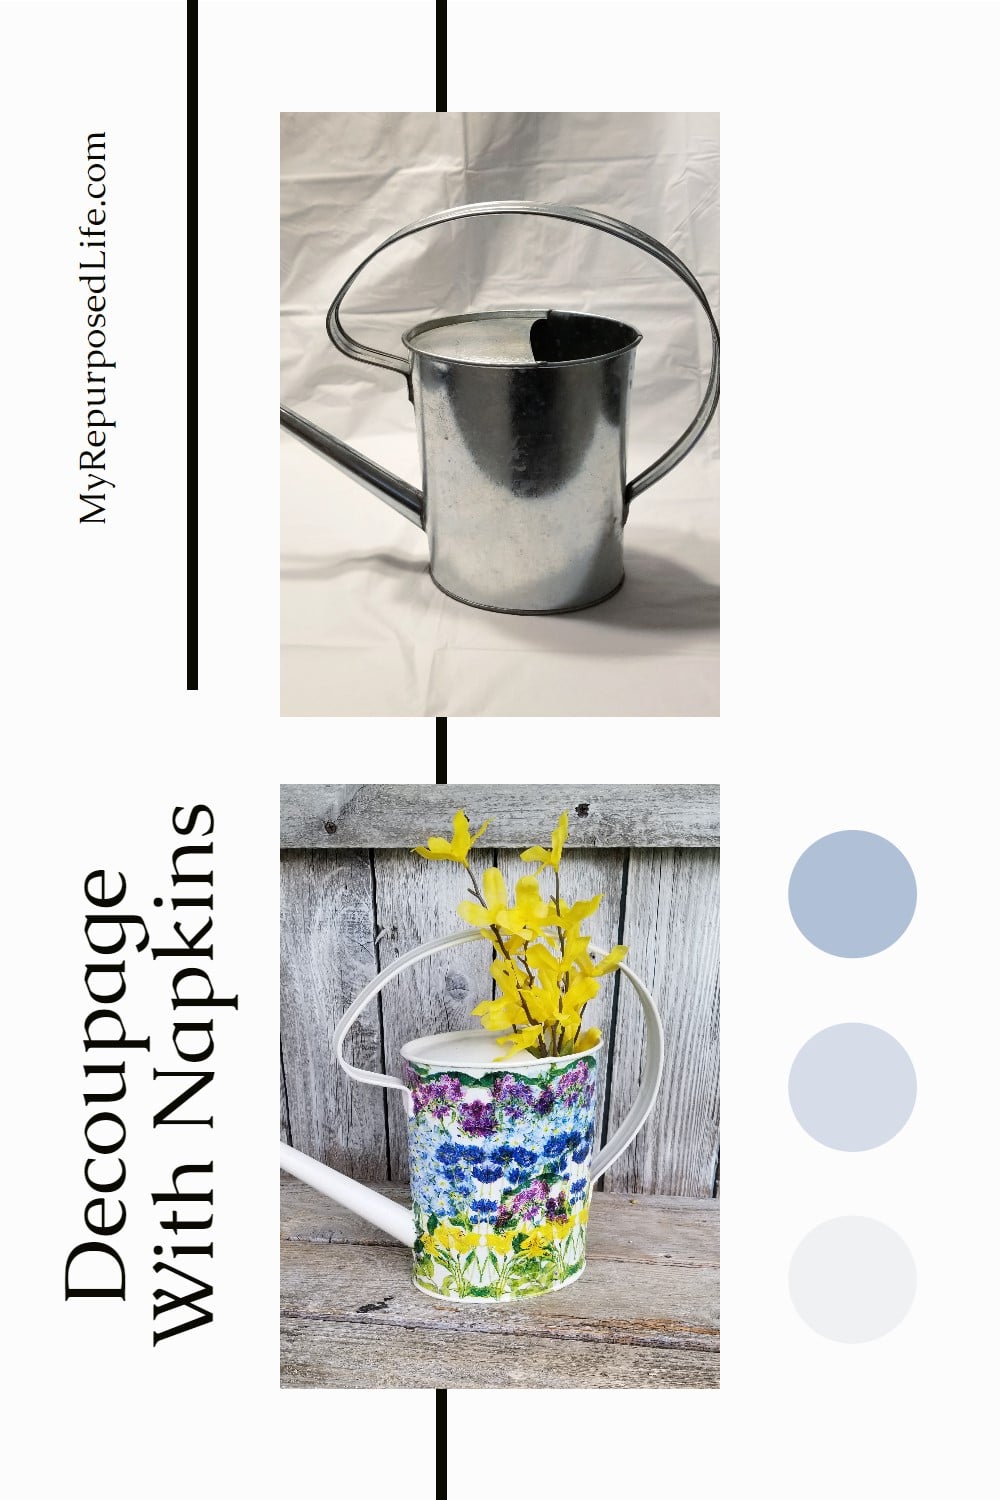
Learn how to transform a plain metal watering can into charming cottage-style decor with this simple decoupage project. Using floral napkins, paint, and Mod Podge, this budget-friendly DIY adds a touch of vintage flair to your home or garden. Perfect for beginners, this step-by-step tutorial will show you how easy it is to create custom decor with just a few supplies.
My watering can is for display only; you would need to properly seal your project if you still want it to be used as a watering can.
Simple Decoupage Watering Can Project

If you’re a regular reader, you probably recognize this pattern. It’s from a package of napkins I’ve used on other projects over the last year or so. I’ll share those with you at the bottom of this post. Let’s see how this easy decoupage project came together.
Easy Decoupage Project Directions

For a shiny item like this, I chose to wipe it clean with alcohol and a cotton pad. If you’re using a previously painted item, you should be fine.

The alcohol removed the grime and the shiny finish. Now, the watering can is ready for paint!
Visit the My Repurposed Life Amazon Store to shop my favorite items.
Dixie Belle Fluff Paint

Dixie Belle Paint in Fluff seemed the perfect color for the can and the napkin. I painted it inside and out with a chip brush.

The first coat was very quick and light, drying very fast. I applied a second coat everywhere that wasn’t going to be decoupaged. The paint adhered nicely, leaving the watering can with a flat sheen.
Prep Napkins for Decoupage

Whenever you use napkins for decoupaging, you need to separate the ply. This pretty hydrangea napkin is three-ply. You’ll only use the top ply, discarding the other two layers.

Typically, the napkins follow a pattern similar to wallpaper. That matters in some decoupage projects, but I’m doing this a little differently.

After separating the napkins, I cut them in half. I’m only prepping one napkin at a time because it’s hard to know how many I’ll need.

You don’t want hard edges when you decoupage unless you work against an edge. I tore away the napkin, revealing three different patterns. The first pattern is the hydrangea, and the second one is the blue flowers with the yellow ones. The third pattern I chose was the tiny purple flowers. These would be used to fill in the empty areas.
Apply Mod Podge and Napkins to the Watering Can

I prefer to dilute the Mod Podge slightly when doing projects like this decoupage watering can. I apply it using a foam brush. I’ll explain more about that a little later.

Wrinkles get a bad rap, but with a thin napkin decoupage project, you’re going to have wrinkles. Embrace them!
How to Decoupage a Watering Can Project
- Thin (dilute) Mod Podge.
- Apply a layer of Mod Podge to the project.
- Carefully lay the napkin onto the project.
- Dab Mod Podge medium onto the napkin.
- Do NOT paint with the foam brush—napkins tear very easily.
- Continue to work in small areas.
- Allow the decoupage watering can project to dry thoroughly.
- Apply a top coat to the entire project, sealing the paint where there is no decoupage.

I chose not to apply napkins to the handle, top, and spout. After applying the topcoat of Mod Podge to the entire watering can, I loved how it looked. Honestly, I can’t remember what stage this is.

For the second application of the topcoat, I needed to coat the inside of the can with the Mod Podge, so I used the chip brush. It left visible brush strokes on the top—I’m not thrilled. I should have used the foam brush. It’s up to you whether you do the inside of the can, but I’m glad I did.
Do you see the wrinkles are less noticeable now that it’s all dry?

Isn’t this an improvement over the original silvery, shiny watering can?

Here are the other items I’ve used these napkins on
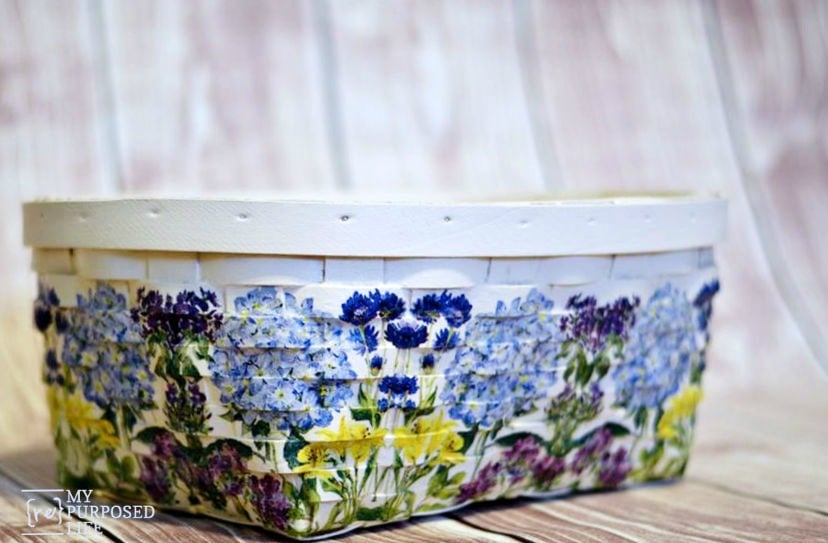
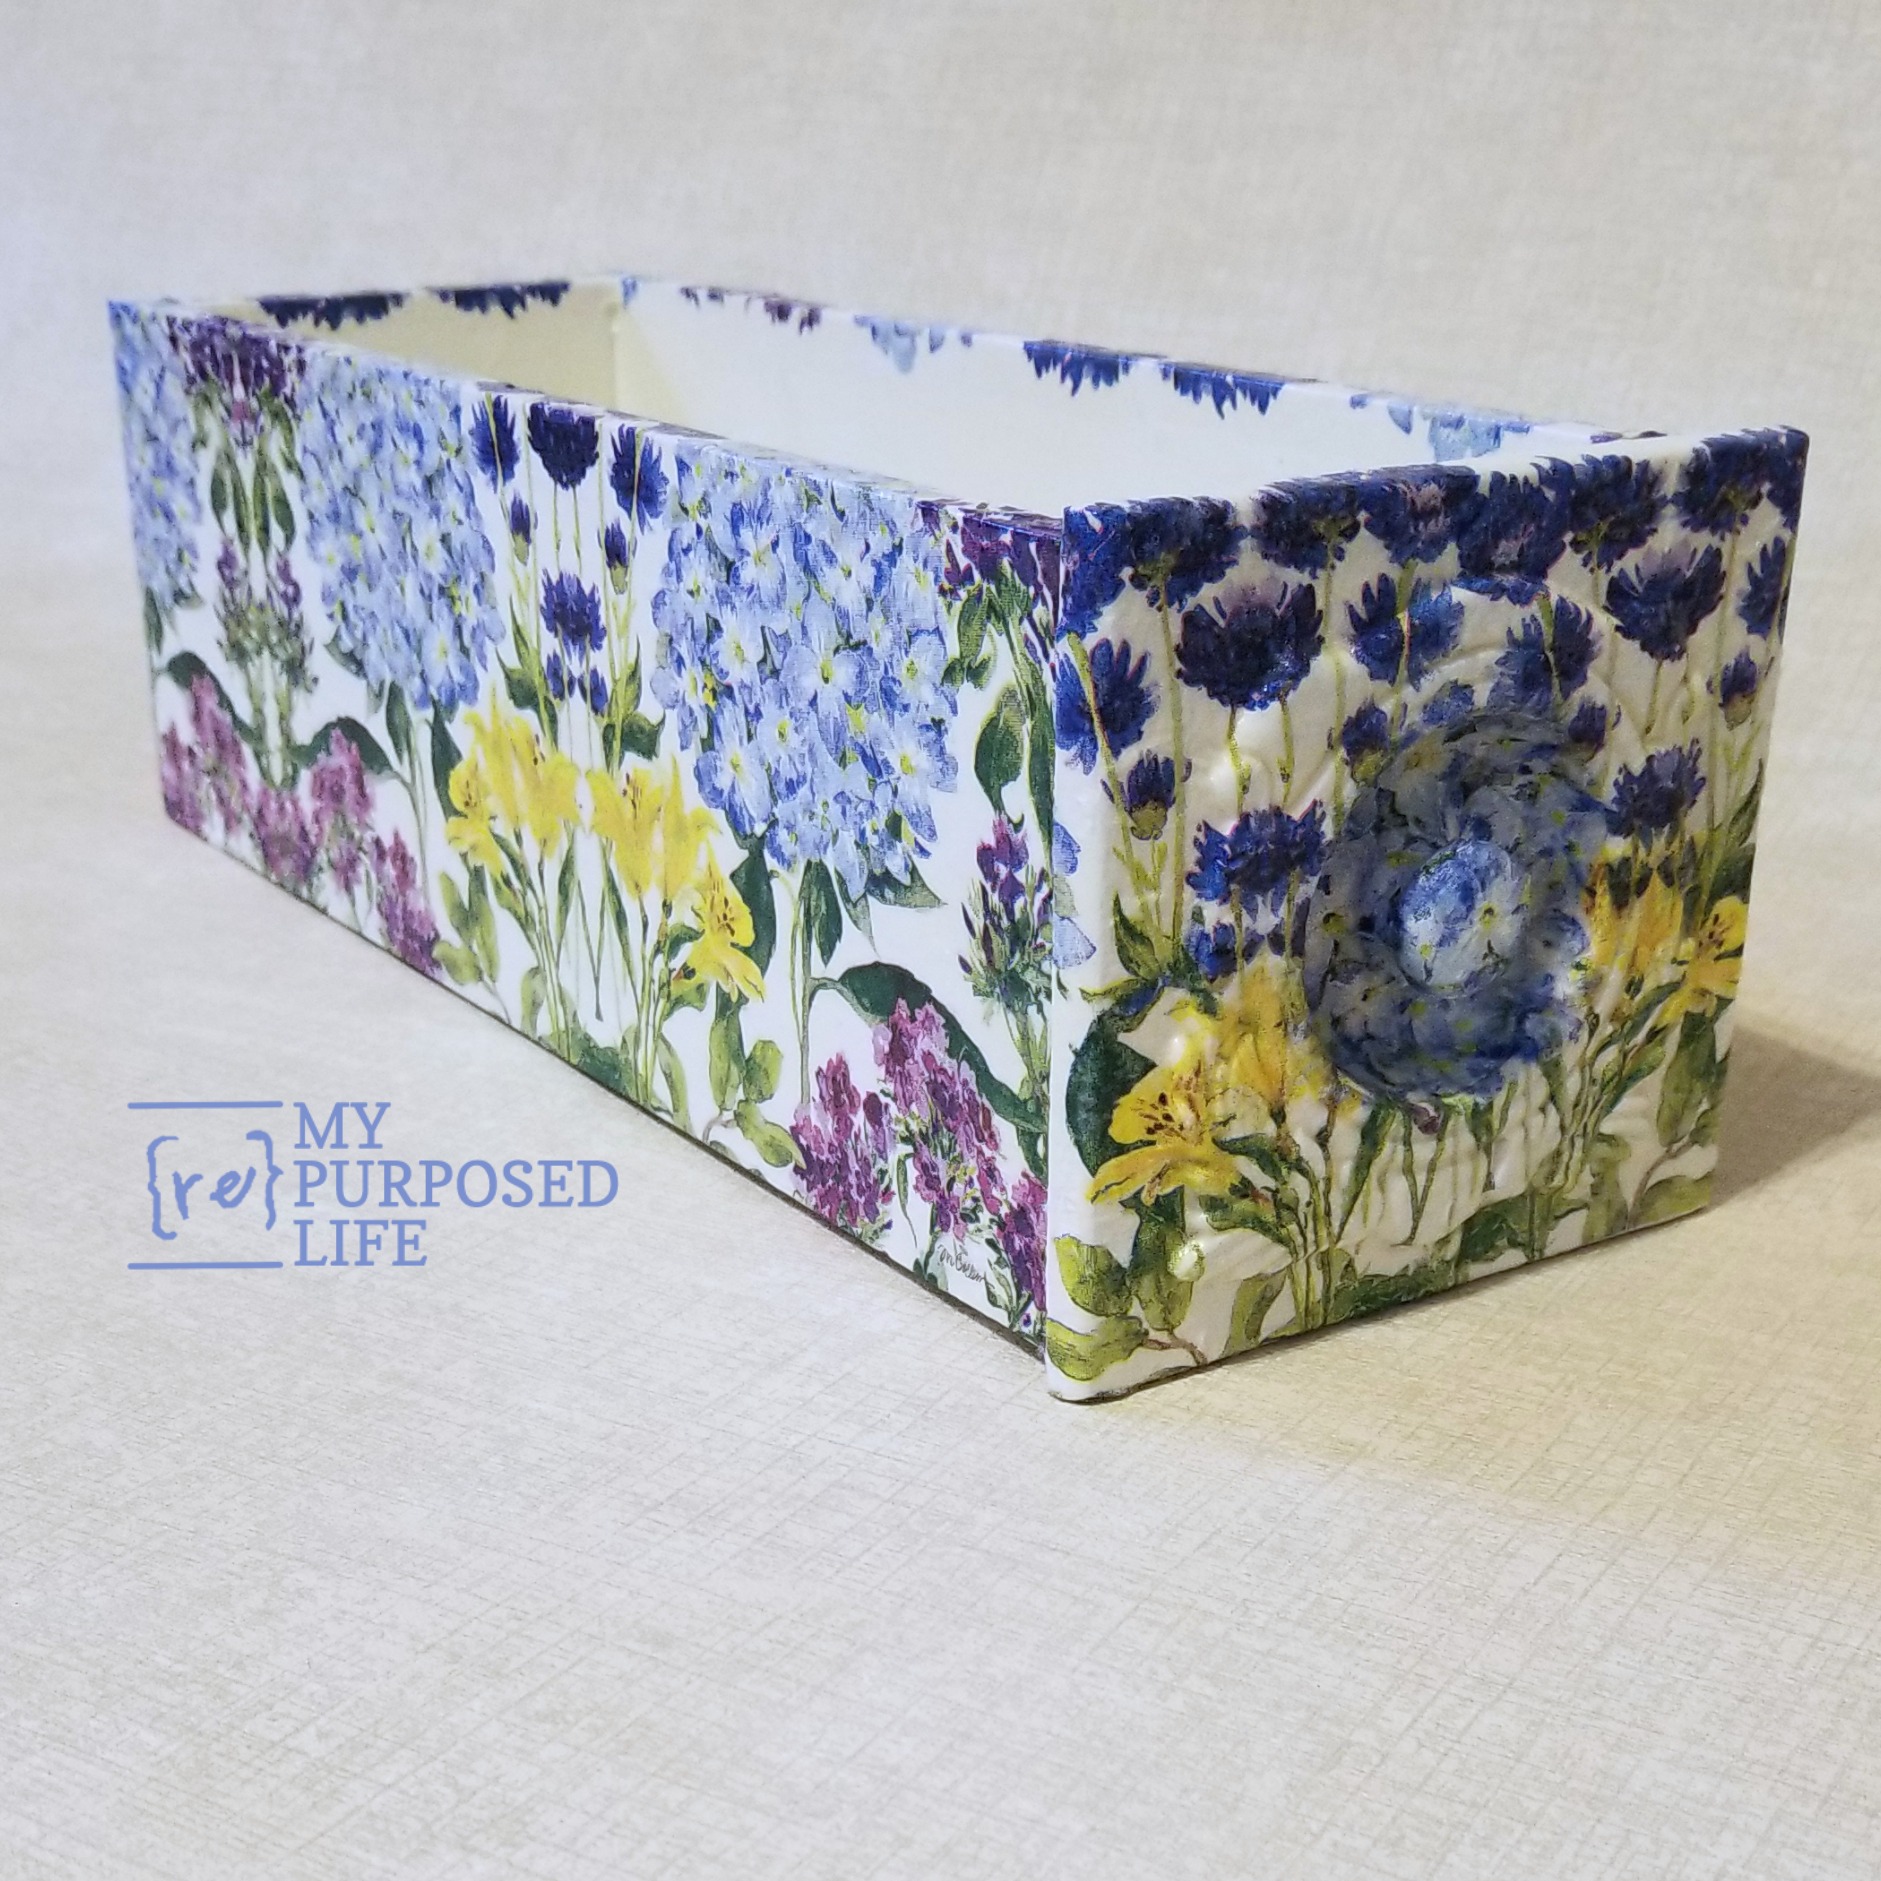
I still have a few more napkins left. The fantastic thing about decoupaging with napkins is that the projects take so few napkins. Most projects take 2 to 3 napkins in total. So, a package of 20 napkins will complete a lot of projects.
What will you decoupage?
gail
What will I decoupage? I’ve never decoupaged anything so I’ll have to think about what I could choose that wouldn’t be a great loss if I made a complete mess of it! Maybe a box with it’s smooth surfaces would be ideal to start with. I’m sure I have a box or two (or more!) that would be appropriate. I’ll let you know if I try it any time soon. Thanks for sharing your watering can project; it turned out really pretty.
So much prettier now 🙂
This looks like a truely wonderful spring project.
And such happy results !
Thanks for sharing.
Great looking watering can. I couldn’t image doing decoupage on metal. You always broaden my horizons.
Thank you Alberta!!! Painting first is a must! I do love an easy decoupage project.
gail
I absolutely love the decoupage post Re: watering cans!!! You totally make it sound doable . Even for a craft “newbie” like me
I am collecting crafting supplies here and there. Haven’t yet started a project. Thank you for sharing your talents with “old beginners” such as me.
Have fun with your projects!
gail