dresser mirror ideas
As an Amazon Associate, I earn from qualifying purchases.

I love working my magic on discarded items destined for the landfill.
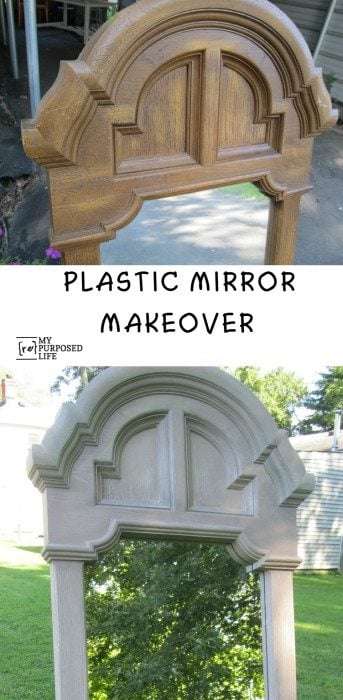
Look at the difference some DIY chalk paint can make. You’re going to love these dresser mirror ideas.
 While I was vacationing in California this summer, a friend dropped off two of these plastic framed mirrors.
 You may remember a plastic mirror I picked up in the spring. I removed the mirror and made a chalkboard out of it. You can see it in the post titled Plastic Dresser Mirror Repurposed Into a Chalkboard
I got a comment from:
Linda@Coastal Charm said…
Gail,
What a fun looking chalkboard…love the words. I had her twin,a few weeks back, but I kept the mirror in it. I painted it and sold it for $69 two days later:)
Blessings,
Linda
So, for these two mirrors, I decided to leave the mirrors alone.
 The mirror frames were quite dirty. I removed the mirror and the cardboard backing, then I simply hosed them off.
 Although this one doesn’t look very black, this is black DIY chalk paint.
 I painted this one with white chalk paint.
 I didn’t take any in progress pictures. I used dark ASCP wax on this one. I don’t know what color to call it, it looks like a scrumptious brown now.
 I used ASCP dark wax on the white one too.
") I prepared to put the mirrors back in the frames. While they were stored in my garage, each of the mirrors had slipped out of their inner frames, and you could see the top edge of the mirror when looking at the front of the mirror/frame. I just happened to have a couple of bi-folding door slats laying around. I used it to brace the mirrors so they won’t slip.
I prepared to put the mirrors back in the frames. While they were stored in my garage, each of the mirrors had slipped out of their inner frames, and you could see the top edge of the mirror when looking at the front of the mirror/frame. I just happened to have a couple of bi-folding door slats laying around. I used it to brace the mirrors so they won’t slip.
") You can see that I’ve already used this slat as a paint stirrer.
You can see that I’ve already used this slat as a paint stirrer. 
") I’m testing it out on the DIY Easel.
I’m testing it out on the DIY Easel.
") Both mirrors are very dirty.
Both mirrors are very dirty.
 Washing windows/mirrors is one of the things that hurts my shoulder the most. So, I grabbed my Fish Foam because it really does make easy work of cleaning glass.
 See how the mirror shines? It is nearly impossible to take a decent picture of a mirror.
 This picture shows how pretty the color is on this one.
 You can see how well it fits on the easel.
 Not the best camera angle, but the sky sure looks pretty!
 I really do love these easels! I doubt if I can get anywhere near $69 for these mirrors like Linda did, but they will be going to Glendale with me.
After I finished with these mirrors, I hauled them into the house at the end of the day. As I did that, I noticed that both mirrors were a little wobbly. A few days ago, I decided to tackle them again, and try to make them more stable. I hauled them back outside, one at a time. (these things are heavy!)
 I took them on with this handy new drill from The Home Depot and Ryobi-pronounced ree-o-bee. (did you know that Ryobi is exclusive to The Home Depot?) When I was in Michigan for the Celebration of Service at Stiggy’s Dogs, the nice folks from Ryobi were kind enough to give us bloggers a drill and charging kit. At the demonstration, one of the guys showed me this great feature where there is a magnet, and it holds your screws for you. Let me tell you that was handy for this project.
") Why was it so handy? Because there were a bazillion screws, and on this particular mirror I put the screws in and out at least 5 times. YEP, all those screws in then all those screws out again, over, and over, and over. I just could NOT get the mirror right. I tried using some very strong permanent double stick tape…
Why was it so handy? Because there were a bazillion screws, and on this particular mirror I put the screws in and out at least 5 times. YEP, all those screws in then all those screws out again, over, and over, and over. I just could NOT get the mirror right. I tried using some very strong permanent double stick tape…
") …I also tried using another shutter slat.
…I also tried using another shutter slat.
") I even tried placing some bubble wrap to secure it. BUT if you look closely you may notice what I did not notice the first 4 times I put it back together. Do you see it? The mirror had shifted a little to the left, and was not quite in between the little ledges. Seriously—why did it take me so long to figure it out? Oh well, I got to break in my new drill really well!
I even tried placing some bubble wrap to secure it. BUT if you look closely you may notice what I did not notice the first 4 times I put it back together. Do you see it? The mirror had shifted a little to the left, and was not quite in between the little ledges. Seriously—why did it take me so long to figure it out? Oh well, I got to break in my new drill really well!
Okay, back to the problem. In the end, I got the mirror situated, and I did not use the bubble wrap. The cardboard had warped, and was bowed—I ended up turning the cardboard over and reinstalling it for the final time inside out. whew! Sometimes I sure can be dense!
 Here’s the before and after one more time.
Have you redone anything plastic? Have you made your own chalk paint? If you haven’t, you really should!
gail
sharing here:

I love what you do. I also have the Ryobi and love it! It’s mighty cold here in Buffalo NY, so I have to hold off on many projects but can’t wait to jump in and spend my time re-doing and repurposing things. Thanks for the inspiration.
Your mirrors look great! Nice work! Hard to believe the are plastic until you show the back.
Wow.. i would have never considered plastic as a viable option.. they look amazing.