Antique Chest Of Drawers Easy Makeover
As an Amazon Associate, I earn from qualifying purchases.
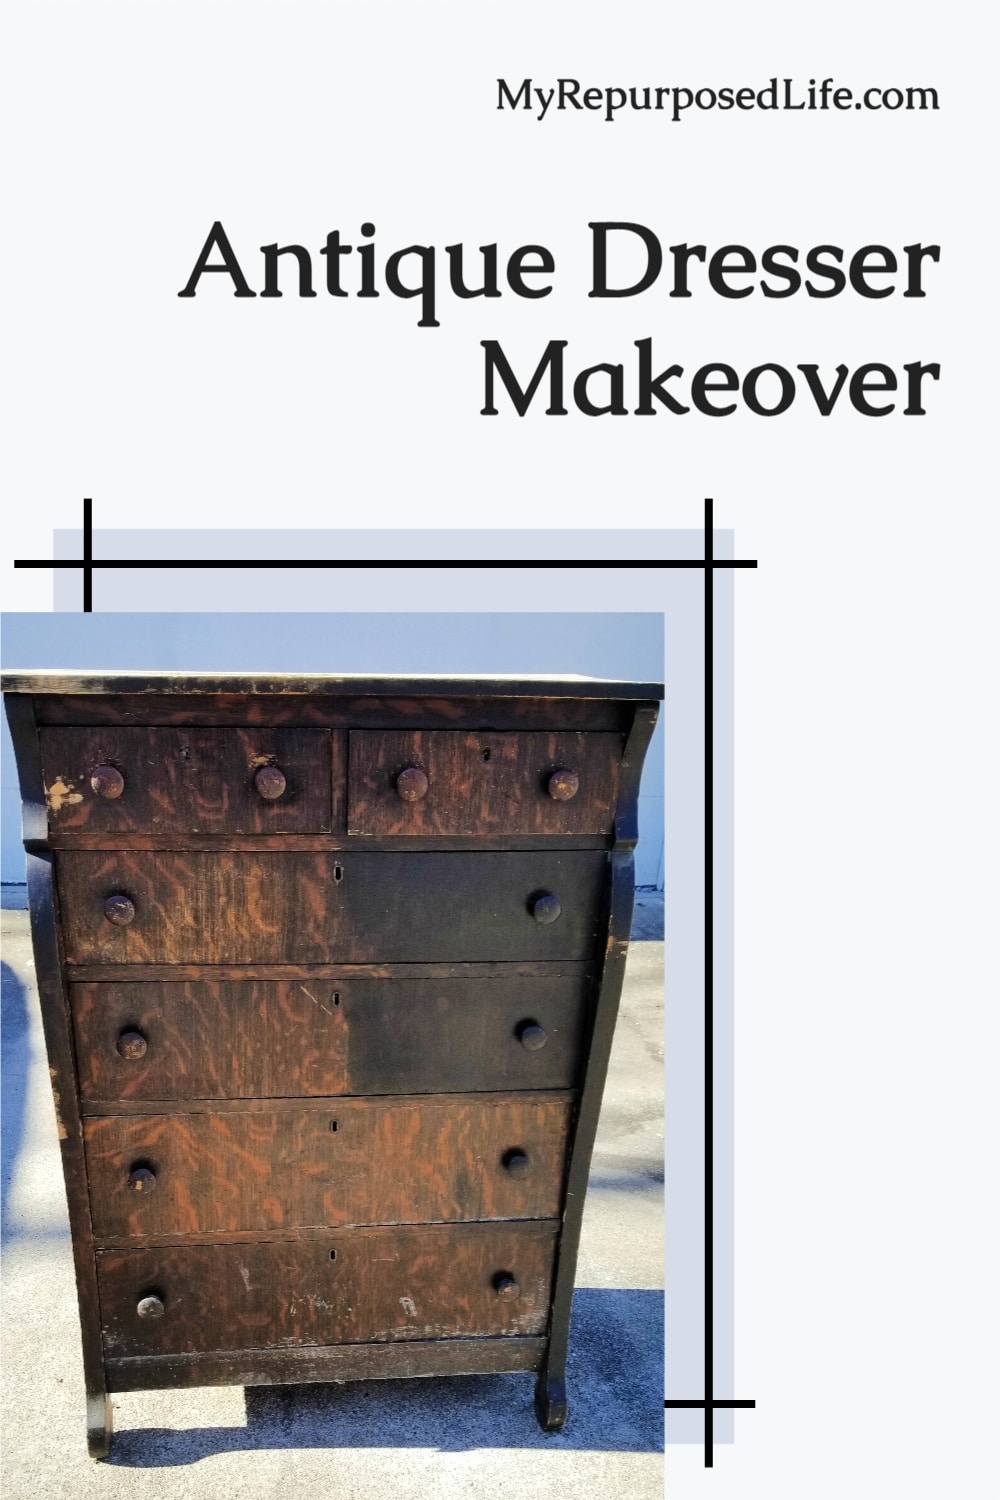
Who would pass up a FREE antique chest of drawers? Certainly not me! I said yes to it, sight unseen. Because this gal has some age, I decided to take the easy route and give her a quick coat of fresh paint. I can truly appreciate her beauty even with her flaws. If you don’t like painted wood, walk away, okay?
Antique Chest of Drawers


Speaking of FREE antique furniture. I got this China Cabinet from my Cousin Terry. Refinishing would have been so difficult, so I painted it. See the China Cabinet Makeover.
I love the style of this chest of drawers. But look at those darkened drawers. What’s going on with that? I didn’t notice how bad they looked until I saw the photos.
Inspect, Clean, and Repair Antique Furniture

Upon closer inspection, you can see that this furniture has some issues. Here’s what I did:
Remove Dust & Debris

After a good inspection, you should give your furniture a good cleaning. I always start with my leaf blower to remove dust. Then I work with a broom to remove all the rest of the debris, inside and out.
Visit the My Repurposed Life Amazon Store to shop my favorite items.
Clean with TSP

Cleaning with TSP does several things. It will remove leftover dust, grime, and mold. In addition, it will give a better surface allowing the paint to “stick” to the wood. I prefer to use the concentrate diluted in a bucket, applied with a rag and latex gloves. This article, How To Prep Furniture, will give more details on preparing old furniture for painting.
Sand the Top with 3 Grades of Sandpaper

Next, I wanted to get a good look at the top of the antique chest of drawers. Using my orbital sander, I started with 60 grit, 150 grit, and 220. Can you see how the top improved a little after each step?
Make Repairs

One of the drawer bottoms had been replaced and was in sad shape. The joints also needed a little work. After prying off the old wood, I used my handy painter’s tool to remove the tiny nails.

A piece of scrap plywood was ripped on the table saw. My nail gun made quick work of securing the bottom. The joints were coaxed back in place with a hammer.
Prime the Antique Chest of Drawers

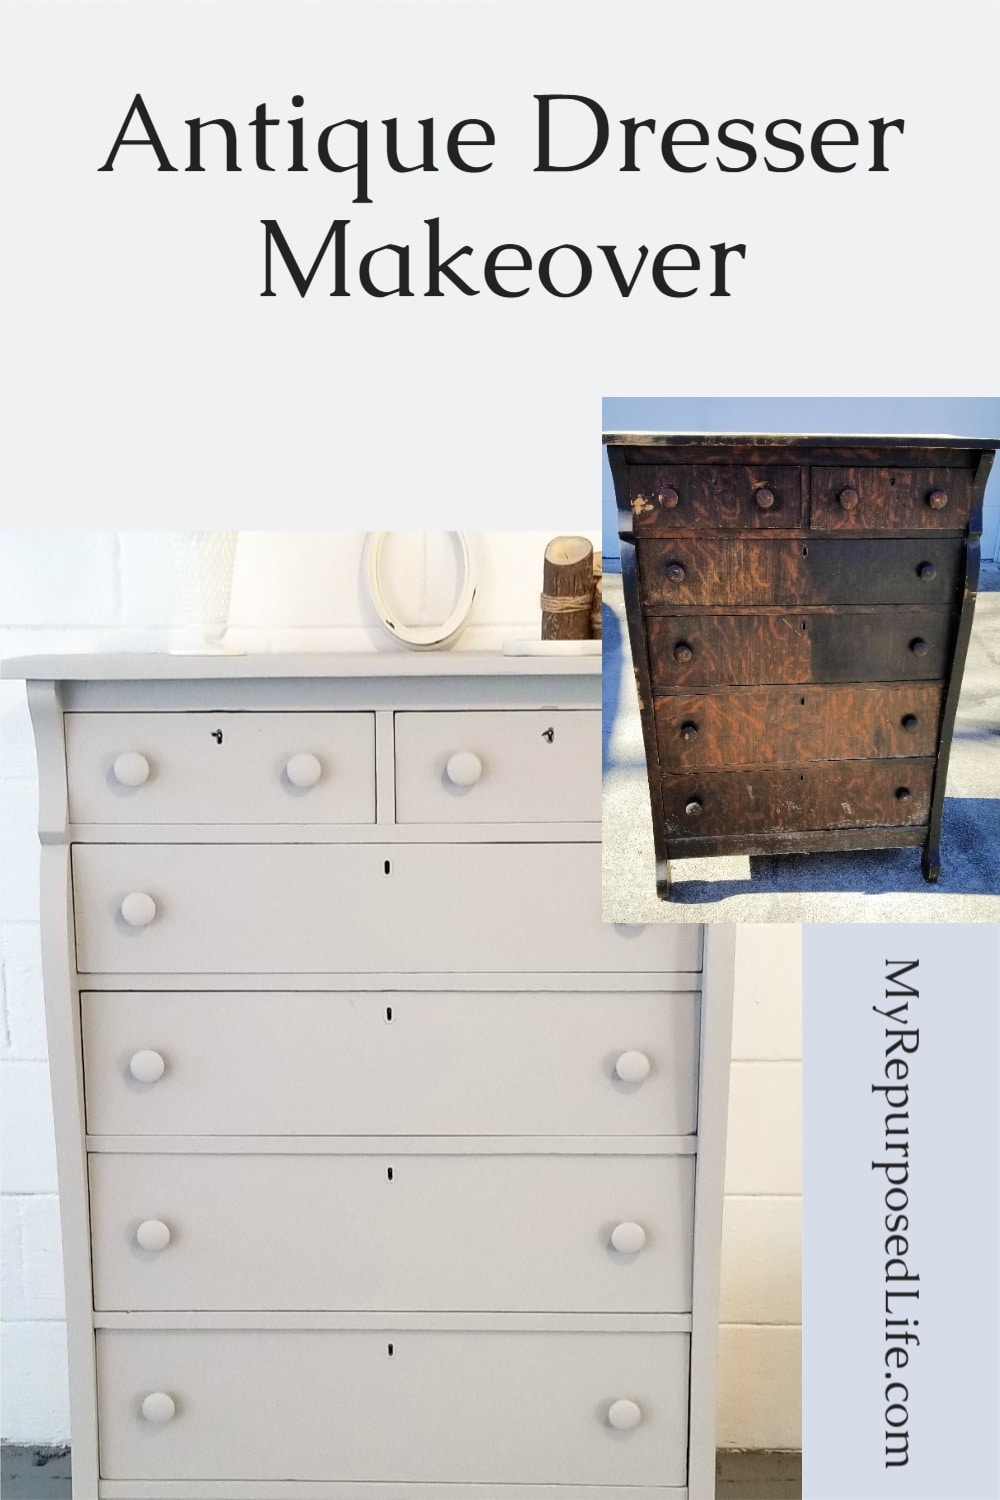
Now it’s ready to paint with a few quick coats of my favorite diy chalky paint primer. The color I chose was Flannel Gray. It’s left over from when I painted my living room. How do you choose paint colors? I gather a few shades I like, but then I let the name make the final choice. Silly? It works for me!
As always, I mix the plaster of paris and water first, then pour the paint into that mixture. Finally, I run it through a mesh paint strainer to ensure there are no lumps or flakes in the paint.

But before I painted on a crisp January afternoon, I allowed my Super Finish Max Extra to warm up in the sunshine. The paint had been stored in the house, so it was okay. I also allowed the antique chest of drawers to warm up in the sun.
Small furniture dollies are very helpful when moving large pieces of furniture alone. These dollies have plywood attached to give them more surface to hold furniture. It’s not a good idea to drag these antique furniture pieces on the driveway to get them from point A to B.
Note: Can you see where I sanded a little on one drawer and on both of the front (sides)? There was slight damage and a few nicks here and there.
Antique Chest of Drawers After Primer

This is after two light coats of chalky paint primer.

Being on the small dollies, I could easily move the antique chest of drawers into the sun to speed up the drying process. Why did I choose to paint the antique chest of drawers with the drawers in place? These drawers fit very tight. They wouldn’t want to close properly if I added paint to them.
If you want to remove the drawers for painting, follow this excellent tutorial for painting drawers without taping.
Sand Furniture Before Topcoat

I was losing daylight and decided to wait till the next day to apply the topcoat. Before doing that, I used a fine sanding sponge to do a light sanding on the top, sides, and drawer fronts. This took all of about 2 minutes. It’s essential to get the best (smooth) surface when using the homemade chalk paint primer. Don’t forget to dust off the furniture before you begin painting again.
Spray the Antique Chest of Drawers with a Topcoat of Paint

Don’t be too confused by the term “topcoat.” All that means is that I use the paint right out of the can without adding the plaster of paris. I prefer to do this topcoat; you may want to poly or wax for added protection. I like to take the easy road.
Speaking of easy—did you notice I didn’t remove the knobs? Seeing how this was a free chest of drawers with flaws, I know it won’t bring a high price. Surely I’m not the only one to see her for her true beauty, right? Therefore, I didn’t want to spend a lot of extra time. Someone may take it home to give it their own spin, and that’s okay. If you don’t want to change knobs but want a different look, you can decoupage them as I did on this Antique Dresser Makeover.
If the tiny crack in the side bothers you, you can easily add a thin piece of plywood over it. So, if you choose to do that, I would do both sides, using Gorilla Wood Glue and clamps. A few brad nails would be helpful as well.
Gray Antique Chest of Drawers

Do you love the color? I think it suits her perfectly. Due to her age, it’s like she’s letting her gray hair show through.
Gray Flannel Antique Chest of Drawers
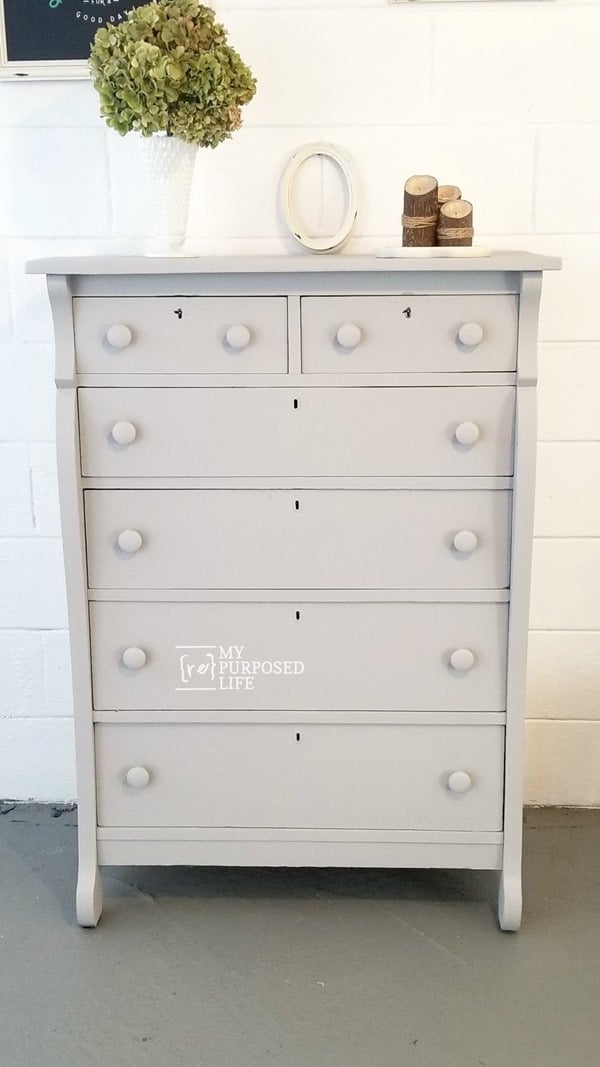
Now, she’s waiting for a new home – someone who will love and appreciate her despite her flaws. I’m using an outbuilding to hold and sell my furniture flips. You can see more by checking out The Sugar Shack.
Related Content: Fast & Easy Furniture Flip
My grandfather had a 3 piece bedroom suit just like that dresser and it was painted in a light gray 🙂 thanks for giving it a little more life ❗️
I bet it was a very nice suite and very unusual to still have three pieces!
gail
The dresser turned out great! I have many pieces of antique furniture & have only painted 1 piece; most are in excellent condition, purchased many years ago. However, if I was lucky enough to get something free, I wouldn’t hesitate to paint it. Nice job Gail!
I agree b, free is no-holds barred! Even good deals at thrift stores. I only have one piece of furniture in my home that is original. It was my mom’s dresser. I refinished it, and brought it back to life.
Thanks for stopping by and taking the time to leave a comment. It’s much appreciated.
gail
I have this exact same chest! Have had for 50 years. Mine is in slightly better shape than yours. I’m going to just paint drawers on mine because one drawer is the only veneer damage. I’ll use either gray, black or paint a scene on it.
That’s amazing Joan that yours is in such good shape! Enjoy the makeover!!! I know it will be beautiful!
gail
I’m glad you painted this one. “Antique” or not, this dresser was hideous and a quick coat of paint made it presentable and fresh looking again.
Thank you so much for your sweet comment! A good rescue is what it’s all about. It’s better than something going to the trash.
gail
You did a beautiful job on this dresser, looks amazing!
Hi Gail, can you tell me where I can find a mesh paint strainer. I use cheese cloth but not easy. I have never heard of mesh paint strainer.
Micky,
I buy mine on Amazon. Here is my affiliate link for the 1 gallon mesh strainers I use.
https://amzn.to/3sCDmEN
You did well by this one! Very nice look.
Really nice work, and so much better!