Decor Transfer Repurposed Headboard Sign
As an Amazon Associate, I earn from qualifying purchases.
I have been working with Iron Orchid Designs for the last couple of months using their Prima products and trying out new techniques. The IOD sisters sent me a decor transfer to try out on a project.
Old Headboard Project
 I came home recently to find the FREE headboard in my carport. I seriously had NO idea who dropped it off until later that evening my neighbor across the street fessed up it was from him. This is the same neighbor that almost chopped up an old dresser for the dumpster, AND he’s also the one that gave me these gorgeous drawer fronts I used for coat racks.
The headboard was very heavy and he offered to help me move it, but I told him it wasn’t necessary because I was going to “trim it up”.
Trim Headboard to Size for Decor Transfer
 I started by hacking off the legs with my Ryobi reciprocating saw.
 Easy Peasy using my new easy diy sawhorses.
Make Necessary Repairs
 The headboard needed a little repair—nothing a little Gorilla Wood Glue won’t fix!
 Because I wasn’t able to “clamp” the two pieces of headboard together, I let the weight of the headboard do all the “heavy” work for me. I use baby wipes in the shop a LOT and they are really handy for wiping up Gorilla wood glue.
 These are the pieces that I salvaged (and saved) for future projects.
Fast forward a few days, and I decide to use this headboard for my new IOD décor transfer from Prima Designs. The design is 30×40 inches, so the headboard is actually too wide.
It’s Okay to Change Your Mind
 More sawing! Do you KNOW how much I love sawing furniture? Especially with my small Ryobi battery circular saw! It’s so user friendly. (nope, I get nothing for saying it, and I bought the saw with my own hard earned money—I just love it that much)
I measured and drew a line with my level as a straight edge.
 The saw blade needs to be at the correct depth, do this before you insert the battery (or plug it in if you have an electric saw)
 Here is the new improved size of the free headboard that I’m making into a sign.
Prepare Headboard Project For Painting
 I did a little sanding to get some yuck off, then I used some TSP diluted in water to wipe the trim down so I wouldn’t have to spend time sanding it.
 I always use latex gloves when I use the TSP.
 This was a busy day of painting some black projects, so I mixed up a nice batch of my diy chalky paint primer in Beluga Satin (from Behr) using some plaster of paris.
Paint Headboard Project
 Of course I used my beloved Homeright Finish Max to get the best coverage! I have the headboard resting on one of my MANY random dresser drawers.
Two light coats of black work better than one heavy coat.
 After allowing it to dry, I did one very light coat of Polished Pearl—intentionally not giving it full coverage. I wanted a specific look for this headboard sign and perfect coverage was NOT what I was going for.
 If you look closely, you will see that I did a heavier coat on the center of the headboard, leaving some of the black showing through around the edges. I love giving faux finishes to my projects with the Finish Max, much like I did on this red chair bench.
 I love the hint of black showing through the Polished Pearl.
Apply Decor Transfer
 Like I said above, this décor transfer is huge, so I needed to trim some off the bottom and set it aside for another project down the road.
Transferring the image is pretty much self explanatory. It’s a rub-on type of decor transfer. I used the small wooden paddle that comes with the image. Rubbing harder doesn’t necessarily make it easier to transfer the image. I found that if I raised the plastic off the project slightly, the image transferred much easier. If you notice in the video, you will see me using my index finger and my thumb to “scrunch” up the plastic slightly as I am rubbing the transfer.
I hope you give these decor transfers a try using my Amazon affiliate link in this post.
 I took a little snapshot of how the camera was set up for the video.
(see the video below)
You may notice that there is a red squiggle mark on the lower left portion of the transfer. Notice the white backing paper in the lower right portion of this photo.
One portion of the transfer was “stuck” on the backing. I made the red mark to remind myself NOT to transfer the area.
If you watch the video below, you will see how I worked around this problem with some painter’s tape.
I contacted Iron Orchid Designs, and they told me they had never heard of this happening before. Should it happen to you, reach out to them.
Large Headboard Sign
 Do you love it? It really was quick and easy. Iron Orchid designs recommends sealing it to protect it. However because it won’t get a lot of wear and tear, I may wax it.
NOTE: the extra little embellishment was left off in this photo.
 After I finished with the décor transfer, I needed to figure out what to do with the pediment piece that is missing.
NOTE: this is after I figured out how to transfer the “stuck” portion with painter’s tape.
 I had this finial in my stash, but didn’t think it worked very well.
 Then, as I was organizing my stash, I saw this similar headboard that had a flat piece on it and decided to make it easy on myself and find some scraps to mimic this design.
 I found a routed board and did some trimming on it until it was the right size to put on top of the middle of the headboard. The problem was going to be matching the paint technique.
Pretty Headboard Project
 I LOVE it! I heard about these décor transfers from IOD several months ago and I couldn’t wait to get my hands on them to try it out. It was easy and fun.

Here’s a little video to show you how I did the decor transfer.
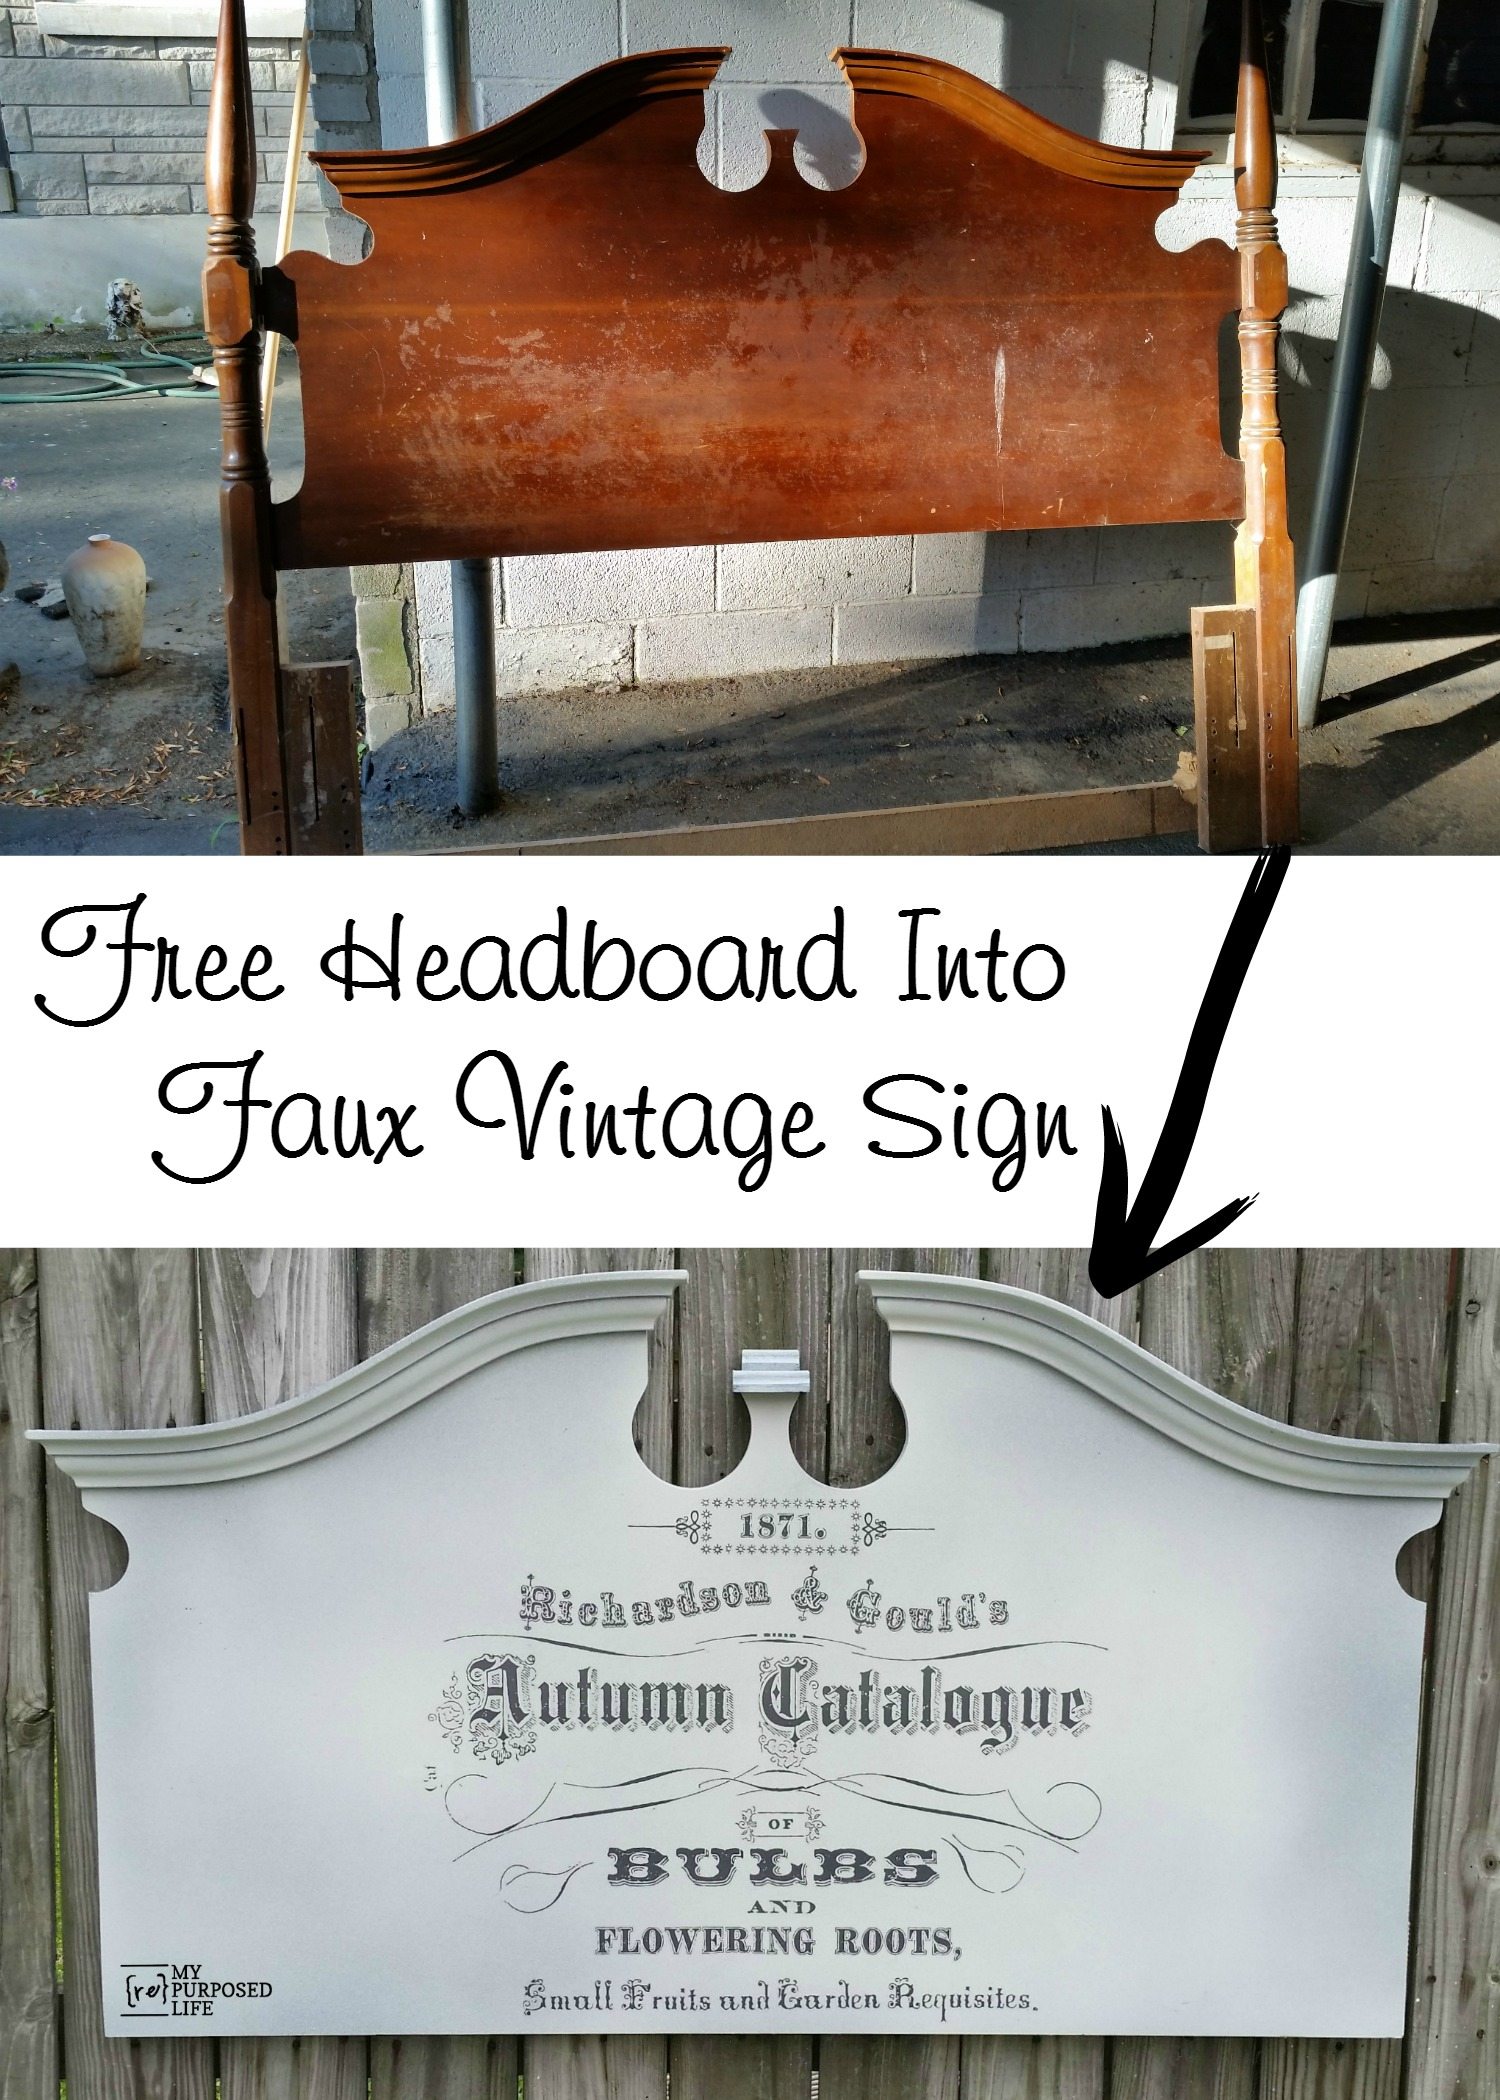
Free headboard BEFORE & AFTER
Save & Share On Pinterest!
Jeanie from Create and Babble did a decor transfer on her wall. Check out her post Rub On Transfer from Iron Orchid Design.
What would YOU put a decor transfer on?
gail
EDITED TO ADD:
Sadly, this piece never sold, so it got a makeover into a great wall shelf with hooks!
disclaimer: Iron Orchid Designs supplied me with the decor transfer for this project. All thoughts, words and ideas are from my own little head.
Wow! Loving that transfer!! Especially on your headboard..ahem, free headboard you lucky gal. I love the IOD products, love them all! Can’t wait to start using them on some projects too…Pinning this awesome project:)
Looks great, Gail! And as always, you’ve included a great tutorial. 😀
I love this! I can’t wait to use my transfer!! Pinned it 🙂
That turned out really nice. I hadn’t heard of those transfers. I think I would put some big black hooks on each side and hang it in the back hallway!
I love how this turned out. Everything about it is beautiful!
that is awesome! love the way it turned out, especially your pediment piece improvisation. <3
I’m really loving that headboard with the vintage style transfer. It would be so lovely in a potting shed or ‘she’ shed!
thank you Vanessa! I appreciate you stopping by and taking the time to leave a comment.
gail