gray glazed shelves
As an Amazon Associate, I earn from qualifying purchases.
I think you know I love making shelves. These gray glazed shelves were made from a piece of cornice molding. You could easily make these shelves using an old architectural piece.
Reclaimed Decorative Cornice Board

The mirror department and a few trim pieces are in the dark recesses of the storage garage. I can’t remember where I got this extra-long piece. That’s unusual, generally I can remember these things. ![]()
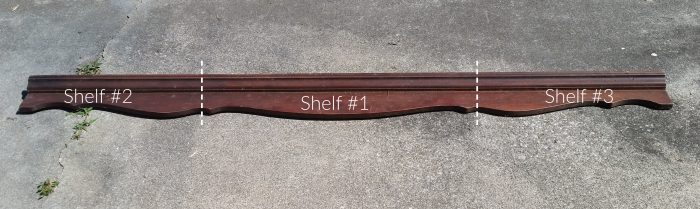
The piece measures about 82” long. I didn’t think anyone would need such a long shelf, so I cut it up. SURPRISE!
Visit the My Repurposed Life Amazon Store to shop my favorite items.
Trim Board to Size on Miter Saw

I cut this on my compound miter saw with the help of my jaw stand. You could use a circular saw or a jigsaw. Heck, you could even use a handsaw.

There ya go, that’s more like it.

Here are the left and right pieces—for a while, I considered connecting them to make another long shelf. But ended up changing my mind.
Add Header to Decorative Board

I added a 1×4 using Gorilla Wood Glue and my nail gun to make a top shelf on the longer trim piece.

To get the board appropriately spaced, I used my Kreg Multi-Mark tool.

I love it!
Paint Shelves

I used Deco Art Chalky Finish Paint (artifact) and a cheap chip brush to paint the shelves.

This is after one coat. I ended up doing two coats on each shelf, front and back.
Project ideas and a video of “how to glaze painted furniture and more”
Glaze Shelves

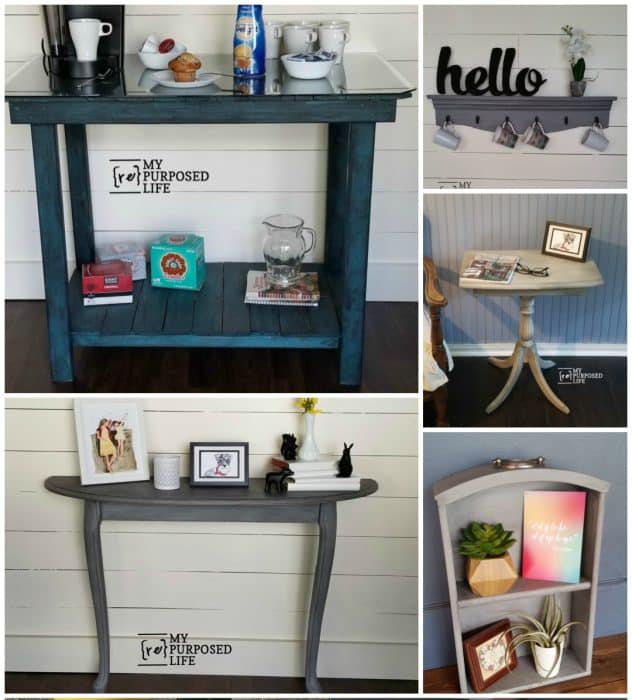
Here are the two smaller shelves. I added a board to each of them and painted them with the Artifact. But here’s where they get their beauty treatment. I’m in LOVE with this Smoked Glaze from Rust-OLEUM. It’s a glaze that gives the best color and seals the chalky finish paint! It’s a WIN/WIN—no waxing needed. ![]() I’ve also used it on the DIY entry table, and more projects to come! I wanted to put the two smaller shelves side by side so you can see the before and after.
I’ve also used it on the DIY entry table, and more projects to come! I wanted to put the two smaller shelves side by side so you can see the before and after.
Watch my video of How To Glaze Painted Furniture
Attach Hooks to Gray Glazed Shelves

Using my self-centering tape measure, I spaced the single hooks I bought from D. Lawless Hardware.
 I used a wooden yardstick to make it easier to keep the distance of each hook uniform.

I find it’s best to mark the spot, drill pilot holes to allow easy securing of the screws with a screwdriver. A power drill may break your screws if you’re drilling into hardwoods.


These single hooks are perfect for hanging coffee cups in the kitchen, hats and scarves in the mud room, or towels and washcloths in the bathroom.

You may remember seeing the smaller shelves when I shared the chippy white chest. Lately, I’ve found more pieces that I think will make great shelves just by adding a board on top. Shelves seem to sell well for me at Glendale.
Here’s a question for you. I struggled with which way to hang these twin shelves. I tried it both ways, with the narrow ends facing each other and the wider ends facing. Apparently, I must have liked this way better at the time because I couldn’t find any pictures with them hanging the other way. Which do you think you would like better? In addition, do you think they should stay together as a set of THREE?
gail
I would price each of them individually. Certainly you can display them together. Also in order to help people see the smaller ones as individuals I think I would add a painted fancy scroll in black on the fat side of the shelf. You could also display them staggered, one over the other. Another idea add small hooks on one side of the small shelves for hanging keys or kitchen utensils, or homemade candles, or dried bundles of lavender. It does help to visualize a use when you set things on top just as you have here.
I think I would hang them the opposite way. And yes, a set of three x
Thanks for your input! I appreciate you taking the time to comment.
gail
I agree — I’d sell the “middle” shelf separately and the two end shelves together. They could always be purchased together if someone wanted all 3. On the 2 “end” shelves, I would say hang them with the wider parts in the center. Not sure why I think that…it just somehow feels right! The nice thing is that they can go either way and still look great. Nice job!
Thank you Lynn for your comment. I’m so indecisive sometimes, and this was one of those times. I knew I loved the long shelf, but hope the small gray glazed shelves find a home as well.
gail
I like the way you have them, narrow ends together I wouldn’t keep them as a set of three, however maybe a discount if someone wants to buy all three. Sell them as a pair and a single for the larger one.
Thanks for your input Annette! I think the large one will definitely sell quickly this fall at my craft show.
gail
My first instinct was with wider ends inside. I would think all 3 shelves together would be limiting, since not everyone would have the space. I’d pair the two smaller ones, and sell the large separately. The early bird could always buy all three if they want.
Thanks Judy! It’s nice that the buyer (of the smaller shelves) will be able to hang them how they like, right?
gail
we are really into grey here, and i love that glaze. i too think 2 and one and bundle if they want all three xx
lLove the large shelf, it’s perfect (visually, balance). The hooks, too. What a great idea for the piece!
The two shorter pieces, I would go with the wider ends to the center.
Thanks for stopping by and taking the time to leave a comment. I think I have many more pieces in my stash that would work as shelves. 🙂 They’re easy to make and great for instant gratification.
gail
I would sell the larger shelf by itself and the 2 smaller ones together. If someone is interested in all 3, you can come up with a bundle price.