Guest Post– Curbed Desk Redo by Rose
As an Amazon Associate, I earn from qualifying purchases.
Today we have a great redo by my good friend Rose. Although I have never met Rose in real life, all of my friends and family know who she is. I used to have to say Rose from online, or Rose from “the boards”, but now, it’s just Rose! Rose and I go way back, I’m not even sure how long we’ve known each other. I was still working when we first met, so it’s been 3 or 4 years? I’m sure Rose knows. We met on the HGTV Trash To Treasure Message Boards, and it was a very mutual friendship from the beginning! Rose is my go-to when I get stuck on a project! Okay, I’m rambling now… you came here today to see a great project, lets’ get on with it!
Hello, my name is Rose, and I’m a Curbshopaholic…….
When Gail asked for guest bloggers to fill in for her during her time off for Jamie’s wedding, I was so very happy to be able to help.
After all, if it weren’t for Gail I wouldn’t even BE a blogger. Well over a year ago, long before I started blogging, Gail very kindly showed many of my projects on her blog. Why, she even let me write my own post one day…the post that became the deciding factor for me to begin my own blog.
It was titled “Confessions of a Curbshopaholic” which became the title of my blog. (Click on the link to read it.)
She became my blog mentor, guiding me every step of the way, and was my very first follower.
Thanks so much, Gail, you’re the best!
For my project today I dug out a piece I’ve had for quite a while now, a year to be exact. (Unfortunately, yes, I often take that long to get around to using my finds.)
This little desk I found waiting for me at the curb one trash day. You can read about it in one of my very early posts titled “Curbshop along with me today!”.
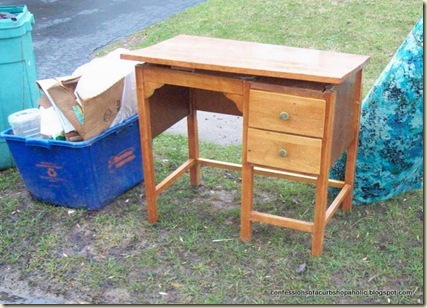
I’m always excited when I find a piece of wood furniture, no matter what condition it’s in.
This poor abused and abandoned desk was just begging to become a nightstand. I could see it in my mind’s eye right away.
The original top was warped and had come off, someone had attempted to glue it back together a few times.
I decided to get rid of the old top altogether and start over with a bigger, prettier one.

First up though was a good sanding, a coat of primer and some repairs.
Next, a new color.
I chose a blue green shade I had in my “Oops” collection. Not unlike Gail, I’m addicted to buying Oops paints whenever I see them. At $5 a gallon they are the best and cheapest way to experiment with new colors.

After painting I played around with some shelf boards I had purchased for $1 apiece at my favorite store, Real Deals.
You just never know what you’ll find when you go in to browse there; they buy out overstock and closeouts and sell everything for a dollar or less. I get all my spray-paint there for a buck!
When they had these wooden shelving pieces, I purchased several, not knowing what I would do with them but sure they would be handy for something.
And what do you know? The scalloped edges of this piece would be perfect for the front of the top.

And I really liked the extra width too. My current nightstand is tiny and I’m forever missing it when I try to set something down during the night. My glasses have landed on the floor more times than I can count!

I just needed to fill in the gap between the front and back boards.
I grabbed a third shelf and trimmed it down to size on the table saw. At the same time I cut the beveled edges off the other boards so they would line up.

I happen to have a biscuit joiner which I’ve rarely used.
This tool came in handy for joining the 3 pieces to make one smooth tabletop.

It’s pretty easy to use, it just cuts slots in the sides of the boards,
The trick is to keep the boards on a flat surface and to cut the holes so they align with the next board.
First get the pieces lined up perfectly. Then make a pencil mark across all the boards.

Use the pencil mark to position the joiner to make the slot.

Then you take the “biscuits” and some wood glue….

and join the pieces together!
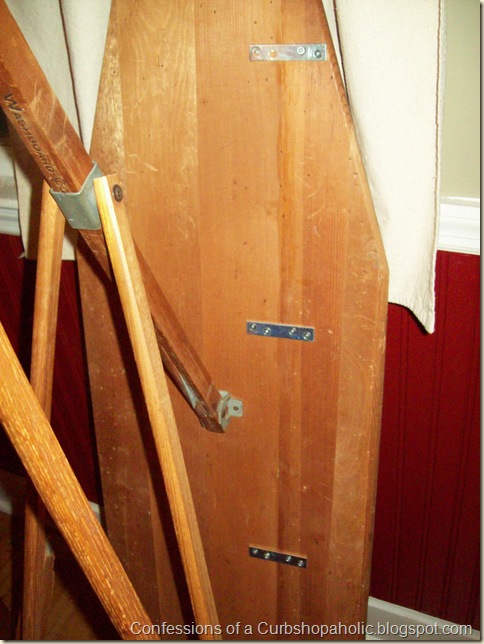
If you don’t have a biscuit joiner, you could do this with a Kreg pocket hole jig (Gail shows how easy it is to use here), or even by using glue on the edges and attaching mending plates on the underside of the pieces to hold them together.
(Something like when I used mending plates to repair a crack in my old ironing board. )
Since I already had the biscuit joiner this was a good opportunity for me to get some practice with it.

I then stained and added 2 coats of polyurethane to the new top.
Next up, a little decorative touch. I’ve always wanted to paint birds on something, but can’t paint freehand.
So I cheated and found something online that had birds on it.
I printed it out and traced the design using carbon paper to transfer it to the piece.

The drawer fronts were the perfect place to add the birds.
It looked like this when I was done tracing.
I used this same technique for my Ironing Board Subway Art last fall.

Some black sharpie marker to fill in the design, followed by a good sanding gave me the look I was going for.
A little bit of glaze was quickly wiped on and then off again to tone down the color.

Next up I attached the new top with L brackets and added some new knobs.
Now to introduce it to it’s new home.
(This is the scary part; I can’t believe I’m going to show you pictures of my bedroom! We’ve been nearly 10 years in this house and still haven’t removed the very old striped floral wallpaper from the walls. Maybe this will embarrass me enough to give me the incentive I need to get around to it!)

It’s the perfect height!

And I’m loving all the extra room I have on the top!


These vintage books were just the right shade to go with my new nightstand. I think I’ll keep them there for a while.


Cost breakdown for my new nightstand; base found for free; $3 for the top; $4 for the 2 glass knobs (on sale at Hobby Lobby); and pennies for the paint, stains, and poly I used from my existing stash.
That brings it to less than $8.
Gail, I hope all is going well on the wedding front, I know we are all dying to hear the details when you get back!
Thanks so much for having me today,

Rose, you seriously amaze me with that Sharpie! I am equally amazed (and jealous) that you find such great stuff at real deals! WOOD? OMG! I love your new nightstand! Thanks for showing us how you revamped it and made it your own! Now, go visit my friend Rose to see what else she’s been up to.
gail
ps make sure you stop by later today for another great guest post!
Related Content: See More Desk Projects Here
I absolutely love what you did with the table. I need something like that. My glasses end up on the floor a lot also. The first time I ever put up wallpaper it was exactly that design. I think it was early 90s. It takes courage to take the 1st step to remove wallpaper. What a lot of work. The table is really great
Thank you so much Carol for stopping by and taking the time to leave a comment on this post about the desk redo. I appreciate your time!
gail
Adorable! I love the birds!
Holy moly Rose, that thing is gorgeous! From a technical standpoint I’m blown away that the top looks that amazing! The colors are perfect, and what a great size. I’m just enamoured of this piece!
Super duper cute!!! What a great, detailed tutorial.
That is just too cute, I love it!
Oh wow, I just got home from work and read all the comments. Thanks so much to everyone for all the kind words…I’m overwhelmed!
Thank you too, Gail, for having me over today, it was a ball! Your readers are so supportive.
Stefanie; I wish it was that store you linked to, that looks totally awesome! I just checked and mine is a locally owned chain of 11 stores. If you’re in the Central New York area you’re bound to find one! I’ve added a link to a news article about the chain. http://www.syracuse.com/news/index.ssf/2009/04/business_is_booming_for_auburn/978/comments-2.html
This is incredible!!! And the color is SO RICH!!! Goodness, I love it!!!
http://www.iheartmygluegun.com
Wow! I am to-ta-ly impressed! 🙂
Awesome! Love the looks of this!
I recently moved to a new town and looked up Real Deals and found a chain here called Real Deals for Home Decor that is open 2 days a week: http://www.realdeals.net/AA/flash/index.php
Is that the same store you’re talking about?
-Stefanie
2ndChanceCreations.etsy.com
OMG… the birds thing is exactly the one I copy from the line few weeks ago…I was thinking of transfer it into wall art for a wall in my kitchem… well, they look great on your nightstand too….now I have new idea where to put those images…thanks for sharing..Love, PC – Penang Malaysia..your fan in FB and Blog!
That was a great redo. Looks like a whole new piece. Love the curved edge to the top now. And that was a great oops color. Good luck with the wall paper removal. We had something similar in ours when we moved here. It was almost the first to go and what a difference it made!