How to make Blat Back Marble Jewelry Pendents from my friend Betsy!
Thank you so much Gail for inviting me over as a guest blogger to share my tutorial on how to make my flat back marble jewelry pendants. I’ve always been in awe over all your fabulous projects, giveaways, and tutorials. It’s always fun to link up my projects with Catch as Catch Can where I always find the most creative and inspiring ideas.
I’m Betsy, and you can find me at My Salvaged Treasures blogging about my junking adventures, repurposing projects, and jewelry creations. I’ve been making these flat back marble pendants and necklaces for about five years now, and I still get asked about how I make them. I’ve experimented with a few different techniques, but discovered that this is the easiest and least time consuming way to make them.
I usually make these up two or three dozen at a time. Choosing the graphics is the most time consuming part, but I always have fun with it.
How to make Flat Back Marble Jewelry
*this post contains affiliate links, read more here*
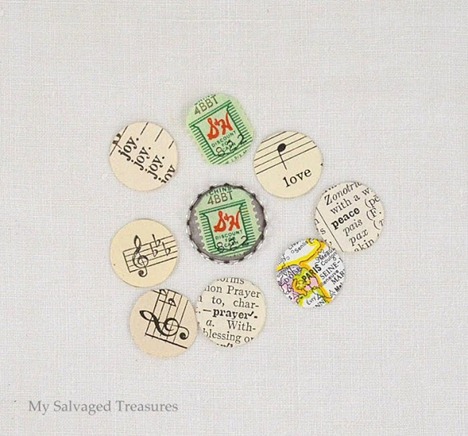
I love using sheet music and old trading stamps for these pendants. Words from a dictionary and colorful images from maps are fun too.
Select your designs
I use the 11/16 hole to trace a circle around the image.
Cut out designs
All the little circles waiting to be glued in the settings. Notice how the S&H Green Stamps are narrower than the settings? Not a problem with the finished product; the magnification from the marble makes it unnoticeable.
Prepare your jewelry setting
Before gluing the image in the setting, bend down one of the lace edge prongs to accommodate the bail or jump ring. I use regular old white glue for attaching the paper to the settings. A drop or two smoothed out over the back of the paper with your finger works great. The glue will stay workable long enough to center the image. Let these dry for about an hour.
Glue your vintage image onto flat marble
*Squeeze 2-3 drops of Diamond Glaze on the back of the flat marble. Spread it out evenly with the tip of the bottle and remove any obvious bubbles. IMPORTANT: The thin layer of Diamond Glaze dries almost immediately when it comes in contact with the paper. Once you turn it over and place it in the setting, you’ll have about two seconds to position it in the middle of the setting. Hold it tight for about 15 seconds and then set it aside. I usually wait at least an hour before adding the bail and chain.*I’d recommend experimenting with this step prior to gluing the marble in the setting. You’ll get a better feel for exactly how much Diamond Glaze to use and how quickly it dries on the paper.
There you have it. Wear them alone, two or three on a chain, or dress them up with other
bits and pieces.
I buy the flat back glass marbles at Walmart or Michaels, but any craft store should have them. They come in a bag and can be found in the floral supply section. Not all marbles are created equal, so you’ll have to sort through them to make sure they aren’t too large or small for the setting, too unevenly shaped, or cracked. I’m usually able to use about half the bag.
The 18mm lace edge settings and large bails can be purchased online at Amazon using links above. You can also use round cabochon settings, jump rings, or bails from any craft supply store. I’ve been really happy with the results I get from Diamond Glaze and it lasts a long, long time. I bought a 2 oz bottle online at least two years ago, and have only used about 1/3 of the bottle. You can also use it to achieve a raised glass-like finish, but it drives me crazy trying to get it to dry without bubbles.
Betsy-thanks for a great tutorial! I think using the circle template is simple, but pure genius. I’m not sure I would have thought of that. I’ve often wanted to use that glaze stuff, but never have thought to buy it while I’m at the craft store. Thanks so much for hanging out with MRL today!
Gail Wilson is the author and mastermind behind My Repurposed Life. She is obsessed with finding potential in unexpected places and believes that with a little hard work and imagination, any old thing can be made useful again, including herself!
Gail reinvented herself during a midlife crisis and has found purpose again. She hopes you will find new ideas for old things and pick up a few tools along the way.
I didn’t make these wonderful jewelry pendants, but I don’t see why photos wouldn’t work. 🙂
great idea!
gail
I have always wondered how these are made! Thanks for solving the mystery. 🙂 Great use for the old green stamps. The options are endless for the images — I love the little map pieces too. Paris!
Betsy, your tutorial is so helpful. I have wanted to make these for the longest time but when I went in the past to find the settings, there were none to be found at either of the craft stores here. I’m not much for ordering online because I always want it right this minute, but it’s good to know where to get them if I gain some patience, and since I haven’t been able to make them yet anyway, I should just go ahead and order. I love the graphics you chose. They are adorable! Liz

 Thank you so much Gail for inviting me over as a guest blogger to share my tutorial on how to make my flat back marble jewelry pendants. I’ve always been in awe over all your fabulous projects, giveaways, and tutorials. It’s always fun to link up my projects with Catch as Catch Can where I always find the most creative and inspiring ideas.


 I’ve often wanted to use that glaze stuff, but never have thought to buy it while I’m at the craft store. Thanks so much for hanging out with MRL today!
Really cute. Thanks for the tutorial.
These are great! Could you do this with photos?? Would then need to be printed on ink jet printers?
I didn’t make these wonderful jewelry pendants, but I don’t see why photos wouldn’t work. 🙂
great idea!
gail
I have always wondered how these are made! Thanks for solving the mystery. 🙂
Great use for the old green stamps. The options are endless for the images — I love the little map pieces too. Paris!
Great tutorial! I enjoy learning how you make your fabulous creations!
hugs, Linda
Betsy, your tutorial is so helpful. I have wanted to make these for the longest time but when I went in the past to find the settings, there were none to be found at either of the craft stores here. I’m not much for ordering online because I always want it right this minute, but it’s good to know where to get them if I gain some patience, and since I haven’t been able to make them yet anyway, I should just go ahead and order. I love the graphics you chose. They are adorable!
Liz