• Skip to primary navigation
  • Skip to main content
  • Skip to primary sidebar
  • Start Here
  • Shop Favorites
  • About
    • Welcome To My Repurposed Life Home of Repurposed Furniture
    • More About Gail
    • Disclosure
    • Privacy Information
  • Gallery
    • Repurposed Furniture
  • Repurposed Items
    • Building Supplies
    • Miscellaneous Household Items
    • Picture Frame/Chalk Board
  • DIY
    • Home Reno
    • outdoor living
    • Painting
    • Shop Talk
    • Tips for Around the House
    • Build It
      • Furniture
      • Home Decor
      • Storage
    • Crafts
      • Dollar Store
      • Easy
      • Holidays Seasonal
  • Furniture
    • Chair
    • Desk
    • Dresser/Chest
    • Headboard | Bed Parts | Cribs
    • Kids Furniture
    • Table
    • Kids Furniture
My Repurposed Life® Rescue Re-imagine Repeat
menu icon
go to homepage
subscribe
search icon
Homepage link
  • About
  • Start Here
  • Project Index
  • Furniture
  • Subscribe
    • Email
    • Facebook
    • Instagram
    • Pinterest
    • RSS
    • Twitter
  • ×

    Home » Home Reno » How I Painted My Vinyl Floor

    How I Painted My Vinyl Floor

    Published by Gail | Published November 29, 2010 | Updated May 14, 2021
    As an Amazon Associate I earn from qualifying purchases.

    Pin
    Share
    Tweet

    MyRepurposedLife-how-to-paint-vinyl-floorPin it!

     Painted Vinyl Floor

    how to paint vinyl kitchen floor

    Let me explain that my vinyl floor is about 15-20 years old. If I ruin it I don’t have much to lose.
    I mopped the floor with a little dish soap, Mr. Clean and warm water. I rinsed the floor until the water was clean and soap free. This took about 6 moppings.
    After the floor dried, I wiped it down with TSP (Trisodium phosphate). The TSP helps to clean, degrease, and dull the finish of the floor. (I also used TSP when I painted shellacked baseboard and knotty pine

    how to paint vinyl flooringAfter the floor was dry from all the cleaning, I started taping  off  the baseboard with Scotch Blue painter’s tape.


    primer vinyl flooring The fridge and stove had been moved to the center of the room temporarily. I used an oops gray primer.


    Mythic Paint Vinyl Floor I like to use these skinny rollers. They allow you to get closer to the edge.


    roll paint on vinyl floor In my opinion they also waste less paint during clean up.


    painted vinyl floor After I painted two coats of primer, I painted a coat of Mythic Exterior (satin). Hindsight, I should have painted two coats of gray at this time.


    pattern for vinyl floor I decided that I wanted my squares to be made up of 9 of the little squares of my original floor. That made my large squares about 18x18 inches. I folded some newspapers to be that size and laid them out on the floor to see how the squares were going to land and to see a pattern for the painted vinyl floor.


    100_8585 Because I have three cute little furbabies and I didn’t want any little hairs mixing in with my paint, I got creative with my leaf blower. The floor did not have any dirt on it, and no visible pet hair, but I wanted to make sure.


    Scotch Blue on vinyl floor I taped off the squares and cut in the base coat (gray) to get a clean line.


    Scotch Blue Painter's tape (vinyl floor) After the first blue squares dried, I taped and painted their “neighbors”. The Scotch Blue tape I used during this process was for “delicate” surfaces since my paint was not cured entirely. It worked fabulously! I will definitely use this tape a LOT.
    disclaimer: I did receive my tape for free, but I would never say I love it if I don’t


    Purdy painted my vinyl floor I didn’t roll the blue squares, I used a nice wide Purdy paint brush. I highly recommend something to kneel on. I used my garden kneeler. (after the third day!)


    paw prints on my vinyl floor Throwing this photo in just in case you missed it the first time around. That would be Louie’s (grand-dog) cute little blue foot prints!


    painter's tape vinyl floor To get my blue squares to match up, I extended my tape to the edge of the neighbor square. The part you see on the right is where I touched up, that’s why it’s wet.


    painted vinyl (kitchen) floor This is when the paint is still slightly damp. I ended up doing a second coat on the blue, by painting very close to the edge, but not taping. After I did that, I decided the gray also would be better with a second coat.


    painted vinyl floor 
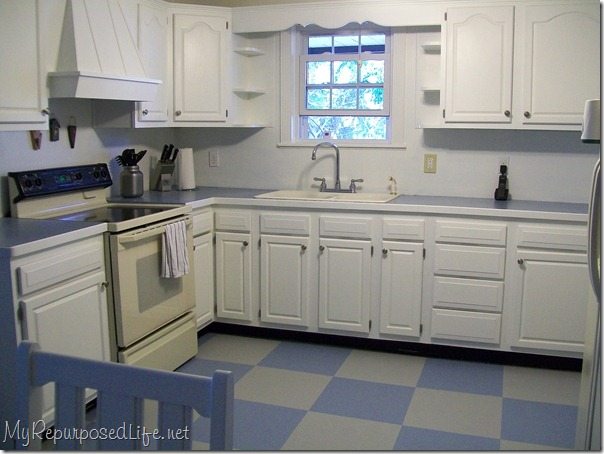
This is how it looks in the kitchen that is not quite finished at this point. If you’re interested in knowing how I prepped and painted my oak cabinets, click on one of those links.


    painted floor white cabinets I painted the backsplash area as a temporary fix until I install a backsplash. At this time, I am not sure what kind of backsplash I will install. EDITED TO ADD: Would you like to  see my board and batten back splash?


    blue beadboard painted floor If you scroll up, you’ll see that this wall was white. I didn’t like the way the kitchen table looked against the white wall, so I painted it the same blue as the floor.

    I won two gallons of Mythic Paint from the DIY Club monthly contest. Mythic Paint has not compensated me in any way for this post otherwise. In my honest opinion this paint is fantabulous! I love the way it glides on. From their website:
    Mythic® paint is a non-toxic, ultra low odor paint that provides the durability and coverage you expect from a premium paint without the off-gassing VOC’s and cancer-causing toxins that emit years after drying. Stronger, safer, smarter paint®. Now that’s a breath of fresh air.
    Being a non-toxic paint isn’t generally that important to me, but after EVERY one of the three furbabies walked through the paint I was glad to know that the paint was safe. I also enjoyed the ultra low odor,  I seriously smelled NOTHING. I also noticed that this paint did not gunk up my paint brush. The process took about 5 days. After each coat, I placed my paint brush in a baggie. When I did the next coat, the brush was like I just started with a clean brush. When I was finished, the paint cleaned up really easily from the paint brush and roller.
    I probably should have gotten a semi-gloss sheen since I was painting a floor, but the satin sheen is the LOOK I was going for. I have not sealed this floor. Granted, it’s only been painted about a week, but so far so good. It does seem to get dirty pretty easily, but it mops up nicely. I had quite a bit of traffic in the first week, due to Thanksgiving, and the floor did not scratch, or knick. Because I did everything by the book, I guess I’ll never know if it was the prep, the paint, or both.
    The downside of this paint would be the cost. Being an unemployed junker, and DIY maven, I would never have been able to afford this paint. However, if you can afford it, or if you have a special need to use it due to it’s non-toxicity (if you’re pregnant, or have small children) I highly recommend Mythic paint.

    Just a couple of more pictures for the WOW factor!
    oak cabinets beforeBEFORE

     oak cabinets after
    AFTER
    knotty pine before
    BEFORE
    knotty pine painted
    AFTER

    Please let me know if you paint your floor! If you have any questions, leave a comment, or shoot me an email. I’ll try to help.
    EDITED TO ADD October 7, 2011 It's been almost a year and my floor is holding up so well. There are a few spots that have some paint where I was crafting in the kitchen. I am unable to scrape the paint off, but it's really easy to touch up those spots with the blue or gray that I used.

    how to paint vinyl kitchen floor how to paint a vinyl kitchen floor two toned gray

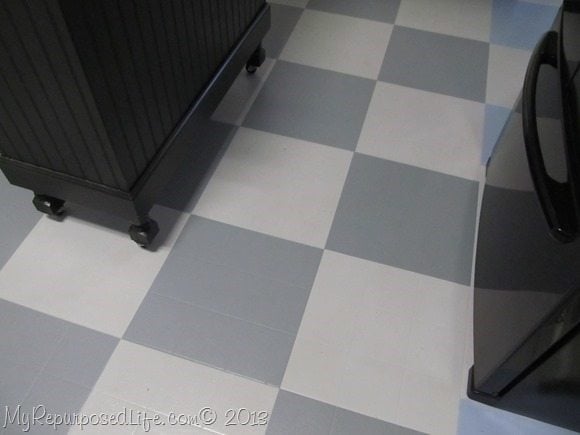
    Edited to add: After over 2 years the floor was still holding up great, but I decided to change up the blue squares to a dark gray. LOVE it!

    gail
    Pin It


    Print Friendly, PDF & Email
    Pin
    Share
    Tweet

    Related Content:

    • Paint Tips
      Paint Tips
    • Painting Knotty Pine
      Painting Knotty Pine
    • Updating Wood Trim
      Updating Wood Trim
    • Between The Studs Broom Closet
      Between The Studs Broom Closet
    • Craftsman Style Door Trim for Interior Doors
      Craftsman Style Door Trim for Interior Doors
    • Double Pedestal Oak Table and Chairs
      Double Pedestal Oak Table and Chairs

    Reader Interactions

    Comments

      See comments Cancel reply

      Your email address will not be published. Required fields are marked *

      This site uses Akismet to reduce spam. Learn how your comment data is processed.

    1. kay

      May 09, 2016 at 2:04 pm

      I love the before and after pics, you could also paint the stove to make it look like stainless steel, and voila a brand new kitchen....btw the stainless steel paint you can buy at home depot or lowes...

      Reply
    2. Bill

      December 11, 2014 at 8:03 pm

      Gail,
      Could you point me in the direction of someplace that sells the oops gray primer or maybe a substitute for it? Also, Is the Behr paint as good as the Mystic? And the finish you used in the paint was a satin finish, right?

      Reply
    3. Linda Todd

      July 29, 2014 at 3:23 pm

      I have tried to tell my husband that this can be done. They do it all the time for basketball courts and it last per my reviews. You did a wonderful job and yes it is pretty. Love it. I would like to do my bathroom like this. I think he is just lazy, or maybe I need to try to do it myself....lol

      Thanks for your tutorial.

      Linda

      Reply
    4. Shoogie

      June 20, 2014 at 12:23 pm

      Looks good. I see you painted the kitchen floor in 2010 - how is it holding up now in 2014? We are planning to paint vinyl flooring over 350 sq ft in our kitchen and sunroom, but want it to last. Let me know! Thanks, SD

      Reply
      • gail@myrepurposedlife.net

        June 20, 2014 at 2:53 pm

        I had nothing to lose when I did my floor. I hated it, so even if I got an extra year or two, I was fine with it. 3.5 years later, I have updated the color and I'm still thrilled with it. I have gotten a couple of small scratches, but touchups are easy because I didn't seal my paint. With the proper prep work, you shouldn't have any issues at all.
        gail

    5. Nancy @ Little Homestead in Boise

      March 28, 2014 at 12:05 pm

      Great job! Wish I'd have known how to do that at my last house!!!!

      Reply
    6. Michelle

      January 20, 2014 at 8:05 pm

      Did you use a sealer on top of the paint? I would think the wear and waking and scrapping of heels and other incidents might need a coat of a sealer....

      Reply
      • gail@myrepurposedlife.net

        January 20, 2014 at 8:27 pm

        Nope, Michelle... I didn't seal it and I haven't regretted that decision at all. I don't like the feel of poly under my feet. Plus I don't like shine. It would be difficult to change the color if I had sealed it.

        I'm not generally one who likes change, but who knows... come spring, maybe I'll change up the color again. lol

      • Michelle

        January 20, 2014 at 8:50 pm

        Thank you for your quick reply! I'm really looking into a simple refurbish on my ugly kitchen and bathroom vinyl floors. II also have a furbaby kitty and I just hope he keeps off! HAHA. I just found your site and I'm loving all you do.

    7. Candace

      January 13, 2014 at 10:04 am

      Awesome! I moved into a house with the family room/office floor painted a checkerboard. I couldn't figure out how they did such an outstanding job. I'm still not sure how to get the lines straight without vinyl squares for a guide, but you've given me hope.

      Question about the low-VOC paint. That's what I've used on all my walls. I made the mistake of using it on furniture and anything I put on top of a horizontal surface sticks and pulls the paint off. I was told the low-VOC isn't as strong due to lack of chemicals. I can't believe it worked on a floor? I know you prepped well, but are there other secrets to keeping the floor from damage with all that traffic?

      Thanks for your inspiration!

      Reply
      • gail@myrepurposedlife.net

        January 13, 2014 at 12:35 pm

        Candace,

        I have used the Mythic paint on my kitchen floor and on my entire fireplace and on several pieces of furniture without any problem of the paint being pulled off. It is great paint, but very expensive. When I updated the color of my floor I used Behr paint (my favorite) and it's held up very well without sealing. I am so glad I didn't seal my floor, because it's so easy to change up or touch up if something gets scratched. is it perfect? no, but I can't replace my floor without taking my cabinets out because my base cabinets sit on layers and layers of sub floor and vinyl floors.

        As long as paint has a good "tooth" to adhere to, it will stick whether it's on furniture or floors. 🙂
        good luck, have fun! 🙂

        gail

    8. Teresa

      December 13, 2013 at 3:46 pm

      That kitchen looks so much different in the before and after photos. So pretty and very inspiring. Your hard work most definitely paid off. I liked the blue, but the grey on the floor is so elegant and probably gave the bead board more of a "showcase" look. Well done!!!!!

      Reply
    9. HeidiW

      November 06, 2013 at 11:23 am

      Hi Gail. Did you use oil-baed or latex floor paint and primer? I have googled and see all kinds of different suggestions as to what will/won't work. Also, I know you said you didn't use poly over the top - was it just so you'd have the option of changing colors? My family is rough on everything and I'm afraid without a top coat it won't last. I am planning to paint and then stencil over our vinyl kitchen floor and entry way. Would greatly appreciate your input!

      Thank you 🙂

      Reply
      • gail@myrepurposedlife.net

        November 06, 2013 at 12:52 pm

        Heidi

        I did use water base latex paint, after lots and lots of preparation! 🙂 I don't like shiny floors, so that is why I chose not to poly. Also, I don't like the way poly feels under my feet. I think if I were going to seal it, I would use Minwax Polycrylic instead of oil based polyurethane. Just my two cents.

        good luck! have fun, and I'd love to see your before and after! 🙂

        gail

    10. Nina Sanford

      September 26, 2013 at 12:14 pm

      I've been debating what to do with my own vinyl flooring for a couple years now. I love this idea and it can be geared to whatever color you choose. This is probably the easiest and least spendy. Thanks for sharing. It gives me hope. 🙂

      Reply
    11. Marina Relf

      September 13, 2013 at 7:46 pm

      I have stuck down lifting tiles with grouting cement and replaced broken ones with ones I found in the cupboard that are not quite the same shade so the floor is covered ready to be painted. In my case the floor is the conservatory rather than the kitchen and will get a lot of wear. You have given me ideas for painting my brown kitchen cabinets. A really great effort.

      Reply
    12. Julie

      September 10, 2013 at 1:14 pm

      Really cute! Reminds me of my dear Granny's cheery kitchen. I would have left the little paw prints on the floor, though, just because they're adorable.

      Reply
      • gail@myrepurposedlife.net

        September 10, 2013 at 1:17 pm

        Thanks Julie for your sweet comment. 🙂

        gail

    13. julia

      August 22, 2013 at 1:04 pm

      What a great looking job. Neat and clean. I am gearing up to paint my kitchen floor but will have to resort to a free flowing design that allows for errors. I know I can never get squares even.

      Reply
      • gail@myrepurposedlife.net

        August 22, 2013 at 1:25 pm

        Thank you Julia... so happy you found My Repurposed Life! I had those little squares to help me. 🙂 It's been years, and I still love it, especially now that I updated the color.

        I appreciate you stopping by and taking the time to leave a comment.

        gail

    14. Valinda

      May 17, 2013 at 10:19 pm

      Did you use a clear top coat on the painted floor? Then how would you clean it in order to keep the paint fresh and shiny, not streaked? I have been looking at staining my vinyl as the shine is gone and I think it will stain. I am trying to find a green to stain it with. Then I would need a clear shine on it.
      Your floor looked great.

      Reply
    15. LBW

      April 19, 2013 at 5:10 pm

      This is so inspirational -- I am wondering how its hold up to traffic?
      I want to do both the Master bathroom and the main bath of our house. Its just not in the budget to rip out the 21 year old vinyl. Painting it seem like a perfect plan as a temp. improvement.

      Reply
      • gail@myrepurposedlife.net

        April 19, 2013 at 5:33 pm

        Thank you. It has been over two years and is holding up great. I have updated the color. It is now a dark gray and a light gray. So happy i did it.
        Have a great weekend
        Gail

      • joe

        April 30, 2013 at 9:13 am

        Great job. Love the blue, do you have the colour chip name for it

    16. Becky

      April 17, 2013 at 10:20 am

      thank you thank you thank you for this inspiration! I didn't know you could paint vinyl flooring! This HAS to be cheaper than replacing with handscraped hardwood flooring, right? RIGHT? LOL.

      Reply
      • gail@myrepurposedlife.net

        April 17, 2013 at 11:14 am

        Thanks for noticing my painted floor! 🙂 I love it!

        good luck

    17. Anonymous

      January 21, 2013 at 11:44 pm

      I was thrilled with this article. I came up with the idea of painting my old laundry room floor by sanding, cleaning, painting and finishing but every paint salesperson I spoke to told me it couldn't be done. Now I am definitely going to do it! NRN

      Reply
    18. Anonymous

      January 10, 2013 at 7:10 pm

      Gail how is your floor holding up without sealing it?

      Reply
    19. Amber M.

      November 05, 2012 at 3:48 pm

      I LOVE the look of your kitchen!!

      Reply
    20. Anonymous

      October 29, 2012 at 2:11 am

      Did you cover the floor with a satin poly finish? It would help make it last even longer.

      Reply
    21. Jamie

      May 24, 2012 at 2:28 pm

      I tried painting my floor and it all started flaking off. I used primer, what could have gone wrong?

      Reply
    22. c.w.frosting

      April 24, 2012 at 1:05 am

      Beautiful Gail! I wish I could paint my apartment floor... it looks worse than your before... imagine multiple colors of vinyl with weird pattern!

      xo caroline @ c.w.frosting

      Reply
    23. Sam Hall

      March 15, 2012 at 12:50 pm

      This is an amazing post for vinyl floor.I was looking for someone who can guide me for vinyl floor painting then I found this awesome post which describe each and every thing.

      Reply
    24. Donna

      March 05, 2012 at 5:11 am

      I painted my vinyl floors 3 yrs. ago but it didn't last too long. So I painted them again this time applying a poly over the paint that made the difference. Now I am getting ready to embark on applying a paper bag finish to them. Only b/c I am tired of the look and can't afford what I really want. Have done a ton of research and I am looking forward to the new look!

      Reply
    25. Amelia

      February 06, 2012 at 4:38 pm

      You are straight up talent! I wish I could somehow do that with my old carpet, haha but really. It looks great and puts a whole new cute twist to the area. Love the puppy prints too 🙂

      Reply
    26. Anonymous

      January 06, 2012 at 12:42 am

      Has anyone tried Linoleum Lacquer? http://www.linoleumlacquer.com I read about it on another blog but want to see if anyone else has tried before I plop down the cash for it. Apparently, you only need one coat so even if its a little pricier I only have to buy one product so it makes sense.

      Reply
    27. angel rose

      December 26, 2011 at 3:31 pm

      All I can say is,one hell of a terrific job !

      Reply
    28. angel rose

      December 26, 2011 at 3:31 pm

      All I can say is,one hell of a terrific job !

      Reply
    29. angel rose

      December 26, 2011 at 3:30 pm

      I want to make a dance studio. Do you have any idea's about what flooring I should use ? I would be tearing up the carpets and I will be left with concrete. Anyone that has any idea's..it would be very much appreciated,and not sure how to put mirrors up on a very low budget ?

      Reply
    30. angel rose

      December 26, 2011 at 3:26 pm

      All I can say is,one hell of a terrific job !

      Reply
    31. flooring Houston

      December 19, 2011 at 2:16 am

      The floor is so amazing. It is good that there are now paints that are not hazardous to our health. It is great that you were able to transform your kitchen without spending too much. Great post!

      Reply
    32. Sheryll And Critters.

      August 07, 2011 at 4:28 pm

      I am now reinspired by your photo's and directions. I just wish I had the money to do anything to my house. I tore up the carpet in my hallway and one bedroom, that I use for my office and was just horrified. Chipped linoleum tiles with paint splattered all over it. So, I popped up the tiles to get to the black glue stuff they used to stick the tiles on with. And if I do manage to clean that off, don't know if the Terrazzo will look decent or not. Hallway is even worse, it has that sheeting vinyl or what ever you call it and I am not getting it up like I thought I could... ugh. HELP?

      Sheryll & Critters (humid Jax, FLA), so I know how much work and time it takes to paint a kitchen and especilly the cabinets. I did that to my mom's large kitchen years ago. And I almost forgot to ask why you want anything different for your backsplash? Kiltz Original will cover and protect behind your kitchen sink, it even covers formica.

      Reply
    33. InMyOwnStyle

      August 06, 2011 at 1:41 am

      Hi Gail-

      I have painted wood floors before and know what a huge undertaking this floor must have been - especially in your kitchen the heart of the home where you can't just shut it down for a long time. It came out great - your entire kitchen did - paint really does make a huge difference.

      My best- Diane

      Reply
    34. Handbags*N*Pigtails

      July 13, 2011 at 11:45 am

      Youre an absolute GENIOUS!(How many times have I said that now?:)) Seriously, Im bookmarking this. It just may be what happens to my cruddy old kitchen floor until someday it hopefully gets replaced. This is such a great alternative! And I cant believe the before and afters of your kitchen.Its so bright and cheery now. You must love walking in there every morning. I would!:)

      Reply
    35. Nike

      June 30, 2011 at 3:00 pm

      You are my hero! I got online today to try and figure out what to do with my floors and this is perfect!! Can.Not.Wait. to try this!
      ~Nike from THRIVE
      choosetothriveblog@gmail.com

      Reply
    36. Kassandra @ Coffee and their Kisses

      June 03, 2011 at 2:12 am

      I just featured this loveliness here at my blog. Feel free to grab a featured button on my left side bar :o)

      Reply
    37. Kassandra @ Coffee and their Kisses

      May 31, 2011 at 6:45 pm

      I love this! I have some ugly vinyl floor in the kitchen and my bathroom and this is an easy fix. Got any ideas on how to fix tiles that are coming up from the floor? lol! You did a beautiful job restoring this kitchen. It was a hot mess and now it's just charming!

      Reply
    38. Holly

      May 08, 2011 at 5:23 am

      You truly transformed that kitchen to be all it can be from floor to cabinet to blacksplash! Amazing. I LOVE your floor!

      Reply
    39. grendelskin

      April 13, 2011 at 1:31 pm

      I just started researching painting my floor - thanks for the terrific post! It was a long winter, how is the paint holding up after a few moths of hard use?

      Reply
    40. Kathy Carbone

      March 28, 2011 at 4:55 am

      Your floor makeover looks so refreshing! Just in time for the spring season. And it's amazing how you have it designed that way. At first glance, you'll think it was an installed blue-vinyl, but no, it was a DIY vinyl designs. I'm now looking forward to trying the same thing on our living room.

      Reply
    41. Erin

      January 06, 2011 at 4:23 pm

      That truly is a WOW transformation!! 🙂

      You must have some major patience!! I could not have painted that floor.

      Reply
    42. Greenbug

      December 28, 2010 at 2:38 am

      Your redo is great! I painted my floor too... Check it out if you like at greenbuggg/blogspot.com/

      Reply
    43. Pam

      December 26, 2010 at 8:01 pm

      Don't know how I missed this post but I am sorry I did....beautiful...just beautiful! Great job as always

      Reply
    44. Amie

      December 08, 2010 at 4:00 am

      II've bookmarked all of these because I'm endeavoring to makeover my kitchen--mostly the cabinets--white. It's such a daunting task!! I wonder, why did you sand between coats of painting the cabinet doors? I would love to talk to you more about this because this project intimidates the heck out of me, and I have a teeny tiny kitchen so I'm being a big baby! 🙂 Amie amiedanny@msn.com

      Reply
    45. Sandy aka Doris the Great

      December 08, 2010 at 2:46 am

      You are freakin amazing, woman! What a job! What a beautiful job! (And I love the choice of color.)

      Reply
    46. Stacie

      December 08, 2010 at 2:34 am

      That looks AWESOME!! LoVe those little paw prints 🙂 Nice JoB!

      Reply
    47. Heather

      December 05, 2010 at 4:42 pm

      Your floor looks amazing, seriously great! I bet you are thrilled with the results!

      Reply
    48. Michelle @Shellsshabbyshack

      December 04, 2010 at 8:04 pm

      I think this tops your window cabinets. Oh wow! What a transformation. I could just see you on HGTV. Great transformation!

      Reply
    49. Funky Junk Interiors

      December 04, 2010 at 5:46 am

      Holey vinyl floor.... amazing transformation! I can't wait to hear how well it wears over the long haul. This is such a fabulous option for outdated floors in great shape!

      Wonderful kitchen transformation.. wow.

      Donna
      http://funkyjunkinteriors.blogspot.com/

      Reply
    50. Maryann @ Domestically-Speaking

      December 04, 2010 at 3:54 am

      You know I have to put your floor in the PoPP Spotlight... it's too cool!

      Reply
    51. The Inspired Nest

      December 04, 2010 at 3:16 am

      That is one crazy good transformation. The cabinets, backsplash, beadboard and floor are so incredible. I had to look at it a few times! I love it and know you must too!
      Lacy

      Reply
    52. Handy Man, Crafty Woman

      December 04, 2010 at 5:07 am

      WOW, what a great job!! Looks so great! Love the cabinets, too. We painted our cabinets white, too, and it made SUCH a difference.

      Reply
    53. The DIY Show Off

      December 02, 2010 at 2:47 pm

      Oh wow, Gail. What a beautiful transformation! It's my dream kitchen. I wish my husband would go for "all white" but then again, since he does the cooking I think he might be 'smart' to protest white everything. So, I'll have to enjoy your dreamy kitchen from afar. 🙂

      Great job! The floor looks awesome!
      Roeshel

      Reply
    54. Elle {SWITCHEROOm}

      December 01, 2010 at 10:21 pm

      AMAZING! and kudos for having the patience to paint the floors with fur babies around 🙂

      Reply
    55. Terry

      December 01, 2010 at 7:41 pm

      Oh my goodness, such a huge transformation. I am so glad that you shared this. Terry

      Reply
    56. Julie @ followyourheartwoodworking

      November 30, 2010 at 10:30 pm

      Fabulous job, Gail!! I love the grey and blue and white. My favorite decor colours. You should be so proud of yourself for making such a dramatic change.

      Reply
    57. patty

      December 01, 2010 at 2:26 am

      i painted my vinyl floors about 8 years ago; did a blue and white checkerboard. didn't have any trouble with the paint coming off all this time. i prepped the same way only i sanded some of the gloss off the vinyl. i love your look

      Reply
    58. Tricia

      November 30, 2010 at 8:09 pm

      WOW! Wow, wow! I'm so inspired! Fabulous!

      Reply
    59. canngil

      November 30, 2010 at 7:56 am

      so clean and beautiful!! very impressed!!

      Reply
    60. Tara @ Tara Being Tara

      November 30, 2010 at 3:21 am

      Whoa - what a huge improvement! It looks great!

      Reply
    61. texasdaisey

      November 30, 2010 at 2:54 am

      Turned out beautiful. I have painted a couple of floors too. I have never regretted it yet.
      You go girl!
      Debbie

      Reply
    62. Hilary @ Sweet as June

      November 30, 2010 at 2:32 am

      amazing transformation!!!

      Reply
    63. Susan

      November 30, 2010 at 2:00 am

      I really like the whole kitchen. Blue happens to be my favorite color. 🙂 I think the backsplash would look great with beadboard or beadboard wallpaper painted in one of your floor colors. Glass tile would look awesome but it's pricey. Anyway, enjoy your new kitchen!

      Reply
    64. kathie

      November 30, 2010 at 1:37 am

      What an amazing & unbelievable transformation, Gail!!! Love love love everything you did. That blue looks so pretty with the white. I know you are LOVING it!

      Reply
    65. kathy from ct

      November 30, 2010 at 12:49 am

      That looks awesome. Great job. The entire room now looks so fresh and updated. Way to go!

      Reply
    66. Sue

      November 30, 2010 at 12:41 am

      so awesome, I really admire you and your creativity! Your blog is on top of my "must read" list...

      Reply
    67. Penny-Rose

      November 29, 2010 at 9:31 pm

      WOW, what a fantastic makeover. Well done 😉

      Reply
    68. Pudel-design

      November 29, 2010 at 8:49 pm

      Looks pretty amazing to me!
      Real good job girl!
      Lovely greetings...

      Reply
    69. Laura

      November 29, 2010 at 6:11 pm

      Wow! It looks great. I am super impressed!

      Reply
    70. Suzanne@Meridian Road

      November 29, 2010 at 5:43 pm

      That looks amazing! Your whole kitchen has turned out so well.

      Congratulations on becoming a resident blogger! They're lucky to have someone as talented as you.

      Reply
    71. pedalpower

      November 29, 2010 at 5:40 pm

      That's an amazing transformation!

      Reply
    72. Maryann @ Domestically-Speaking

      November 29, 2010 at 5:28 pm

      Gail that is stunning! What a transformation. You are making my brain spin with ideas on what I could do with my linoleum floor that I hate.

      Reply
    73. Maria Gridley

      November 29, 2010 at 4:59 pm

      wow the kitchen re do look AMAZING!! I should save these pics and show my husband.. I have been trying to get him to let me paint out cabinets white.. they are ugly and old and brown.. but still pretty solid. So I asked if we could paint them white.. I thought it would look so nice.. but he looked at me like I was crazy... UGH! haha Maybe if he saw how nice yours look he would get it! LOL

      Reply
    74. Allison

      November 29, 2010 at 4:58 pm

      I LOVE this. As I commented before, I am using your before and after pictures as inspiration for my mothers kitchen. I am currently writing a plan for the kitchen, but I already posted some before pictures. Take a look if you have a second and maybe give me some ideas:
      http://aburlock.blogspot.com/2010/11/moms-kitchen.html

      Reply
    75. Bonnie

      November 29, 2010 at 4:32 pm

      Wow, what a big change! You might want to look into appliance paint to get a true white on the stove. For the backsplash, I think blue glass tiles in different shades would be great...wonder what junking stuff could substitute? marbles? broken glass chunks?

      Reply
    76. Carmen at Primcatshouse

      November 29, 2010 at 4:08 pm

      AMAZING transformation! Just AMAZING!!!!

      Carmen and the Primcats

      Reply
    77. Stephanie

      November 29, 2010 at 4:00 pm

      I was so excited to see the final results, and I wasn't disappointed. The whole kitchen looks so fresh and bright! It cracked me up that you found another use for the blower. I know this was a huge undertaking for you, but really Gail, you out did yourself, it looks fantastic!

      Reply
    78. Recovering Craft Hoarder

      November 29, 2010 at 3:38 pm

      I LOVE what you did with the floor. And the before and after shots? WOW! What a transformation.

      Reply
    79. Ann Marie @ Twice Lovely

      November 29, 2010 at 3:30 pm

      It turned out GREAT Gail!!

      Reply
    80. Shannon

      November 29, 2010 at 3:27 pm

      I love everything!
      I agree about the white wall. It looks much better now and your furniture doesn't disappear.

      I love the floor. It looks great!

      You have been BUSY!

      Reply
    81. gypsy@Hebrews11:13

      November 29, 2010 at 3:21 pm

      Oh wow- so gorgeous!! Love that shade of blue with white. Your kitchen looks so big and airy!

      Reply
    82. CountryBelle

      November 29, 2010 at 3:08 pm

      You sure put a lot of hard work and effort into this project! Good for you!!! It looks so lovely and airy!

      Reply
    83. Jill

      November 29, 2010 at 3:08 pm

      Wow! What a huge change! I think the thing that stood out the most is that blue wall and the painted floor.

      Reply
    84. Marla @ Always Nesting

      November 29, 2010 at 3:03 pm

      This is me giving you a STANDING OVATION!! Wow, amazing and beautiful and gorgeous and incredible and WOW!! Love love love that floor.

      Reply
    85. Cassie @ Primitive & Proper

      November 29, 2010 at 2:52 pm

      wow, gail!!! it is beautiful!!!! i am anxious to see how the floors hold up to traffic as i really wnat to do this in my house. your kitchen is breathtaking now, and so updated and relaxing. you must be THRILLED!

      Reply
    86. Cassie @ Primitive & Proper

      November 29, 2010 at 2:52 pm

      wow, gail!!! it is beautiful!!!! i am anxious to see how the floors hold up to traffic as i really wnat to do this in my house. your kitchen is breathtaking now, and so updated and relaxing. you must be THRILLED!

      Reply
    87. Corn in my Coffee-Pot

      November 29, 2010 at 2:51 pm

      I've painted my floor in the past...not vinyl, but wood. I've since covered it with vinyl because we had to rip so out to do plumbing work...
      Yours is great looking and you did a good job on the tutorial as well.
      As always.

      Reply
    88. Sylvia

      November 29, 2010 at 2:21 pm

      Fabulous job. Your kitchen is beautiful. You are amazing.

      Reply
    89. A Pretty Pastime

      November 29, 2010 at 2:12 pm

      Oh My Gosh! You are truly amazing! Your kitchen looks so pretty. Nice and bright. Please tell Louie I like his artwork 🙂

      Reply
    90. Sarah @ The Bird's Papaya

      November 29, 2010 at 2:02 pm

      are you kidding me?!
      That's freaking amazing!
      who knew you could even do that?!
      I'm so impressed.
      Your kitchen is so adorable and classic looking now. You should be SO proud!!

      Reply
    91. Kathy

      November 29, 2010 at 2:02 pm

      That is one terrific kitchen redo! I really like the wall change from white to blue. Great job.

      Reply
    92. LouLou@thelifeofloulou.blogspot.com

      November 29, 2010 at 1:41 pm

      Girlfriend. You NEVER cease to amaze me. Ever... That is a fantastic idea! Your kitchen looks amazing!

      Reply
    93. Denise

      November 29, 2010 at 1:25 pm

      Great job Gail, the lighter colors will brighten your winter days. Not sure I could have tackled a project like that.....hubby and I are going to make a few renovations to the chicken coop, hopefully I don't mess that up!

      Reply
    94. My Cottage Charm

      November 29, 2010 at 1:25 pm

      Hey lady, the kitchen looks fabulous! I know how much hard work you put into it, but the before and after pics show it was worth it. 🙂
      I think I might mosey on over and put one of my projects in the DIY club for Krylon paint...I should own stock in that paint cause it's just about all I use! 🙂 LOL
      Love ya girl and again, wonderful job on that kitchen~!
      Hugs

      Reply
    95. Terri

      November 29, 2010 at 1:16 pm

      OMG...please give yourself a huge pat on the back...to accomplish this transformation all by yourself is nothing short of amazing. I love your new kitchen...what a makeover!

      Reply
    96. Peggy

      November 29, 2010 at 1:03 pm

      Gail, this is insanely incredible! You really need to get this published in a one of the DIY magazines! Trust me it is nicer than some of the projects they ever publish. I will keep my eyes open for all and any contests for DIY kitchen makeovers because this is a definite winner!

      Reply
    97. Cynthia R. Hallum LeChaiseParfait.blogspot.com

      November 29, 2010 at 12:52 pm

      Gail this looks so incredible. I hate my kitchen floor. Thanks for showing us that it can be done.

      Reply
    98. It's Just Me

      November 29, 2010 at 12:39 pm

      Wow is an understatement ... It turned out beautiful.

      Reply
    99. Pattie

      November 29, 2010 at 11:59 am

      GREAT JOB! I love it! I have wanted to paint my floor for a long time but just haven't gotten around to it.
      Thanks for sharing.

      Reply
    100. Megandvd@Beauty in the Attempt

      November 29, 2010 at 11:09 am

      Oh my....you are taking "painting the kitchen" to a whole new level! I love it. I am so happy that you did this painting the floor tutorial. I am going back and forth with the master bath. I am hoping a I work enough hours at the hospital to do my floors. Is that not sad that home decor motivates me to get up at 5 and head to the hospital to work? Oh..that and helping people. :)I do what I do. 🙂

      Cheers~
      e

      Reply
    101. Rose @ Confessions of a Curbshopaholic

      November 29, 2010 at 10:56 am

      Let me just say......WOW!
      The transformation is simply amazing.

      Reply
    102. Denise Beverly

      November 29, 2010 at 8:24 am

      looks lovely... i so need to redo my kitchen floor...ugly ugly parquet. your whole kitchen is absolutely beautiful, thanks for sharing it with us along the way.

      Reply
    103. Creative Mind

      November 29, 2010 at 9:48 am

      waoooo...what a great effort you have done...its marvelous dear...great job!!!!

      Reply

    Primary Sidebar

    Hi, there! I’m Gail Wilson, the author and mastermind behind My Repurposed Life. I’m obsessed with finding potential in unexpected places and believe that with a little hard work and imagination, any old thing can be made useful again—myself included! I hope you’ll enjoy the journey and pick up a few tools along the way… literally!

    More about me →

    Join Our Mailing List

    ​

      Click the topics you're interested in below:

      Subscribing above means you agree to our Privacy Policy​

      Footer

      ↑ back to top

      SEEN ON

      Might I Suggest

      • Start Here
      • Furniture Makeovers

      Newsletter

      • Sign Up! for emails and updates

      About

      • Gail's Favorites on Amazon
      • About

      As an Amazon Associate I earn from qualifying purchases.

      Copyright © 2023 My Repurposed Life · Privacy Policy · Disclosure