How to build: DIY Barn Doors
As an Amazon Associate, I earn from qualifying purchases.
I have been wanting some diy barn doors in my kitchen for a long, long time. When I searched online for hardware, I found that it is way out of my price range. Then I saw The Accent Piece used hardware from Tractor Supply. I decided even though it was very expensive, it was worth a splurge. This post will explain how I built my doors. If you want to use an existing door as a barn door, read this.

The design process of building interior barn doors

When I decided to build my doors, I bought the hardware (more on that in another post). This is the bracket. I wasn’t sure if using 1x’s would make a thick enough door for the brackets. I laid out some boards to try to get a feel for what I wanted.

Because my doors were going to be narrow, I thought I would prefer two doors that resembled ONE door when closed. I was having a difficult time trying to find a place to work on them. This is in the bed of a pickup truck.

Fast forward to a few day’s later…
I decided to work on a drop cloth in the carport. During the few days off, I did some ciphering and concluded that I could make them slightly wider than originally planned, therefore being less narrow. I played around with different configurations.
What lumber should I use for my interior barn doors?

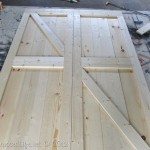
This is what I decided on. The door consists of (from left to right) 1×10, 1×4, 1×6, 1×10. The frame consists of 1×4 on each side, with 1×6 pieces going horizontally on the top, bottom and middle. I went with this configuration because I wanted them to appear “pieced” together, and I didn’t want to rip any of the boards. I used the wider boards on the left and the right to be more supportive of the frame.

More dry fit before I start attaching all the pieces.
Assemble your barn doors

I used my Gorilla Wood Glue to secure all the pieces. It was crucial to clamp the boards in several spots all the way down the door to make sure they were pulled together.

After I applied the glue, I used my nail gun to hold the frame pieces temporarily.

Everything glued and nailed. (note the safety glasses by the nail gun. I always wear them when I’m sawing and nailing)
It’s all in the details

DIY Barn Doors, It’s all in the details!!
The cross pieces are 1×4’s. I angled the top board to fit across the top of the frame. To get the angle alongside the inside frame I laid a board on top of the frame and drew a line on the 1×4. I used my jigsaw to cut this angle. I did the same for the board on the right hand side.

Then I turned the board over, drilled pilot holes and inserted screws for a permanent hold. The wood glue and the nail gun made it easy to do this.
Sand and paint DIY barn doors

After sanding, I painted the doors, with the paint that matches the walls in the kitchen. It’s Sweetened White (almost white), in a satin finish. I didn’t like the finish, so I used Mythic Paint (Bright White) in a Semi-gloss.

This is where the diy barn doors are going to be installed. It’s a wide doorway from the kitchen to another room that is hard to describe. It’s the last room in the house that needs a makeover, so you won’t be seeing any pictures right now. That is a sheet hanging up, because I don’t heat/cool that room.
Your material list will depend on your doorway
Materials I used:
- (4) 1x10x8 (11.41 ea) 45.65
- (4) 1x6x8 (7.78 ea) 31.12
- (7) 1x4x8 (4.77 ea) 33.39
- Screws and nails (1 1/4”)
- Gorilla Wood Glue
- Sandpaper
- Paint
Each door is 27 3/4 x 84”
Tools:
- self centering tape measure
- Compound Miter Saw
- Jigsaw
- Drill
- Drill Bits
- Nail Gun
- Quick Clamps
The lumber for these diy barn doors cost about 115.00. yikes! I had some, and bought some, I didn’t know how much it totaled until now. I had the screws, nails, glue, and paint on hand.
See how I installed the doors in the post Tractor Supply Barn Door Hardware (how to)
gail
Very cool! I ended up using your plans to make my barn doors and they came out beautifully! I used a barn door hardware kit from Off the Hinges .net instead of tractor supply, because I liked the look better. Anyway, thank you for your advice!
These doors look great! I like the way that you varied the wood widths and put the diagonal piece across. You make it look easy to get everything to line up so well.
I love the white and silver!
I just built two barn doors for my house. the hardware for mine were about $25 (including track and all)
for the smaller door, i used free pallet wood and bought the trim pieces at home depot. the entire door cost about $46.
for larger 4ft door for my dining room, was built using a 4’x8′ sheet of shed siding (cut to size). then i trimmed it out with wood as well. The entire door was about $80.
here’s the link to how i made the smaller door.
https://www.pinterest.com/pin/275915914647754276/
I haven’t posted a pic of the larger (shed siding) door yet. But i built in using the same concept.
Was searching for diy shed doors and I stopped when I found this page. What a great idea, so easy to get different widths. I went with 1x8s on the sides and three 1x4s in the middle and bam – 25″ wide on the nose. They’re perfect, they look great. Thanks for posting!
Dan,
So happy that you found My Repurposed Life! Thanks so much for leaving a comment to let me know you stopped by and were able to use my little tutorial to achieve the perfect doors!
gail
I love your barn doors. My husband and I are doing home renovations and would like to put barn doors between our living room and front hall entrance. My question is, how did you decide how wide to make each door? Thank you.
I absolutely LOVE this! Great project, I actually went to Tractor to price out hardware for my very own 🙂 My hubby thinks I’m nuts! I’d love for you to link up to my first ever linky party, Ta-Da Tuesday 🙂 check it out here !
Awesome and pinned!
~Bliss~
Those doors are AMAZING! I love that barn door look and you totally captured it 🙂 I have a brand new link party going on right now and I’d be thrilled if you’d share this over there so everyone can see how you did it!
So THAT’s the secret room….good to have a picture of it, I was having trouble visualizing the entry.
You really worked hard on these doors, but they came out amazing and in comparison they really aren’t as expensive as you think they were. If you had bought new doors off the shelf(not even barn doors) it would have cost you way more than this.
Great job on the tutorial too!
Oh you rocked this project. The tutorial makes it look easy! Lol. I know how hard you worked on these and I tell ya, they are worth every ounce of back breaking sweat and tears, they are awesome!
These are fantastic, Gail!! I can’t wait to see them hung in place. This would be a fun idea for my pantry when/if we ever give it a country kitchen makeover!
Thanks so much for sharing your tute… I am madly in love with those doors. I walk around my house lately trying to figure out where they could work… so far I am safe unless I want to remove 2 french doors. Not likely to happen anytime soon though…lol
I especially love your awesome tip to use the nail gun to hold it all together. I wish I had a gun when I did the shutters it would have made things so much easier.
You did an amazing job yet again Gail… such perfection. Love, love, love them.
Hugs,
Deb