• Skip to primary navigation
  • Skip to main content
  • Skip to primary sidebar
  • Start Here
  • Shop Favorites
  • About
    • Welcome To My Repurposed Life Home of Repurposed Furniture
    • More About Gail
    • Disclosure
    • Privacy Information
  • Gallery
    • Repurposed Furniture
  • Repurposed Items
    • Building Supplies
    • Miscellaneous Household Items
    • Picture Frame/Chalk Board
  • DIY
    • Home Reno
    • outdoor living
    • Painting
    • Shop Talk
    • Tips for Around the House
    • Build It
      • Furniture
      • Home Decor
      • Storage
    • Crafts
      • Dollar Store
      • Easy
      • Holidays Seasonal
  • Furniture
    • Chair
    • Desk
    • Dresser/Chest
    • Headboard | Bed Parts | Cribs
    • Kids Furniture
    • Table
    • Kids Furniture
My Repurposed Life® Rescue Re-imagine Repeat
menu icon
go to homepage
subscribe
search icon
Homepage link
  • About
  • Start Here
  • Project Index
  • Furniture
  • Subscribe
    • Email
    • Facebook
    • Instagram
    • Pinterest
    • RSS
    • Twitter
  • ×

    Home » DIY » outdoor living » How to make a small porch post

    How to make a small porch post

    Published by Gail | Published August 24, 2010 | Updated May 14, 2021
    As an Amazon Associate I earn from qualifying purchases.

    Pin
    Share
    Tweet
    I made a small porch post!
    Do you remember this large  plant stand/display post I made earlier this summer?
    I had a little time last week, and couldn’t figure out what I wanted to make, so I decided to make this easy project you can make in an afternoon.
    blue porch post plant stand
    This blue one has one square piece on top of the other (at the bottom).

    *this post contains affiliate links, read more here*

    Use Reclaimed Molding

    crown molding for small porch post
    But, for this small porch post, I decided to use some old  scrap crown molding that was given to me in the Spring.

    Scrap Wood for Small Porch Post

    plant stand
    First, I cut some new 2x8’s into squares, and I cut a 4x4 down to size.

    Measure Twice Cut Once

    red plant stand
    Then, I cut some crown molding. But when I went to place it at the base of the 4x4 I realized that I had cut the four pieces a little too small.

    Using a Speed Square

    use a speed square

    It is really difficult to measure from the small (short) end to the short end. I figured out how long I needed it to be from the long end to long end. I temporarily placed my speed square at the place where I needed the crown molding to measure from.

    Then I removed the speed square while holding the crown molding tightly in place and proceeded to saw it. Voila! It worked like a charm.

    How To Glue Molding on Small Porch Post

    crown molding trim on small porch post

    When you work alone, you find that you don’t have enough hands sometimes. You can see in this picture that I used my other pieces to “hold” the crown molding in place.

    gorilla wood glue
    I used my trusty gorilla wood glue to hold my crown molding pieces together.
    glue the trim pieces with wood glue
    These are the four pieces that I cut too short. I glued them together also.
    triangle trim pieces make a pyramid

    When you cut crown molding, you have to make a cut to get the right angle on the correct end. After each cut, I would have to cut a small piece off to get the angle to go in the right direction.

    I had four of these end pieces laying around and decided to glue them together also. They make a cute little pyramid!

    Constructing a Small Porch Post

    small porch post

    After much trial and error on the router, I decided to make this cut. Which bit? I have no idea. It looks like a round over bit cut, but it seems to me that whichever bit I use, I get the same look.


    porch stand

    So, you can see that I have a 2x8 on the bottom, then the crown molding,  (which I adore by the way) then the 2x8 on top with the “oops” crown molding and the cute little extra pieces for the pyramid.

    Painting DIY Projects Indoors

    After I got it built and glued, I decided it was too hot to work outside. So, in the house I went. I painted this with an oops red.

    diy red plant stand-porch post
    A gal's gotta do what she's gotta do!

    Small Porch Post

    plant stand
    I glazed it with some burnt umber (watered down).

    Using a Cabinet Knob to Hold a Sign on Porch Post

    use a knob to hag wreath or sign on porch post

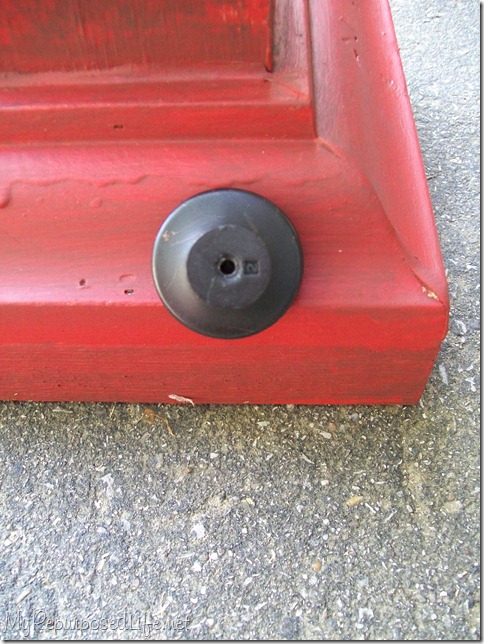
    As I was looking for a hook to use in order to hang a sign, I found a cute little knob. See how small that hole is? (The runs on the crown molding are not from me, they were on the used crown molding I used.)

    I  hammered a nail into the 4x4 post to place the knob on.

    What Sign Should You Use for Small Porch Post?

    plant stand It was staged with a few signs I have around the house. Jamie  painted this one for me for my birthday several years ago.
    welcome sign
    This sign was a gift from one of my former students.
    I suppose this could be used in your house also, on a hearth maybe?
    small porch post
    Here it is with the little “topper” attached.
    red glazed porch post

    Another picture with the topper attached. This is a very versatile little guy. On this side you could put your name, or your house number if you put it on your porch. (the knob is on the back side).

    Please SAVE & SHARE on Pinterest!

    Hang a Sign or Even a Wreath

    small porch post with welcome signWithout the topper it could hold a plant or a statue or something of that sort. I have very  little money invested in this project.What did I use?

    • ½ of a 4x4  .51 cents.
    • a small portion of a 2x8 .51 cents
    • The crown molding was free
    • little of a container of  oops paint .50 cents
    • cute little black knob FREE from my stash

    gail

    I used a reclaimed porch post to make a coat rack!

    Print Friendly, PDF & Email
    Pin
    Share
    Tweet

    Related Content:

    • Reclaimed Stair Stringer Tiered Plant Stand
      Reclaimed Stair Stringer Tiered Plant Stand
    • Reclaimed wood projects | Fence | Pallets
      Reclaimed wood projects | Fence | Pallets
    • Scrap Molding Signs
      Scrap Molding Signs
    • Portable Folding DIY Pallet Bar - great for weddings, tailgating and more!
      Portable Folding DIY Pallet Bar - great for weddings,…
    • Wall Shelf with Hooks | DIY
      Wall Shelf with Hooks | DIY
    • Red White and Blue Chandelier
      Red White and Blue Chandelier

    Reader Interactions

    Comments

      See comments Cancel reply

      Your email address will not be published. Required fields are marked *

      This site uses Akismet to reduce spam. Learn how your comment data is processed.

    1. Gracie Marie

      April 30, 2011 at 5:13 am

      This is a really great idea for the use of scrap lumber and molding. I can see all sorts of variations with what I have laying around the shop. I just finished building a porch swing arbor and have two really nice sized pieces of 4x4" left over, plus buckets of leftover moldings. Thanks for the ideas and the lessons. I always enjoy seeing how others do thier creativity. It is also nice to know I am not the only lady out there that can work in wood! 😀 GracieMarie

      Reply
    2. The DIY Show Off

      September 19, 2010 at 3:31 pm

      Super cute and what a neat idea! LOVE it!

      Roeshel

      Reply
    3. The Polka Dot Closet

      August 25, 2010 at 3:21 am

      That is the best idea ever!!! I love it!

      Carol

      Reply
    4. Cassie @ Primitive & Proper

      August 25, 2010 at 12:12 am

      i think this one would be adorable at christmas time with a little green wreath hanging from its knob!

      Reply
    5. Cassie @ Primitive & Proper

      August 25, 2010 at 12:12 am

      i think this one would be adorable at christmas time with a little green wreath hanging from its knob!

      Reply
    6. Erin@likegrandmas

      August 24, 2010 at 5:31 pm

      Terrific!!! This would look perfect on my front porch! Thanks for the great idea!

      Reply
    7. Suzanne

      August 24, 2010 at 4:54 pm

      So cute and it looks like it's a fairly easy project. Love the idea of having a spot to hang a wreath!

      Reply
    8. Proper Prim

      August 24, 2010 at 4:11 pm

      You are a genius... I love everything about this post. Perfect that it has a couple of different looks... could be used as a plant stand also. The knob just finishes it off. I always say mistakes can sometimes be your best friend.

      Another great project from the infamous Gail. Good job.

      Hugs, Deb

      Reply
    9. shannon i olson

      August 24, 2010 at 3:21 pm

      Cute, how much fun is that going to be!!!

      Reply
    10. Jill

      August 24, 2010 at 3:07 pm

      Very cute. I think I like it best without the topper. LOVE the color of it!

      Reply
    11. Kathy

      August 24, 2010 at 2:46 pm

      I saw this listing on Craigslist Nashville for 2.x pieces and thought of you. Are you near enough?http://nashville.craigslist.org/mat/1914510321.html

      Reply
    12. Pam

      August 24, 2010 at 12:44 pm

      Wow....and there you have something you can change out for the seasons....nice

      Reply
    13. Denise

      August 24, 2010 at 12:24 pm

      Love how you can change the signs depending on what season it is! Very creative.

      Reply
    14. Rose @ Confessions of a Curbshopaholic

      August 24, 2010 at 10:15 am

      Way to make good use of your mistakes! It's like the topper was meant to be there all along.
      Cute post and I love the knob too.

      Reply
    15. Vicki

      August 24, 2010 at 7:37 am

      You always amaze me with what you do. This is fabulous and very ingenious too 🙂 Would look great with a hanging pot plant on top with the bits hanging down too. Thanks for showing us.

      Reply

    Primary Sidebar

    Hi, there! I’m Gail Wilson, the author and mastermind behind My Repurposed Life. I’m obsessed with finding potential in unexpected places and believe that with a little hard work and imagination, any old thing can be made useful again—myself included! I hope you’ll enjoy the journey and pick up a few tools along the way… literally!

    More about me →

    Join Our Mailing List

    ​

      Click the topics you're interested in below:

      Subscribing above means you agree to our Privacy Policy​

      Footer

      ↑ back to top

      SEEN ON

      Might I Suggest

      • Start Here
      • Furniture Makeovers

      Newsletter

      • Sign Up! for emails and updates

      About

      • Gail's Favorites on Amazon
      • About

      As an Amazon Associate I earn from qualifying purchases.

      Copyright © 2023 My Repurposed Life · Privacy Policy · Disclosure