IKEA Tarva Hack Challenge
As an Amazon Associate, I earn from qualifying purchases.
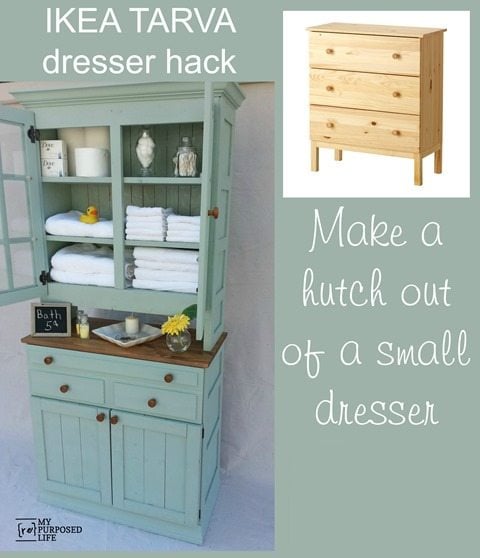
Are you looking for a great IKEA Tarva Hack? You’re in the right place!!

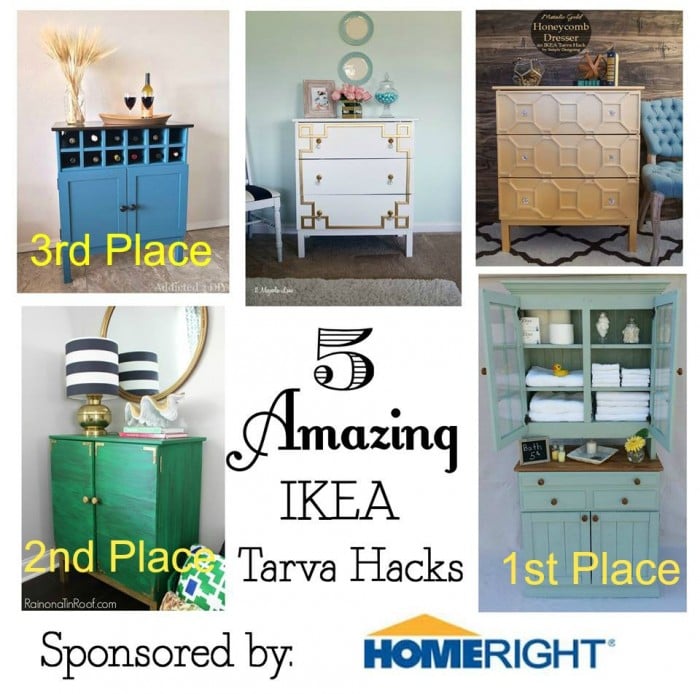
UPDATE: On November 18, 2014 a winner was announced! My IKEA Tarva hack won the HomeRight blogger Challenge.
I am so excited to show you this IKEA Tarva Hack project! Oh, how I love a great challenge. My friends at Homeright offered up 5 IKEA Tarva dressers to their brand ambassadors. The interest was overwhelming, so they did a random drawing the old school way—pulling 5 names out of a hat. Well, I wasn’t actually there, so I’m not positive there was a hat involved, but I was one of the lucky FIVE!
 Just as I was leaving for the Country Living Fair, the dresser arrived. Now, for argument’s sake, I must tell you that I call these pieces of furniture chest of drawers. However, I’ve noticed that most people call them dressers, so in the post, you will hear me refer to it that way. I stored it on a furniture dolly so I could easily move it around when the time came to work on it.
 The nearest IKEA is 90 minutes away, so I don’t own, nor do I have experience putting together their furniture. I laid out all of the pieces. After which, I sort of had an idea of what I wanted to make, but I wasn’t sure it was going to become a reality after seeing the pieces.
 I jumped in and just started putting it together—sort of. I planned on only using one drawer, so I installed the glides for the top drawer. You can see that instead of the lower glides, I installed cleats for shelves.
 I knew that I wanted to cut the legs off a little, but wasn’t sure how much, so I started with 2” off of each leg.
 I built the drawer as per directions, but added some extra durability with my nailer/stapler and some Gorilla Wood Glue.
 It’s coming together, and still sort of resembles an IKEA Tarva dresser. My goal was for people to see my hack and NOT even know it started out as IKEA furniture.
 I tried to use the existing drawer pieces for the shelves, but there weren’t enough leftover materials, so I used some new pine boards.
 This is where my vision takes off. I knew I wanted to go UP with my IKEA Tarva hack. I placed a board on top of the dresser to get a feel for the depth of the top piece. Those who are familiar with My Repurposed Life, know I don’t draw out plans. Even if I did, I’m sure those plans would change as I move forward.
 ![]()
 My cousin was getting rid of a huge hutch over the summer (bottom right), so I decided to repurpose two of the doors for the top part of my IKEA hack cupboard. You can see that I leaned them up against the dresser to see if they would work for the width of the top.
See how I used these doors for another project, Photo Display Wall Shelf.
 Last Spring a friend gave me a bunch of thin pieces of hardwood flooring. As I was thinking about how I wanted to give some character to this new piece, I decided these thin pieces of wood were the perfect touch!
 I got busy cutting some of those floor boards to size, then using Gorilla Wood glue and my nail gun I attached them to the side of the dresser to mimic an antique style dresser. Perfect!
 I used a Kreg Jig to make a front facing for the doors, and the frame for the top part of the hutch with new materials. This is basically a design stage (dry fit) Note the clamp at the top to hold it all together.
 Is it making sense? Are you tired just from trying to keep up with it all? I’m really liking it, but there’s something about that deep drawer that just isn’t working for me.
 After looking at some cupboards online, I noticed some of them had three drawers. One shallow drawer at the top for flatware, with two small drawers beneath it for linens and such. I did NOT want to redo the drawer, so I gave it a faux three drawer look with some of that flooring.
THIS really is my favorite part of the entire IKEA Tarva Hack project. FYI I’m using the wrong side of all of the flooring. It’s a little rough, but I didn’t want to deal with the glossy shine of the right side of the boards.

 Do you see how much the groove from the trim router helps fool the eye into seeing three drawers?
 I patched and sanded the holes and cracks with some drywall spackling. It’s looking a lot less like an IKEA Tarva dresser, don’t cha think?
 I added crown molding trim to the top of the cabinet, then used the Kreg Jig to make some pocket holes to attach the top of the cabinet to the original IKEA Tarva dresser. Bottom right shows how the wood plank will cover up the pocket holes once the cabinet is attached.
 In this photo I am trying to figure out the design for the lower doors. Please ignore the pretty trim on the bottom of the cabinet (that covers up the original IKEA Tarva legs) It was MDF trim, and after the cabinet got heavy, I was moving it and the trim got busted. I had to remove it. NOTE to SELF-don’t use MDF trim.
 Trying to keep with the antique look of this country cupboard, I used more floor planks for the back panel on the bottom (and the top hutch)
 Isn’t this a funny angle? I couldn’t do a dry fit that I always need to do because I didn’t want to attach the doors before painting. SO, I laid it all down on the ground and took a few pics.
 another shot of it on the driveway. Wow! The IKEA Tarva Hack build is nearly complete! Finally!
 It’s time to head to the paint booth to get the fabulous Homeright Finish Max treatment.
 I mixed up some DIY Chalk Paint with some pretty green oops paint.
 I taped up the top of the former IKEA Tarva dresser, but no need to tape up the drawer. The Finish Max has very little over spray.
 It would have taken forever to paint all of these pieces by hand—LOVE my Finish Max paint sprayer!
 I stained the top. Disclaimer here—you may think I do “product placement” for compensation. I do not. I do it so I can remember what I used on everything. If I don’t photograph it, I can’t possibly remember what I used. CASE in POINT. I did not take a picture of the Minwax can on top of this piece, so I’m not exactly sure what color this is. It might be Early American or Golden Oak.
 Finished? nope! I painted the original IKEA Tarva knobs and installed them, but wasn’t really loving it. You can see in this picture that I have installed new trim on the bottom.
 D. Lawless Hardware furnished me with enough knobs to bring it all together. I stained them by wearing a glove and dipping them into the can.
 I patched the knob holes in the glass doors and moved those knobs up to the center of the door.
 It is so difficult to take a picture of glass doors without a reflection. Do you LOVE it? I do! I’m so happy with how it turned out. It really is just as I planned (in my head).
 It’s a perfect storage solution for any room in the house!
 The drawer is nice and deep to hold a lot of needed craft supplies.
 Lots of hidden storage for the bathroom too!

WATCH this short video to help visualize how I made this hutch.
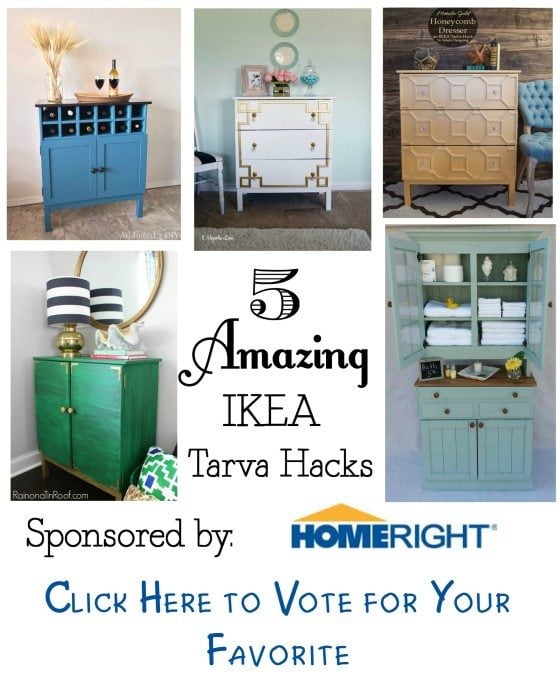
Remember above when I told you there are four other bloggers participating in this challenge? Are you ready to see their awesome hacks? 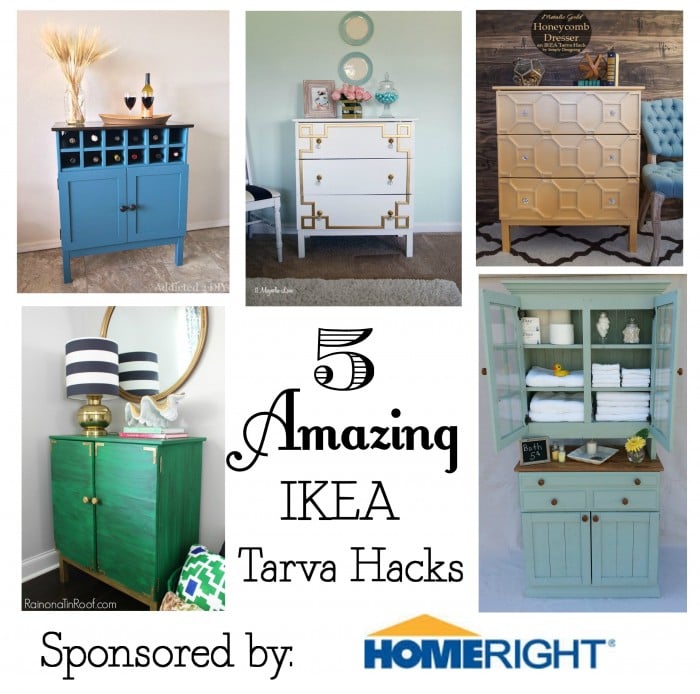

Top left is from Katie @ Addicted 2 DIY.Top (middle) is from Christy @ 11Magnolia Lane Top (right) is from Ashley @ Simply Designing
Bottom (left) is from Jenna @Rain on a Tin Roof Bottom (right) is from Gail @My Repurposed Life
gail
LOOKING for more projects? Sharon’s Be Inspired Party always inspires ME!
See more great projects @ Not Just a Housewife