Kids Dress Up Armoire
As an Amazon Associate, I earn from qualifying purchases.
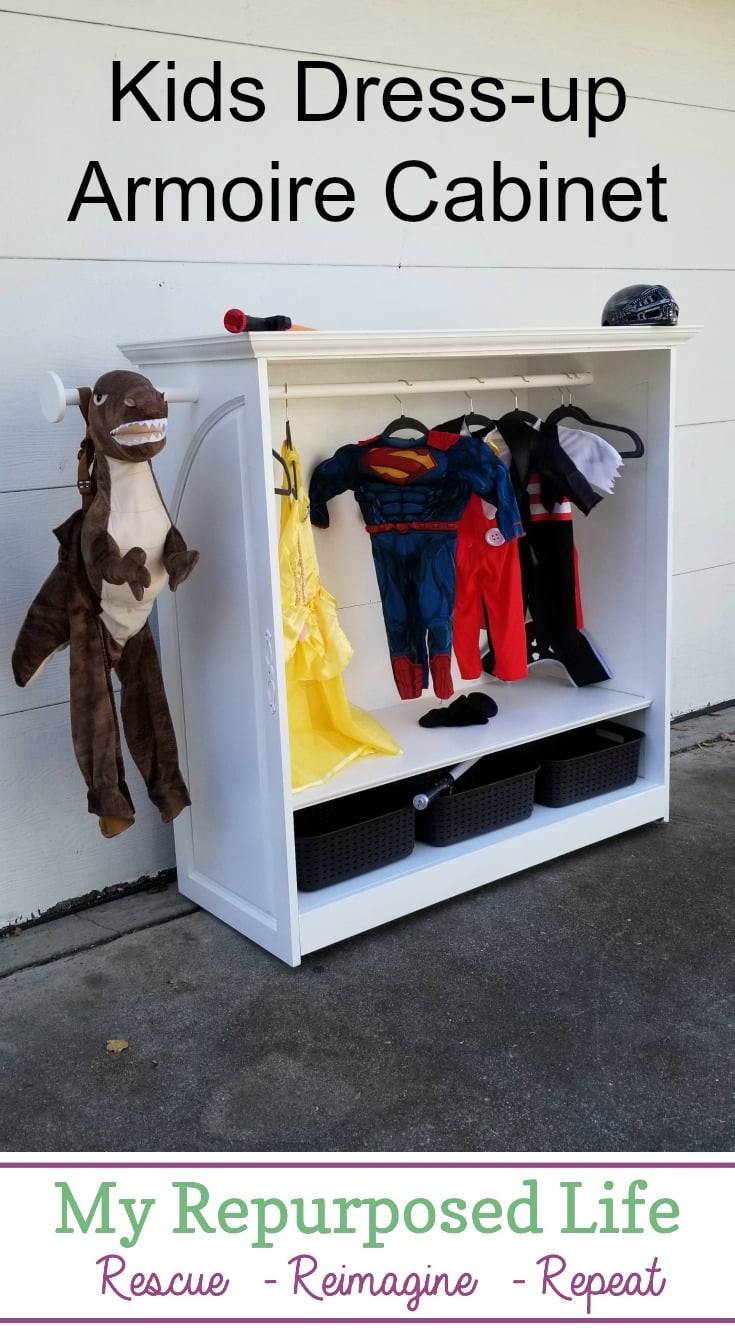
Do your kids love to dress up and pretend? Cousin Terry asked me to make a kids dress up armoire for her sweet grandkids. She dropped off most of the components for the dress up station, and I got busy putting it all together.

This dress up armoire cabinet offers lots of storage for all your children’s creative play!


Don’t you know some children who would love to have this dress up option in their playroom? Of course the size of your project will depend on your materials and your space.
Materials for Dress Up Armoire

Do you recognize these armoire doors? They are part of an entertainment center Terry bought and we modified for her home office. You can read about it in my post Repurposed T.V. Armoire Office Storage. Terry has also given me the smaller doors to use on a future project. The plywood is reclaimed from a fabric store that closed several years ago. I’ll use some odds and ends from my stash to make this dress up armoire come together.

The reclaimed plywood only needed a little trim on the table saw, while the armoire doors needed the hardware and more removed.
*this post contains affiliate links, read more here*
Constructing the Kids Dress Up Armoire

Because I prefer pocket hole joinery, I used my smaller kreg jig clamped to the end of the plywood piece that would become the bottom of the dress up cabinet.
 The top piece of plywood was screwed from the outside of the armoire door into the plywood.

For more stability, a cleat was added under the bottom shelf.
Simple Construction

Thankfully, Terry bought some heavy duty wheels. I put them on temporarily in order to allow me to move this monster about as I worked on it. I ended up making some changes on the wheels, more on that later.

I’m in the process of doing a couple of diy projects around the house, one of those is a small kitchen project. I removed the board and batten backsplash, giving me the perfect board to use as a front apron on the dress up armoire. It was secured using Gorilla wood glue and brad nails.
Why Does The Closet Rod Extend?

During the design stage of the extra touches on the kids dress up armoire, I worked on installing the rod for hanging dress up clothes and worked with baskets to see about a lower shelf. On top of the armoire, you’ll see I have already cut some trim to bring it all together.
In Terry’s mockup drawing, she showed the rod sticking out the left side in order to hang more dress up clothes. I was working really hard to make it just as she had envisioned. ![]()

With the clothes rod extending through the side, I was in need of a creative solution to hold the dress up clothes on the rod. I used an extra large hole saw to cut a disc.
Then (top right photo) I used brad nails to tack the disc on a scrap piece of wood. While it was attached I used a paddle bit to drill a hole the size of the wooden rod, being careful not to drill completely through the wood disc.
The hole the paddle bit made was perfect to allow a screw to attach the disc to the rod.
Finally, I added a screw to the inside of the dress up armoire to secure the wooden closet rod.
How to Plug Large Holes

Because the armoire had large holes, I decided to use wooden plugs instead of trying to patch them. That large hole saw kit has really come in handy. I added Gorilla wood glue and used Irwin quick clamps to hold them until they set up. After the plugs were set up, I used my orbital sander to smooth them out.
Not shown: While I was waiting for the plugs to set up, I worked on installing the top trim. I believe it really adds a lot to the cabinet, don’t you?
Just Add Paint
 Whenever I make a piece like this using so many different bits and pieces, I’m always anxious to get that first coat of diy chalky paint primer on it so that everything matches.
Adding a Lower Shelf

Meanwhile, Terry dropped off another piece of plywood for the lower shelf. I drilled pocket holes and used pocket hole screws to attach the shelf. Using a few scrap fence boards to support the shelf was helpful while attaching it.

The lower shelf offers the perfect nesting place for baskets.
Raising Wheels off the Ground

After wheeling the dress up cabinet around, I realized that the wheels needed just a bit of height to them. I found some scraps, cut them to size and marked them for drilling.

After applying wood glue to the wheel support, I used the nail gun to “tack” the block in place. Finally, I replaced all four wheels which are now the perfect height off the ground.
Easy Painting with Finish Max

Would you believe Terry made yet another trip to my house with some thin plywood for the back?

At last, it was time to paint the dress up armoire with my Finish Max and some semi-gloss white paint. I thought it was finally finished, but I was wrong. Yes, there was more work to do. The seam where the back meets was flopping around a little. How did I fix it? My neighbor Rodney stopped over and he helped me install a support on the back where the seam is. So, then I wasn’t liking the way the raw edge of the plywood was looking . . .
Nobody Likes the Raw Edge of Plywood

Before Vendors’ Village closed, I bought a bunch of $1 baseboards. I used some to make a crate for my Mollky Game. I ripped the routed edge off the baseboards and of course I hung on to them. It turns out that these were the perfect size to trim out the raw edge of the plywood.

My nail gun made this a simple and LAST piece of this puzzle.
White Kids Dress Up Armoire Cabinet

Terry said it’s just how she imagined it would be! That’s a good feeling, to do a custom order and get it right. Because of all the reclaimed material used, the only cost for this DIY Kids dress up armoire was for the wheels and paint.

I would love for you to PIN THIS project for later.
gail
related content:
Kids? I have my own dress up stuff! I have like 5 capes, actually pulled one out this year for Halloween!
Thank you so much for building this! Christmas is right around the corner and I can’t wait to fill it with all the dress up clothes I found for them. I am sure they will love it as much as I do.