Mid Century Hutch | Thrift Store Makeover
As an Amazon Associate, I earn from qualifying purchases.

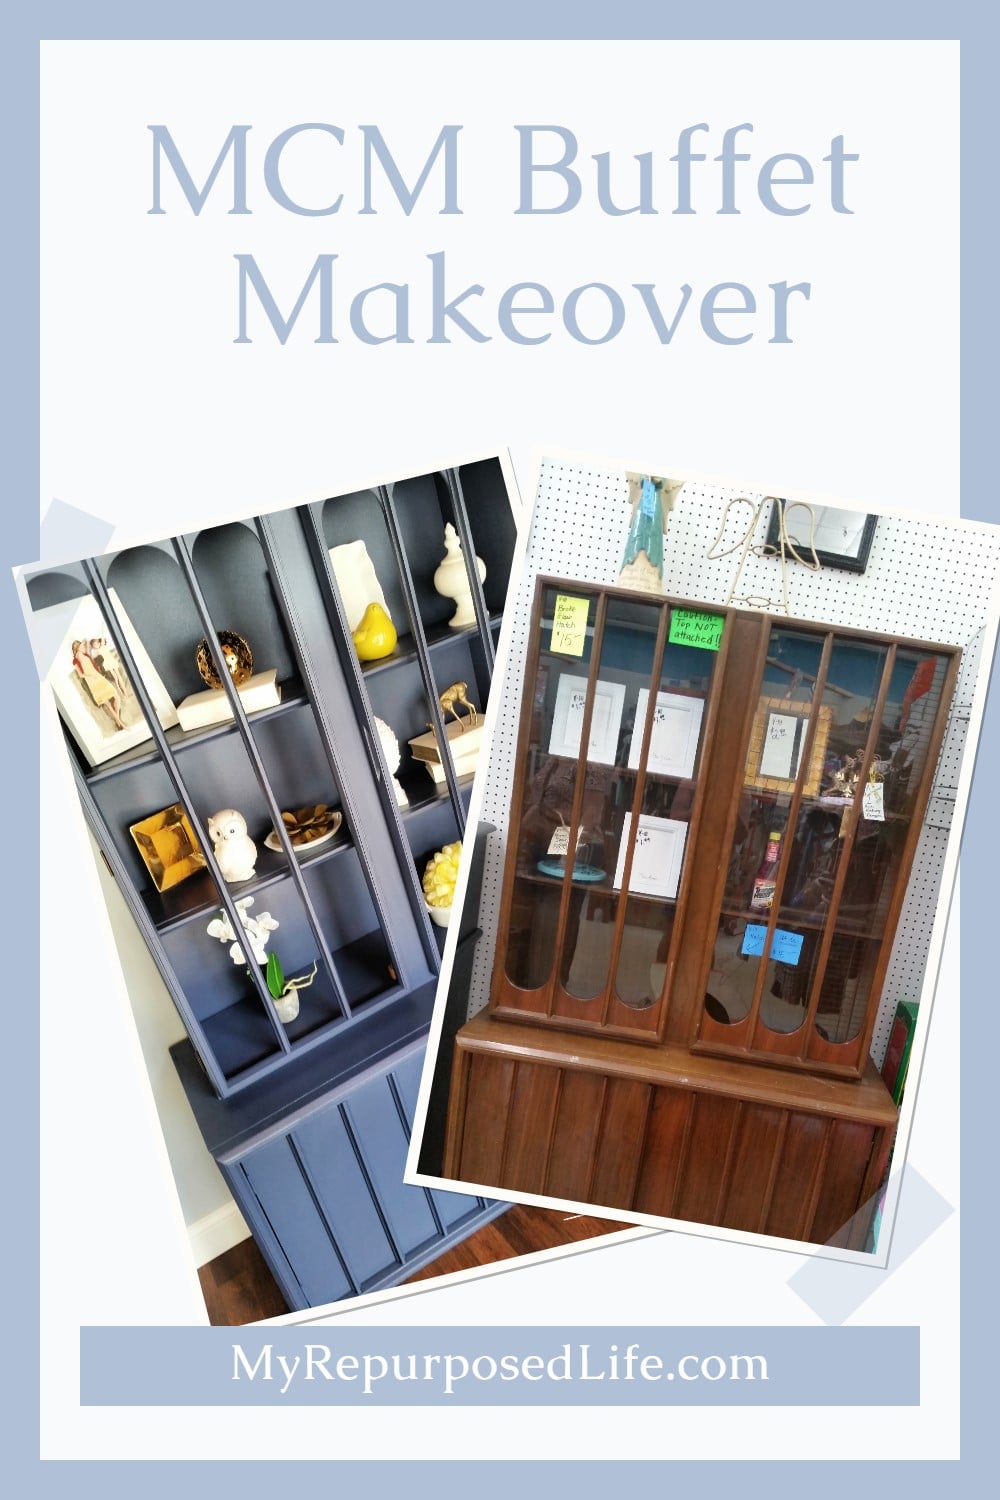
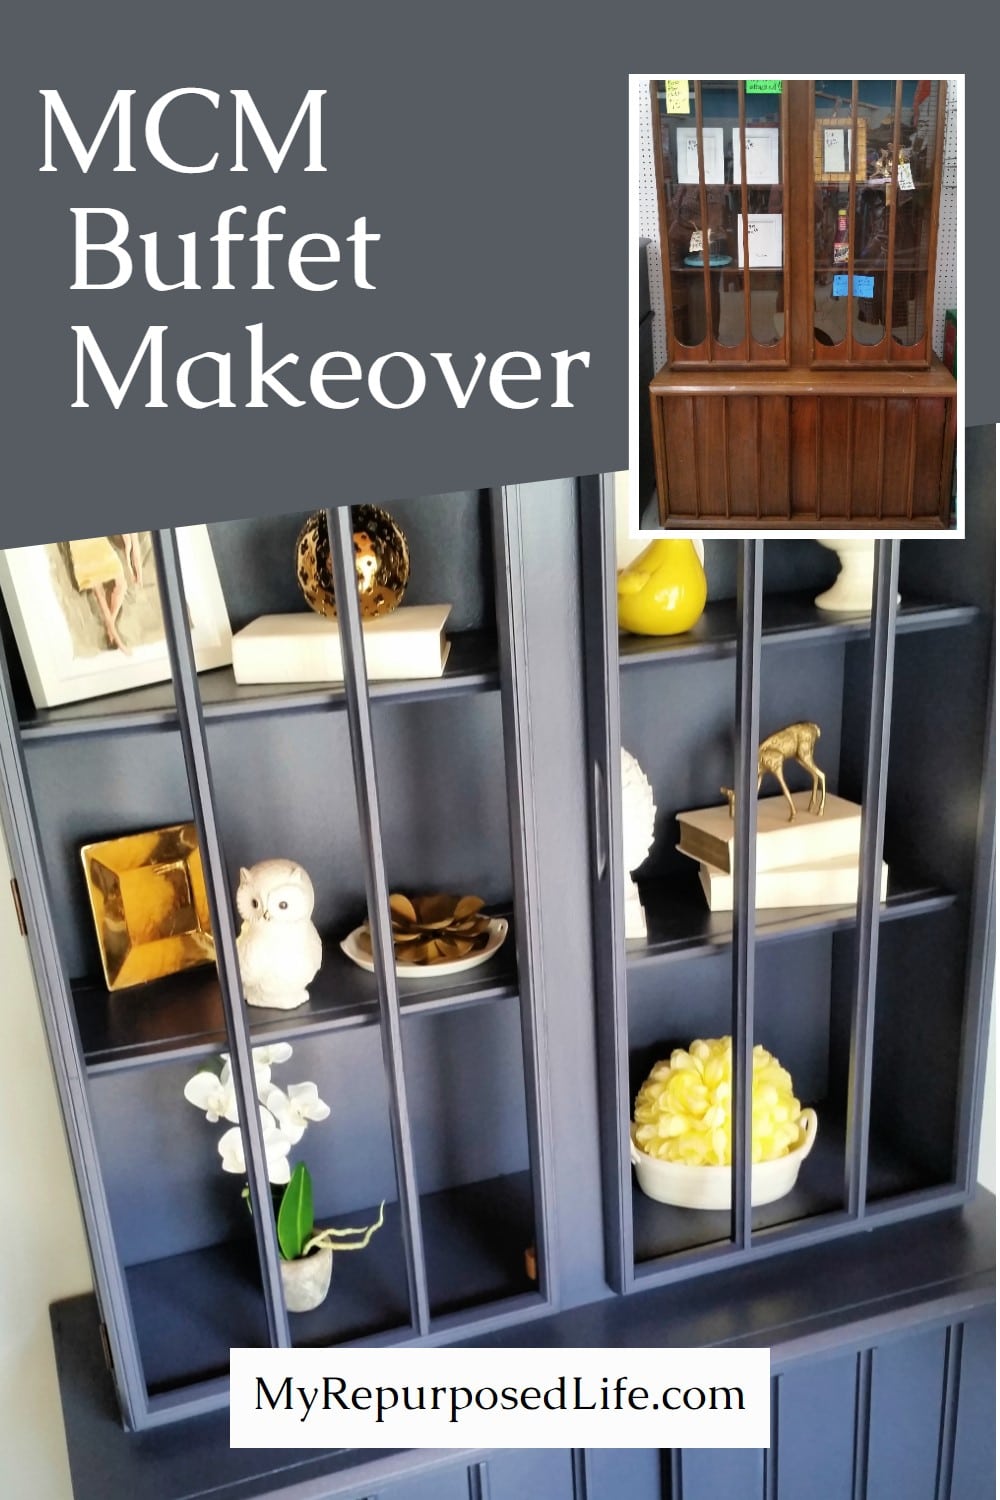
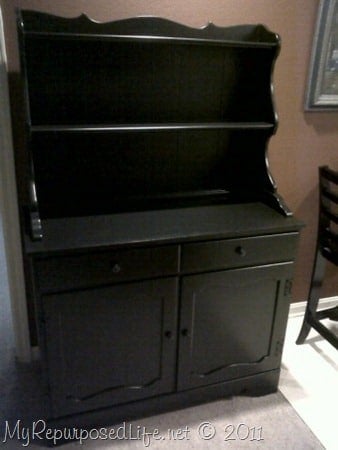
I spotted this mid-century hutch at the thrift store for $15, and I could not leave it behind. The catch was simple. One pane of glass was broken, and the bottom edges had the pressed-wood-under-veneer condition that does not play well with refinishing. So I did what I do best and gave it a paint makeover, plus a few practical fixes along the way.
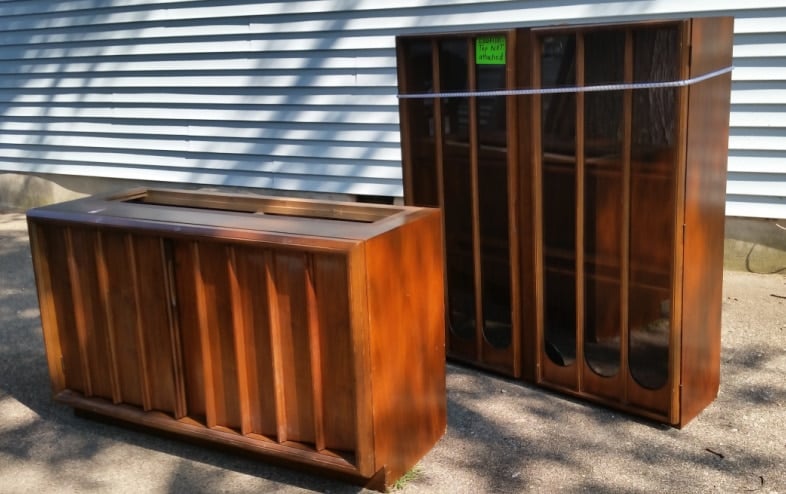
Thrift Store Mid-Century Hutch
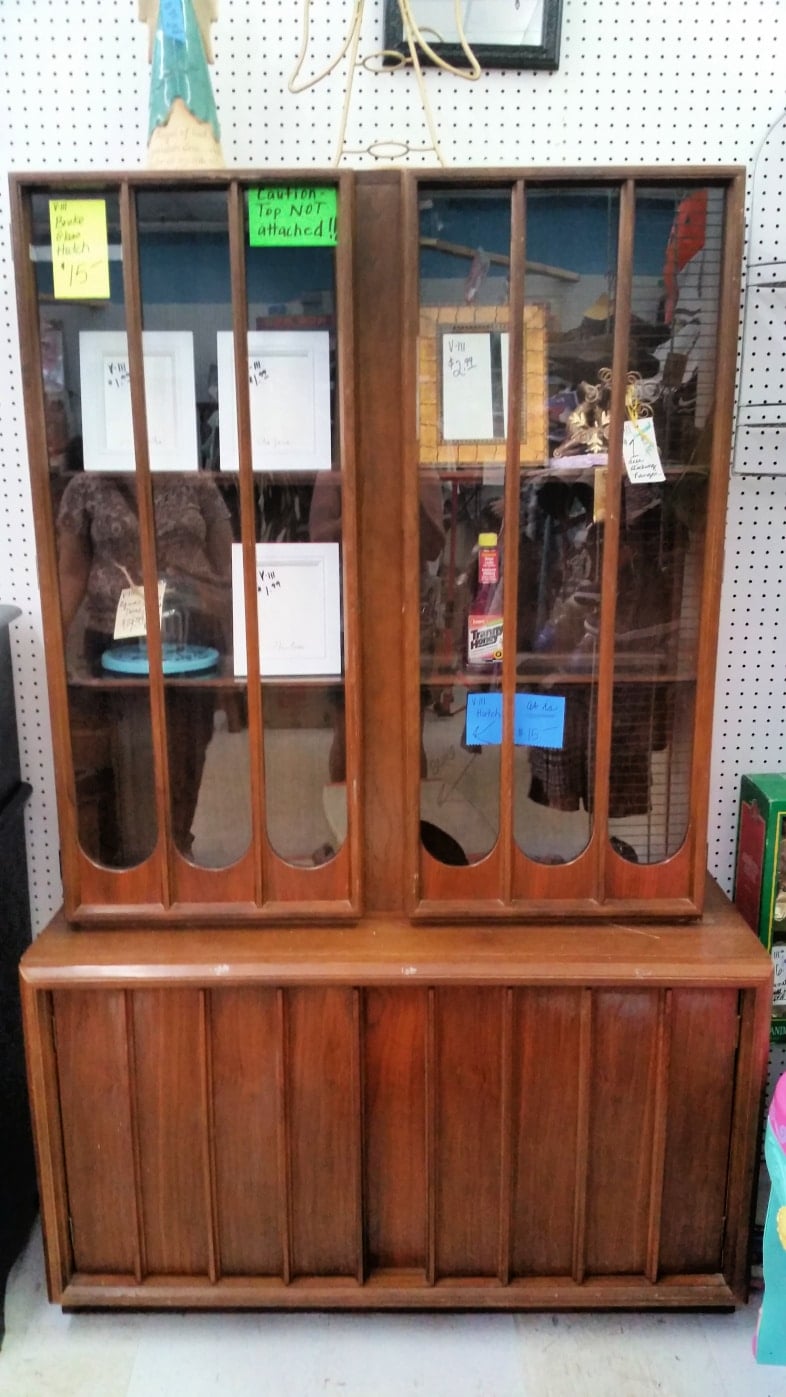
Other than that, it was in good condition, except for the side edges of the bottom. This is pressed wood under veneer, so refinishing it wasn’t an option.
Can you see the bottom edge here? And the broken pane of glass?
Preparing to Paint MCM Hutch
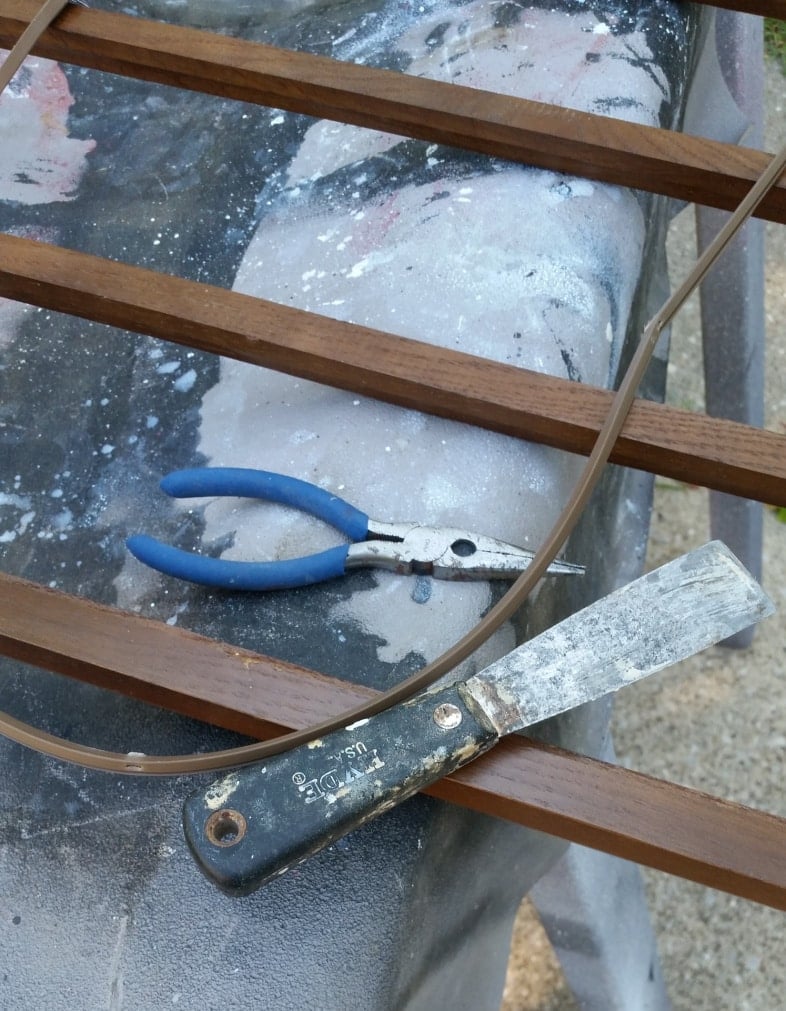
A putty knife and needle-nose pliers were used to remove the glass from the mid-century modern hutch.
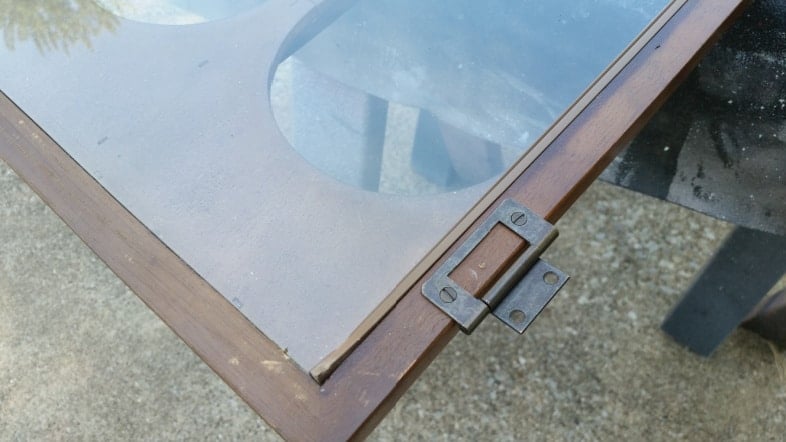
This is how the glass was secured in the cabinet. I took a picture of the hinges to know how to reattach them when the time was right. Tip: Take photos that will enable you to reassemble your project.
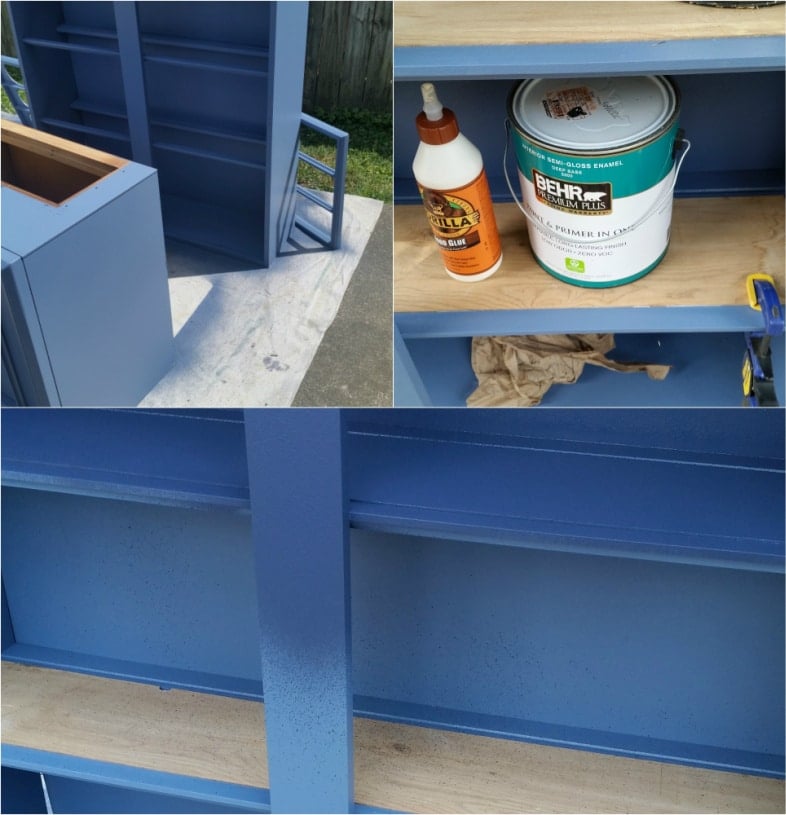
Step 1 Clean and Degrease
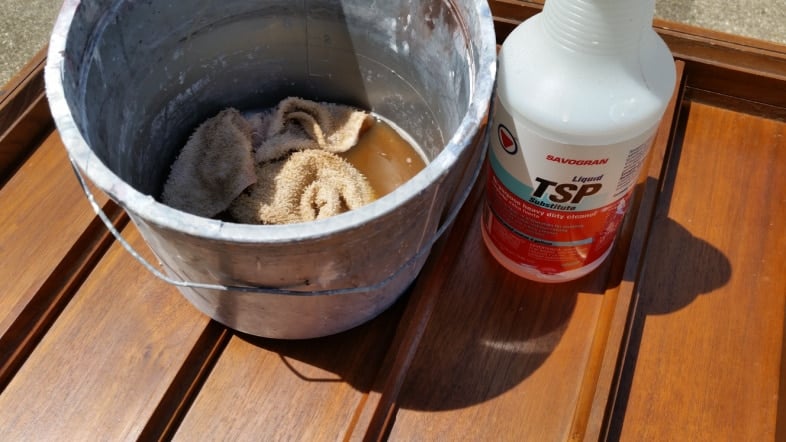
When you buy thrift store furniture, you never know what it’s been through or where it has been stored. TSP is an excellent cleaner/degreaser to remove grease, grime, and nicotine. Look how dirty the water is in the bucket.
Excellent All-Purpose Paint For Thrift Store Projects
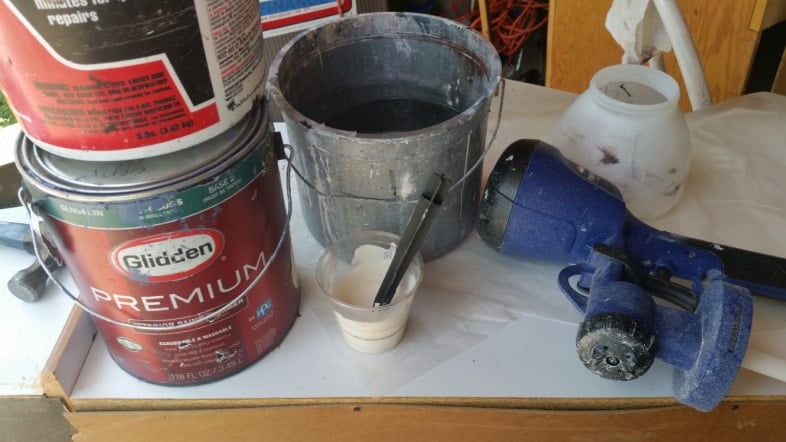
My new best friend, the Homeright Finish Max Super, is becoming well-loved and broken in. I mixed up some DIY chalky paint primer using some blue oops paint and plaster of paris.
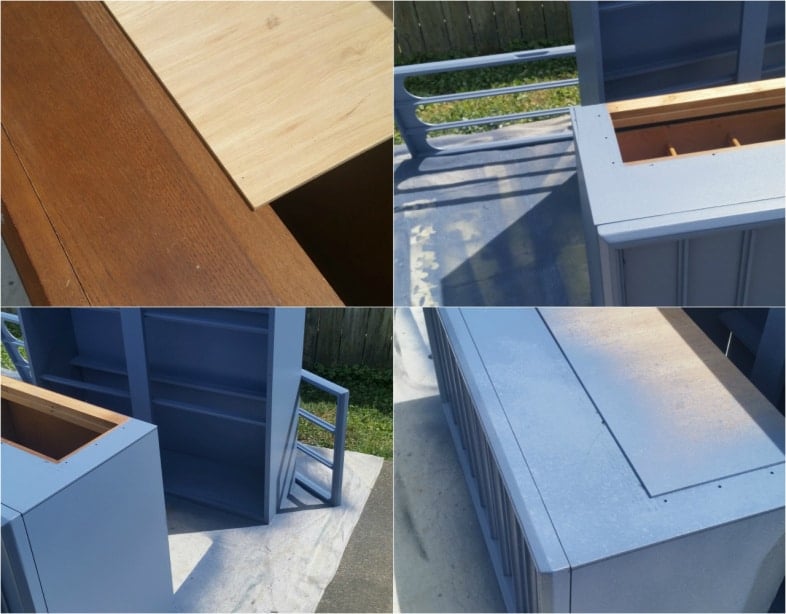
Leaving the original inside the bottom cabinet wasn’t a difficult decision for me. When a cabinet is used for storage, paint can be scratched. For this reason, I prefer not to paint the inside of storage pieces. I used a scrap piece of thin plywood to prevent overspray inside the lower cabinet.
Thinking that I would leave the MCM hutch a dark blue; however, it wasn’t the color I intended. I got the color mixed up with another, oops, blue.
Replacing Glass Shelves With Wooden Shelves
Did you notice that the buffet was missing shelves? They were glass and were broken upon arrival at my home. Honestly, I have no idea whether they were already damaged or whether they broke during a “load” shift in the truck. I had no idea the shelves were glass when I bought the furniture piece, or I would have transported them separately. In the bottom image, you can see the difference in the blue paint color.
Related Content: Navy Blue Furniture Projects
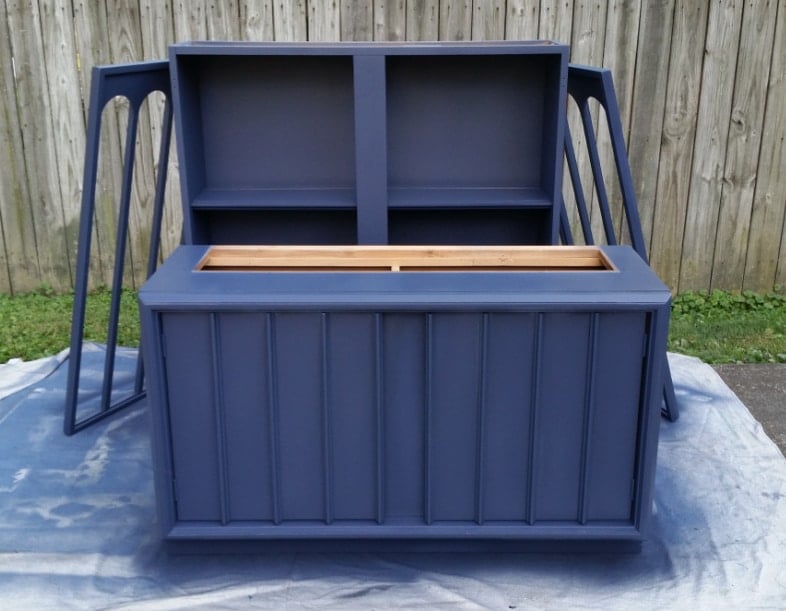
The buffet is beautiful after two light coats of the chalky paint primer and two light coats of the navy (dark denim) top coat!
Replace Hardware
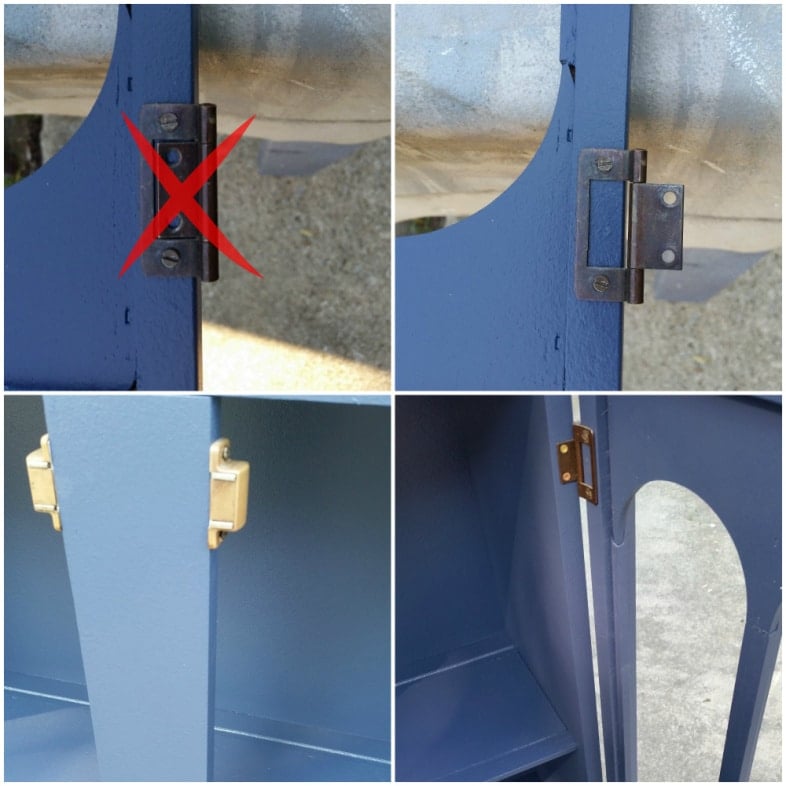
It’s time to reinstall the hardware. The top-left photo shows that I installed the hinge incorrectly, even after looking at the picture. I was not paying attention to the knuckle. It needed to rest beside the edge of the door. I also added the magnet closures and the plates that line up with the magnets.
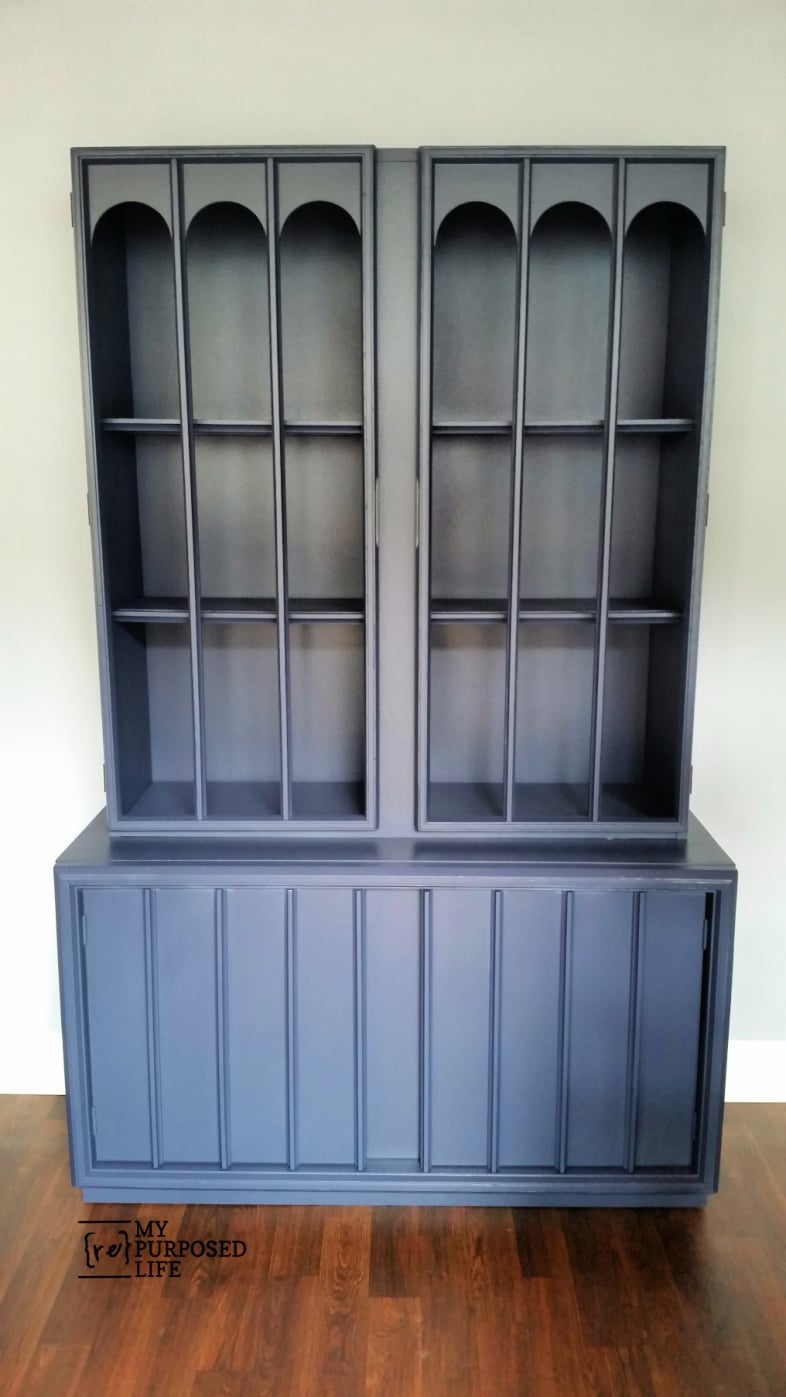
The plan was to add some decorative brass metal where the glass had been. The pieces I had were not large enough. I didn’t want to invest any more money in the buffet at this time. I’d love to hear your thoughts on what you would do with the naked hutch doors.
EDITED TO ADD: Melanie on FB said, “I liked the doors hung the original way. But besides that, it is awesome.” Too funny! I didn’t even realize I hung the doors upside down. So, now I have another question for you . . . should I FLIP them back?
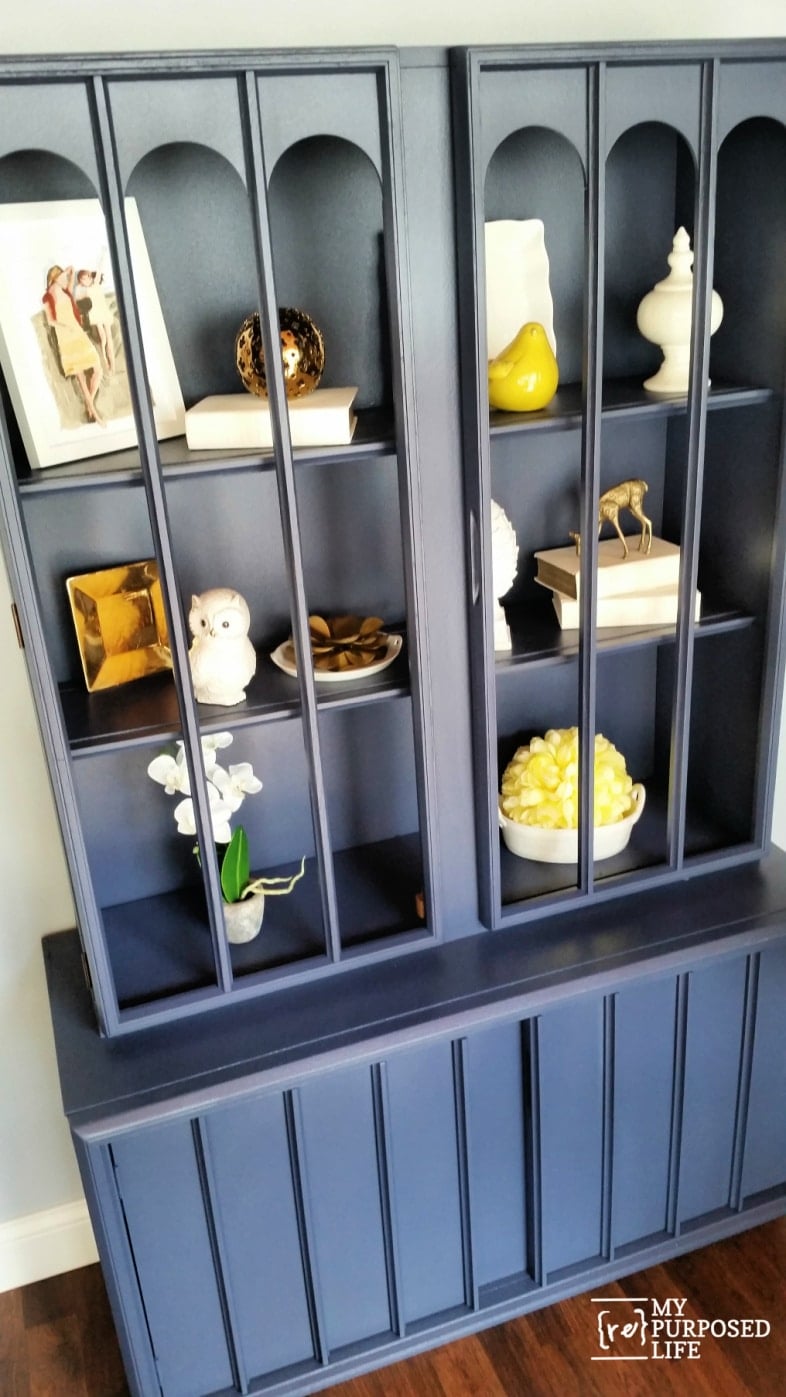
For now, I added some pieces to take pictures, and being without glass made it much easier to photograph.
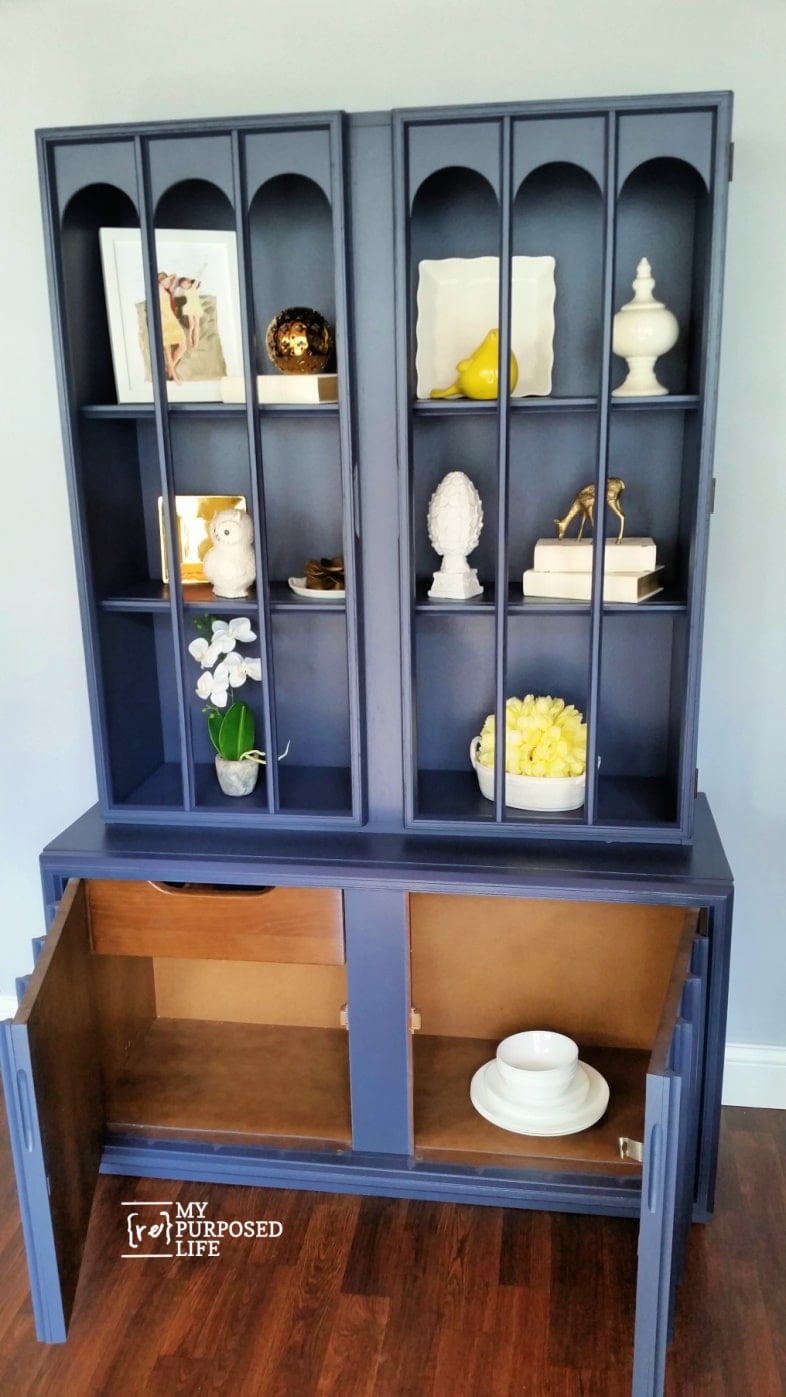
You can see that I didn’t paint the inside of the bottom cabinet.
I would love for you to PIN IT!
This navy blue mid-century hutch turned out so pretty, but I am still torn about those doors. Do you like the “no glass” look, or would you add decorative metal, replace the panes, and call it done? Either way, I hope the prep and paint steps help you feel brave enough to rescue a flawed thrift-store find. Leave me your vote in the comments, and if you want to save the idea for later, go ahead and pin it.
gail
See other buffets I’ve done below:
I like the doors hung the “new way” better! and It is soooooo beautiful. That shade of blue is perfection! Love that you always show us when you “make a mistake”. Because we newbies are ALWAYS making mistakes. You remind us that even the pros screw up every once in a while!
Ohhh Susan! I am far from perfect and I don’t mind sharing my mistakes if it helps my friends get better results.
Thanks for stopping by, and leaving such a kind comment.
gail
I think it looks beautiful the way it is. If someone who buys it wants glass, they can buy it.The doors look fine, too.
Thank you Donna Marie!
gail
I actually thought that the door were upside down in your original picture and I hoped that you would switch it with the arches on top. It looks more intentional and finished to me.
I love the blue, but would personally prefer a shine rather than a matt finish on this piece. It would add to the simple elegance of the piece.
Sorry I don’t have enough experience with options for replacing the glass, other than just that, replacing the glass… 🤔
Evie,
You have a keen eye about the doors. 🙂
I hear what you’re saying about the shine. Thanks so much for sharing your thoughts with us!
gail
I love the blue color and even if the doors are upside down I think it gives it character. Awesome job😃💙🩵💙
Thank you Kim. I love navy blue furniture projects. Love the blue hearts you added in your comment. Cute!
gail
Thanks for sharing ! This is now a beautiful piece.
I love the color.
I do think the doors are upside down, but who knows …?
Yes – the glass is important for displaying items and less dust.
Chicken wire would not look good on a MCM piece.
I think this is my fav of your redo’s 🙂
Yes !!! Feet would be a great addition.
Thank you so much for your awesome (thorough) comment! It made me smile that this is your favorite!!
gail
The color is fabulous! Once staged it takes on a new look. I like the doors on upside down. It gives the hutch a more elegant look. If you decide to put on handles, brass would give it an extra punch!
Thank you Frances for your comment. I appreciate you stopping by to read my article.
gail
Did the glass in the doors break? I like seeing the items displayed so I vote for the glass back.
I think the doors look great both ways.
Theresa,
Yes, some of the glass broke. Thanks for sharing your thoughts with us.
gail
The thrift shop didn’t know what they had. See this: https://sweetmodern.com/products/vintage-brutalist-style-china-cabinet-/45439/c90/
amazing ! it’s the same piece!
Hi could you please share the primer and the paint brand and colors you used?
Hi,
I used an “oops” color from Home Depot. It was on clearance because someone didn’t take it after it was mixed. Typically after the person refuses the paint, the employees will add more tint to it to change the color so the customer can’t come back to get it at a discounted price. (at least that’s what I’ve been told)
So, I’m sorry, I can’t tell you the name of the color. The primer was mixed using the oops paint and some plaster of paris. I always do this to give the paint a really flat sheen in order for the topcoat to adhere.
gail
Thank you so much for sharing this! It looks great!! I have this EXACT hutch which was my Grandparents. It was a fixture in their dining room before I was born. When my Grandfather passed no one wanted it. So I took the whole set tables and chairs included. It has been sitting in my spare room since I got it home. Now I am doing that room over and want to paint it. My Grandfather hated painted future which is why I never did anything with it but I really have no choice but to paint it if I want to actually use and enjoy this piece. I found the original advertisement in the silverware draw. The name of this collection is Keller Furniture Dimension VII. If you could share what you used for paints and primers I would be grateful. If you want me to send you a picture of the advisement let me know… Thanks again for sharing everything you did step by step. .
Lisa,
That is so awesome that you have the entire set. Thanks for the information on the name of the collection.
As I say in the blog post, I used my own homemade primer with the oops navy blue paint I had on hand. I prefer to make my own primer with the plaster of Paris. (link in the post for the directions.
Then I use that same paint without the plaster as the topcoat. Generally, it’s a satin or semi-gloss, depending on what I have on hand. Mixing some of the paint with the plaster makes it have a very flat sheen that adheres very well. Then a few coats of the paint right out of the can protects the flat paint from chipping etc.
have fun, and good luck!!
gail
Thank you Gail for all your great info and help. BTW you have hung the doors the correct way. The arches on the top is how it was set up at my Grandparents house. I am thinking of painting it white with (MAYBE gold trim) but not 100% sure about the gold as I don’t want it to look tacky. I am going using it at a bookcase for my glam room that I am currently working on right now which was a spare room that was COVERED in s ugly wallpaper. I don’t have the heart to get rid of the whole set but I want to at least keep the hutch and actually us it. The room will have white and gold accents if that helps.. Let me know your thoughts.. Thanks again <3
That sounds awesome Lisa. We could all use more glam in our lives. I think your grandparents would understand, and want you to be happy with whatever you do!!
Glad to know I hung the doors right. It has been rehomed, I hope the new family loves it.
gail
I just bought this same piece today at an estate sale. Not quite as cheap, but still a good deal at $50. Mine had the arches at the top, but I prefer them at the bottom. Mine also had peg legs. // I didn’t take a photo and I’m not picking up until next weekend, but I thought it was marked “Miller” inside the left lower door. Did you see any markings on yours?
I don’t remember there being any markings in the hutch.
Enjoy your new project!
gail
I did some research and had another look inside. The brand is Keller and this hutch – Colonnade – typically sells for between $300-$600. I’m just going to clean mine and keep the arches at the top. Thanks for the inspiration with all your fantastic makeovers!
I just bought this exact same hutch TODAY for a steal and found this on Pinterest! I’m so excited to refinish mine. In reviewing your site, someone mentioned the doors were hung upside down. They’re actually hung correctly the way you have them!! Beautiful piece!
How fun that you bought the twin! What do you plan to do with yours?
Thanks for stopping by and taking the time to leave a comment, happy you found it on Pinterest!
gail
If it’s in good shape, don’t refinish it. I painted the Keller Colonnade Hutch sells for between $309 and $800. 1stdibs has it at $1,300. It’s a valuable Mid-Century Modern piece.
Unpainted, not “I painted.” The unpainted hutch is valuable.
Gail,
I like the blue/gray finish on your refinishing of the hutch. I also like the doors better with the arches at the top. It would be nice to replace the glass that was broken. Would acrylic or plexiglas be less expensive?
Barb,
I’ve been so busy around the house I haven’t checked into replacing the glass with anything yet. I will probably try to sell it as is, including the one piece of glass I have in case someone wants to replace the glass, they will only have to buy one piece. 🙂
gail