Repurposed Chair Bench
As an Amazon Associate, I earn from qualifying purchases.
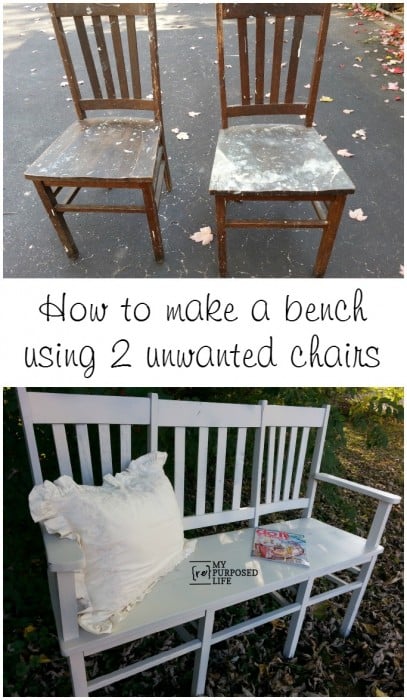
I have always wanted to do a repurposed chair bench project like this—ever since my friend Rose made a triple chair bench back in 2009. The problem is, I’ve never had 3 chairs that match.

I got those chairs two years ago. A friend dropped some stuff off by the house while I was out of town.
 Then in June, our contributor Mindi made a triple chair bench of of two old chairs. That was my AHA moment! Thank you Mindi for inspiring me to make my own bench.
How to design a repurposed chair bench
 This is the design stage of my bench. Much of it is just like Mindi’s design. The first step was to remove the wooden seats, then use some scrap wood pieces to join the two chairs together. I used my clamps to hold everything together as I worked it all out. I had just the perfect pieces to make up the seat.
Using a router to add slats
 To make the faux third (middle) chair, I needed to add some slats. I used a 1/4” straight bit in my router to make grooves for the slats.
 This is how I attached the middle of the repurposed chair bench. I used pocket holes to attach the top and bottom of the new chair back. I used Gorilla Wood Glue to hold the slats in place. The slats were ripped on the table saw from a 2×6.
Kreg Jig Pocket Hole Joinery
 I also used my Kreg jig to attach the front and back braces that would join the left and right chairs together to make the third chair in the middle.
Need more details on using a Kreg Jig? See my article How to use a Kreg Jig Pocket Hole System
Use original chair seat as a pattern
 To make my bench look like it really was from chair seats, I used the original seats to trace a pattern on the 3 1x’s.
 It sort of looks like three chairs, right? I really do like the shape of the seat. I may do something like this on the next headboard bench I make.
 When I started this project, I thought “I should add arms”. This is me just trying to figure out how I want to do that.
Should I add arms to the repurposed chair bench?
 Initially I thought I would use the arms left over from this butchered rocking chair. They were too long.
 I found some hardwood scraps in my stash. I cut them to size, and nailed the two pieces together. Then I used the arm of the rocking chair to trace a pattern, cutting it (them) with the jigsaw.
 They look a little funny, but I’m okay with that. I cut and sanded them while they were connected together with the nails from my nail gun. This is before I separated them.
 There is definitely a left and a right arm rest. I think this left one ended up on the right side.
 ![]()
 I screwed through the armrest into the brace. Then, I used pocket holes to attach the armrest to the chair and the brace to the seat. I had already begun the process of patching the holes when I remembered to take pictures.
Using a Finish Max Paint Sprayer
 Off it goes to the paint booth for some DIY Chalk Paint Primer with my HomeRight Finish Max. Speaking of the Finish Max—HomeRight has a new part for this paint sprayer that will make it easier to clean. Check out their new Foam Splash Guards in my latest contributor post HomeRight adds Foam Splash Guards to Finish Max Sprayer. You will also get some paint tips from me over there.
 As soon as I got it out of the paint booth, I noticed that a little something was missing. Do you see it?
 To make that middle (third) chair LOOK like a chair I needed to add that piece in the middle. Wouldn’t it be great if I knew what these chair parts were called?
 ![]() I added it by using pocket holes—easy fix.
I added it by using pocket holes—easy fix.
 Back to the paint booth for a topcoat of a sort of creamy white that I mixed up. It is also chalky paint. Click this link for more HomeRight Sprayer Projects


How to use an auto buffer for furniture wax
 I used my AutoRight buffer to apply and buff the wax. To apply the wax, I use a foam applicator, and then use this blue bonnet to buff the wax. You can see more details in my post Plastic Radio Cabinet Makeover.
 After waxing, buffing, and a little distressing.
Finally, I can check this off of my to-do list!!! Plus I got two more pieces of furniture out of storage. ![]() Win/Win!
Win/Win!
gail
See one of my first, and an all-time favorite chair projects here
Impressive and inspiring! Make some more saw dust.
Awesome! We get a lot of requests for benches. Can you make me some?
That is awesome, Gail! My favourite part is the routed out grooves for the slats!!!!!!!!!
Looks wonderful Gail! I’ve never made one of these but think I will have to add it to my list. 🙂
This is great Gail!
I got the idea here I think you might have featured Roses 3 chair bench…and I made one. My very first Kreg Jig post!
I think I’ve finally gotten the hang of that fancy not to mention HANDY little tool. You’ve done some much to introduce new products that make life easier…INTO MY LIFE!
Thank you for that!
I like the way your bench turned out. I would make one again if given the chance. I use mine everyday and it holds about 4 little bottoms for lunch! Ha! My grand kids love my 3 chair bench. I need to get one of these handy Homeright sprayers… and REPAINT MINE. It has gotten some abuse since I first built it.
have a great HUMP DAY!
Patricia
I love your bench from chairs, Gail. It would be so great in an entryway. I’ll be getting one of those foam do-hickies for my sprayer. Thanks for sharing!
I can’t believe you made the middle section! It looks all so seamless, great job Gail! And I love that new filter splash guard HomeRight came out with, that was genius on their part.
Yea!! It looks fantastic Gail! I love how you added the slats in your “third chair” very cool, and the arm rests look great! I also like how you traced the seat, it is the finishing touches that make a difference! I am so happy you finally got to finish your three chair bench!
You must be an amazing puzzle-builder, based on how you build furniture! Great work.
Pinned it. We watched a Flea Market Flip where the ladies “tried” to do a bench chair. They should of consulted with you, that’s all I’m saying!
Nice job! I’ve seen quite a few of these chair-bench projects and haven’t liked a bunch of them because they look a little mismatched and odd. Yours is perfect! Love the gallery you shared too! xox
That part of the chair is called the apron…This bench is awesome!!!!!