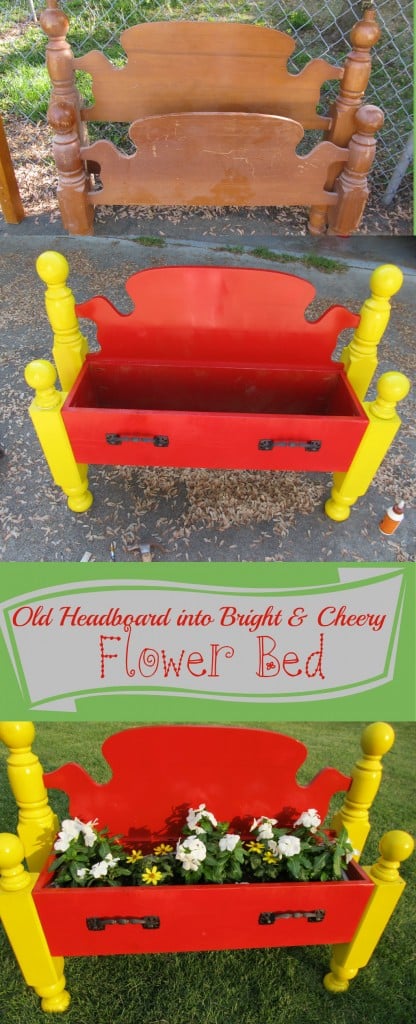
Repurposed Headboard into a Flower Bed
As an Amazon Associate, I earn from qualifying purchases.
This is a long {tutorial} post, to show you how to make a flower planter from a repurposed headboard. It is very picture heavy. If you want details, feel free to read all the tips. If you’re like me, you’ll skim over the words, and just look at the pictures.

I’ve been trying to get back into working on larger projects, but still resting my shoulder every other day or so. Some days are okay, others are still quite painful. But you’re not here to hear about that, you’re here to see this great repurpose of a headboard.
This post contains affiliate links
 I started with the taller of these two pieces. I used the shorter one for this bench made from a chest of drawers.
 This is a picture of me trying to figure out the design. I have the sides of the box sitting on the back board.
 I decided to cut the back board, and have the sides rest in between the back board and the sides of the bedposts.
This Post Contains Affiliate Links
 To build the box I use my Kreg Jig and one of their fabulous face clamps. It fits so nicely into the clamp and it allows the jig to be easily moved from spot to spot.
 Because the box is small, I was unable to use the drill to install the Stainless Steel Pocket-Hole Screws
. I used a ratchet screw driver.
 TIP: to hold the front on while I install the screws, I popped a couple of brad nails into the board.
 Now, I can easily apply pressure to install the screws.
 The box is complete and attached to the bed. I used extra long screws on the left and right pocket holes (in the back) which allowed them to be screwed through the side boards directly into the side bedposts. I also installed some screws through the back of the headboard into the box.
In the picture, I’m testing out some legs. These were the perfect height already.
 Because this is going to be a planter, I opted for slats in the bottom instead of a full sized board. The slats will allow water to drain. I used a sharpie to get the board even all the way across. I drilled pocket holes and used pocket hole screws to attach the slats.
 Meanwhile I’m not happy with the green legs, so I move on to plan b. I’ve had these tall bedposts for a long, long time.
 They are from this headboard I parted out. Sad to say, I believe I threw this out to the garbage. Would I throw it away today? Nope, I would make a sign and/or a shelf from it. This picture was taken three years ago.
 ![]()
 The bedposts are way too tall, so I cut them off. Look at that sweet piece on the right that was left after cutting off the tall bedposts.
 Dry fit.
 This was a bunk bed and I didn’t want that piece on the top. I used my Dremel Multi-Max to do a flush cut and ZAP! it was gone.
 Easy peasy! I used my orbital sander to smooth out the part I removed.
 Looks good, eh? This is a good angle to see how I did the slats across the bottom.
 I received some Krylon spray paint for Spring Fling, I decide to go with this bright yellow. I don’t have enough, so I use the green for the inside of the box and the bottom.
 Into the paint booth it goes to get it’s makeover.
 I have a change of plans, and happily paint the bed with my Krylon Banner red. Bad move, do you see the Grinch?
 I move on to other business. The bedposts I’m using for the front legs have those huge slots for the bed rails. In order to fill the void, I grab some scrap shutter/bi-fold door slats and cut them to size, and stuff them in the hole.
 Here is the after! After putting the slats in there, I used spackling to fill the cracks. It wasn’t until I saw this picture that I realized I didn’t fill the holes. LOL
 I start taping off the red portions of the flower bed so I can paint the posts. You can see that I used more red for the inside of the box to get rid of the Grinch.
 After lots of tape and newspaper, it’s ready to be painted.
 A few portions of the bed didn’t take the paint very well. I don’t always follow directions like I’m suppose to. I really should have washed the bed down. I think it had some waxy residue, maybe some pledge?
p.s. are you still with me? is anyone actually reading all of this?
 I think the red against the yellow is very cheery, don’t you?
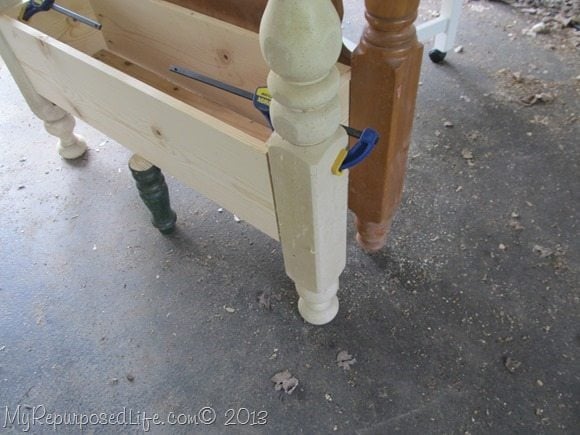
 I get down to business of attaching the front legs. I use the level and a clamp to make sure the legs are in the right position.
 After drilling some pilot holes, I used some extra long screws and drove them from the box into the front bedposts.
 The grinch is gone, but now I’m feeling like I want a hot dog with some mustard and ketchup.
 I knew from the very beginning that I wanted the box to resemble a drawer. In fact I was initially going to use a drawer, but I didn’t have one large enough. I root around to find some hardware.
 I chose these large handles and ended up spray painting them black.
 I suppose there’s something to be said for collecting junk. I needed something for the front legs, and sure enough, I had these perfect pieces in the basement, just waiting to be given a useful purpose.
 While the top posts are drying, I attach the hardware to the front of the box.
 Does it make you smile? I’m really loving it!
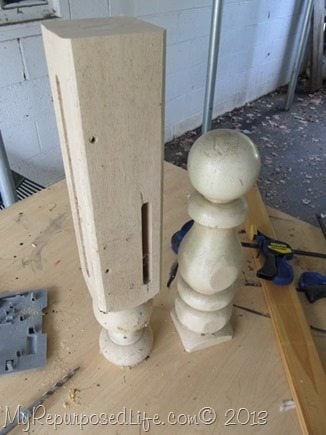
 It’s time to attach the top posts which already had holes in them. . I drilled a hole in the post and glued a dowel in place. I then placed the Gorilla wood glue into the hole and slid the top post onto the dowel.
 There ya go!, so much better!
 What kind of flowers would you plant in this “flower bed”? What kind and what color?
Want to see more headboard projects?
See my favorite Mission Style Headboard Bench with Storage-The Complete Tutorial
gail

I really love this project and weds it is awesome. About 4 years ago I got a head board for free, it’s been waiting for this project. Is there any way that or place I could get a price out of the instructions to make this with dad? He would needs to have some kind of print out to be able to see the how to. And what would you suggest as a protective coat after painting. Again this site is so wonderful.
Beth,
I have emailed you a copy of the post, you should be able to print it out from there.
Thanks for your kind words, have fun with the project!!
gail
WHEN I FIRST SAW THIS I THOUGHT IT WAS A TOY BOX W/OUT A LID. UPON READING THE INSTRUCTIONS, I SEE DIFFERENTLY. LOVE THE IDEA, BRIGHT PRETTY COLORS TO ATTRACT BEE’S TO POLLINATE THE FLOWERS.
I’VE GOT A BED FRAME EXACTLY LIKE THE ONE SHOWN AND ONE W/TALLER END RAILS, SO I THINK I’LL MAKE BOTH A FLOWER BOX AND A TOY BOX W/1 DEEP DRAWER. TY
thanks so much Joyce!
I appreciate you taking the time to leave a comment. Have fun with your projects!!!
gail
Gail, I love this post. Thanks for the step by step as I am trying to put together a headboard bench myself. Wish me luck!
~Tami
I have a double bed head and footboard and a head and foot board from a bunkbed. Since I have been reading all your posts I am always on the lookout. Got them both “free on the curb” sort of thing. I wanted to make benches out of them. My neighbors around me in my townhouse are so curious as to why I have this JUNK. Thanks to this detailed post I have an idea as to how I can do it. Wish I had all your great tools but I still will do it.
Painted an old desk and end table with the chaulk paint yesterday. Is it supose to look like pudding? Oh, forgot to take before pictures, so eager to just get started. Your my inspiration to do all the things I alway wanted to do.
Thanks so much Gail!
Diane
I just have a question. seeing how usually wood from a headboard or bed is designed to be used inside did u seal the wood ahead of time to prevent it from warping? I have a interior door I plan on turning into a outdoor patio table. and figured it would be a good size.
Stephanie,
I didn’t seal it, but I did use Krylon Spray paint which is for outdoor use. If using latex paint, I suggest a marine varnish/polyurethane to seal your door.
gail
Cute as can be! (And I did read your entire tutorial!)
I love this Gail!!! It is so fun to see one of your creative builds! Totally inspiring! and I too read every word, of course!!! It will look so cute in your yard, I can’t tell you what kind of flowers, but I would love white daisies!