Repurposed Sewing Table Stenciled
As an Amazon Associate, I earn from qualifying purchases.
Grab yourself a cup of coffee or a Coke, cause my tutorial on this repurposed sewing table is going to be a long post!
")
")
It had been 19.00, but then they discounted it to 10.24.
How To: Repurposed Sewing Table
")
Dismantle Sewing Table
")
Someone had put in a support board for the machine. I removed that board and any hardware that was inside.
")
Then, I tipped the machine upside down and took some measurements of the width and depth of the “box”.
Add a Shelf
")
I cut a board that I had left over from Modern Glass Shelf. The shelves of that project were very heavy and they came packaged in plywood. I used my combination square to measure the position of the shelf.
This post contains affiliate links
")
I used my Kreg Jig to make pocket holes to hold the shelf in place.
")
Here is the shelf installed.
")
Primer Several Projects at a Time
")
I primered the sewing cabinet when I did Jan’s bench and the Amazing Grace and Kiss Me Goodnight signs.
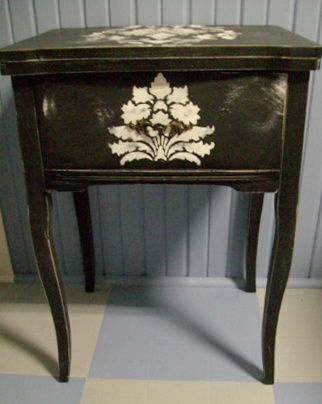
Paint Repurposed Sewing Table Black
")
Next, I used my sprayer to paint it black when I did the the signs.
")
I had sanded the finish off the top so it had a smooth surface after being painted.
Add A Stencil
")
I used my Damask harmony stencil from Cutting Edge Stencil to give the top some pizzazz.
")
You can also check out how I did this same pattern on a mirror.
Distress Paint and Stencil
")
I wanted to sand the image so that it would not be raised at all. Because I wanted it to appear that it was part of the original design. I sanded the black to distress it.

Cathy and I have done a few other side tables, do you like green or blue green?


This side table would be great for a laptop.

The laptop could be stored neatly inside.

This sweet little repurposed sewing cabinet into a side table has already found a new home!
Check out the updated louvered door hall tree:
")
")

For now I’m finished with it. Jamie may use it in her booth as is. If she doesn’t then I will list it on Craig’s List and “build to suit”. 
gail
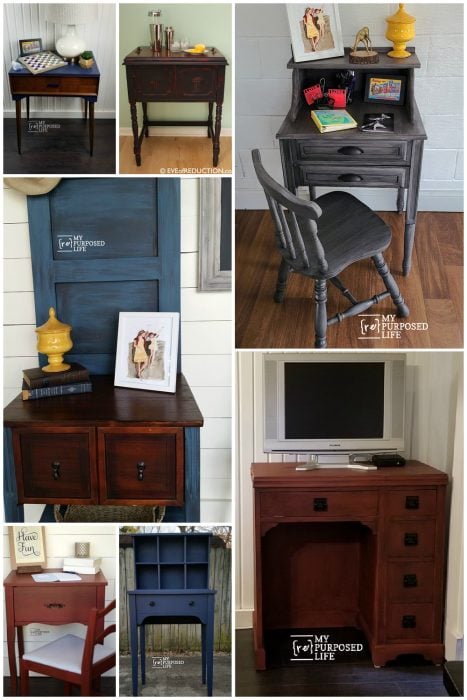
See More Sewing Cabinet Project Ideas
Great job and idea on storage!
Holly
I used to work in a habitat Restore. At any given time there would be at least three of these sewing machine tables lined up. I am kicking myself right now for not doing something like this. The laptop desk idea is perfect. I need one, my son needs one. I need to get over to the Restore today.
I’d snap that louvered hall tree in a heartbeat. Wish I lived in your area! Guess I’ll need to look for old shutters today, too.
Gail,
Now you did an outstanding job on this one…looks very pretty!!!
Blessings,
Linda
Oh my goodness, THAT LOOKS LIKE MY SEWING TABLE THAT I SOLD 10 YEARS AGO AT A GARAGE SALE IN ERDA UTAH. I think I sold it for $20. My dad bought it for me in 1966 when I was 14! I used the sewing machine until the day I sold it! It was used when he bought it and paid probably $20 for it! WOW! good job! Did it have the machine with it?
Fantastic transformation on the sewing stand. Love the contrast.
i love it!! the black is my favorite–very very cool!!
chris
Two GREAT projects, Gail! I love that you made the sewing table to suit your needs. Its lovely!
I LOVE it! That table looks so classy, and it’s functional now, too.
Thanks! You gave me some ideas for my table.
The hall tree is really cute, too.
OMG! This is too funny! I purchased a sewing cabinet (empty) at goodwill a few weeks ago for $7.99. I couldn’t decide how to do paint it. I posted a picture on my Blog for suggestions. And I read your Blog post today and seen what a BEAUTIFUL transformation that you did with yours. Wow! What a great idea. Thanks for sharing.
Sandi
Love, love, love BOTH of these projects. I have seen several of those sewing machine tables around “thrift-dom” and never knew what to do with them! Darling and idea!
And that louvered door hall tree is adorable…so many possibilities! Great job!
supercute, gail! i love the finish you gave it, too… i am impressed!
supercute, gail! i love the finish you gave it, too… i am impressed!