Farmhouse Floating Shelf for Under T.V.
As an Amazon Associate, I earn from qualifying purchases.
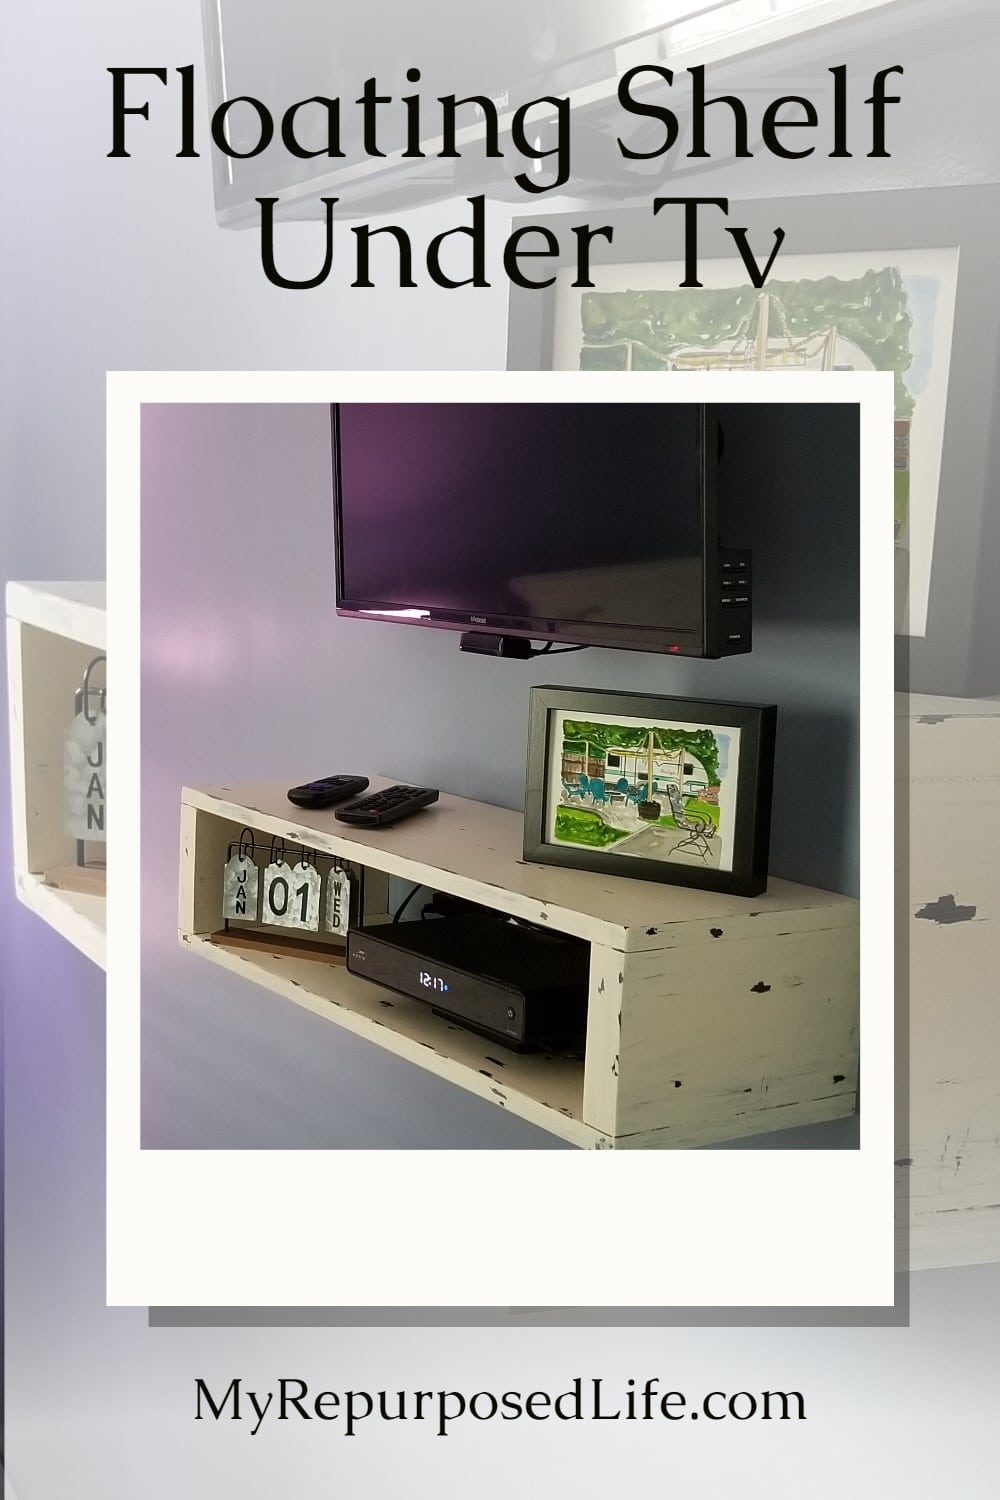
Are you looking for a floating shelf? For this month’s DIY “Let’s Get Organized Challenge” I made a rustic floating shelf to go below my new bedroom t.v. I had no idea that hanging a t.v. on the wall could bring on so many problems! The t.v. in the living room rests on a repurposed buffet tv stand.
Farmhouse Floating Shelf

Now that the tv is hanging on the wall, I will need to deal with wires, a mini cable box and more. Let’s see how it all came together, shall we?
I would love for you to PIN THIS!
Hang T.V. Hide the Wires

Can you see it? The mess of cords? The nearest outlet is about 6 feet away. I bought my t.v. wall mount kit on Amazon.

After searching online for a solution, I settled on this very inexpensive bracket set up. NOTE: The light switch was changed out for a receptacle. Because I use smart light bulbs controlled with an app, I was able to give up the light switch.

Because the cable cord actually comes up through the basement, so it was fished from the floor in between the walls. But, the bracket was pointing in the wrong direction, I removed it, grabbed the cable cord and then inserted it downward. Finally, I replaced the plate screwing it onto the orange bracket. The orange bracket was purchased at Home Depot.
")
Now that the setup is complete, it’s time to make it more organized and tidy. So, I took some measurements and got to work.
How to Build a Floating Shelf Below the T.V.

I purchased some 1×12 boards and rummaged through my stash for the 2×6.

Using the 1×12 in it’s original width was slightly more than I needed. Initially taking the measurements, you might just measure the cable box. However—you will need to take into consideration how close the box will sit up against the wall. I ripped about an inch off the boards.
*this post contains affiliate links, read more here*

Using my 10” measurement, I cut the 2×6 scrap on my miter saw.
Dry Fit of Shelf Boards

In order to hang the floating shelf on the wall, I would need a support to attach to the wall stud.
Sand Boards Smooth

I sanded all the boards smooth.
Construct Floating Shelf with Wood Glue and Nail Gun

Because there won’t be anything really heavy placed on it, I opted to use Gorilla Wood Glue and my Nail Gun to construct my rustic floating shelf.
Wet Wipes Help Remove Wood Glue

Wet wipes are handy to wipe away any glue that oozes out.

After completing the construction, I gave everything another quick sanding. For a more rustic look, I prefer rounding over the edges of the boards to give them an older looks. An orbital sander is perfect for this task.
Staining Floating Farmhouse Shelf

To get the rustic look I’m looking for, I used the same technique I did for these Farmhouse Shelves. First, I stained the rustic floating shelf with Jacobean stain by Minwax.

The following day after the stain was completely dry, I used Vaseline as a paint resist for the off white paint.
Using Vaseline as a Paint Resist

I applied the vaseline in a random pattern all over the shelf.

Using a gentle stroke with a chip brush will allow the vaseline to resist. Yes, you could stop here, if you like this look. I wanted a little more coverage.

Can you see the vaseline treated areas peeking through? I chose to do another light coat with a dampened chip brush so I wouldn’t get too much coverage.
Allow the paint to dry for a couple of hours.
How to: Farmhouse Distress

So, I know this look isn’t for everyone, but I have a heavily distressed nightstand in the bedroom that I love. A damp rag was used to reveal the vaseline resisted paint areas.

Holes were pre-drilled and screws were started in order to make installing the shelf easier to do by myself. A level was used to insure proper installation.
Related Content: Easy Farmhouse Ladder
Floating Farmhouse Shelf for Under T.V.

Don’t forget to save & share this project on Pinterest!
Finally, no more messy cords! I love easy organization ideas, don’t you? Don’t forget to check out the great “Let’s get Organized Projects” below!
- Addicted 2 Diy How to Add a T.V. Riser
- The Inspired Workshop Essential Oil Storage Cabinet
- House Becoming Home DIY Coat Closet Organization
- Ugly Ducking House DIY U Shelves
- The Awesome Orange Simple Router Bit Organization
- At Charlotte’s House DIY Doll Clothes Storage
that is such a wonderful shelf. changes the whole look of that wall. ❤
So useful, Gail! It’s a huge improvement to all those cords!
How I wish our homes here in South Africa weren’t all solid bricks. What a great way to hide all those unsightly cords and your little farmhouse floating shelf finishes it off perfectly too. Brilliant idea Gail
Awesome job hiding all those cords and cables! I love how such a simple piece can make such a big difference!
I love this. When we down sized, I had a choice of what we could find space for and what was going to have to be rehomed. So I chose 3 pieces. A large armoire that is now my hutch, my grandfathers oak desk (I’m still debating about this piece), and a Queen Ann cedar chest that for years I had used as a buffet table. The chest now has all of our boxes and wires that run the TV that’s on the wall. We suspended them underneath with wire baskets screwed to the underside. Oh and of course there is a baby fence around it