Spray Paint Shelter by Homeright
As an Amazon Associate, I earn from qualifying purchases.
Today I’m telling you about the fabulous Homeright Spray Painting Shelter . I’m so excited about this new and unique product!

Many of us struggle with places to do our painting. I was doing my spraying in a carport, but it’s so dark in there, that I find I have a difficult time seeing if I’ve missed a spot.
Then I started spraying my projects on a drop cloth on the driveway. Now, I have a new way to get my projects done.
 This is the wonderful new Homeright Spray Shelter. It is such a compact size to store away, but opens up to make a roomy spray booth.

 I’ll be honest, the first time I put the paint shelter up, I struggled with the assembly. I’m not a camper, and I don’t have a very good understanding of how tents go up.
 ![]() Since that first time, I’ve put it up several more times, and it’s gotten so easy I can put it up in about five minutes. The directions are attached right to the bag so you will never lose them! Here are a few key points to remember:
Since that first time, I’ve put it up several more times, and it’s gotten so easy I can put it up in about five minutes. The directions are attached right to the bag so you will never lose them! Here are a few key points to remember:
- Laying it out on the ground or your driveway first is a must
- The front of the tent has pins that insert into the back poles.The front poles crisscross and end up using the pins on the back of the tent.
- I find that it’s easiest to insert the front poles and pins, then the back poles and pins.
- After you’ve done that, attach all of the clips to the poles.
- There is a ring in the back center that can be secured with an included stake, or weighted down with something heavy if you’re on a hard surface instead of the grass.
- When taking the Spray Shelter down, go in the reverse order.
- Lay your tent out neatly, folding it up that way, will allow you to put it up quickly the next time you use it.
Specs for the Spray Shelter
- Depth: 72″ at bottom – 30″ at top
- Width: 102″ at bottom – 92″ at top
- Height: 66.5″
When stored away:
- Depth: 29.1″
- Packaged width: 4.3″
- Packaged height: 4.3″
 After setting up the paint shelter and some sawhorses, I readied my project. It’s a free coffee table I got from my friend Cathy.
 Of course I used my Finish Max with Heirloom Traditions Paint. (Moody)
I thought was going to be a gray, but then it looked blue…. then gray again. So, I guess you could say it’s an awesome blue-gray!
 I started by painting the underneath side of the table.
 Raising your project off the ground really helps your aching back, and allows you to get to hard-to-reach places.
 The Finish Max and the Heirloom Traditions paint made this cheapo coffee table look good.
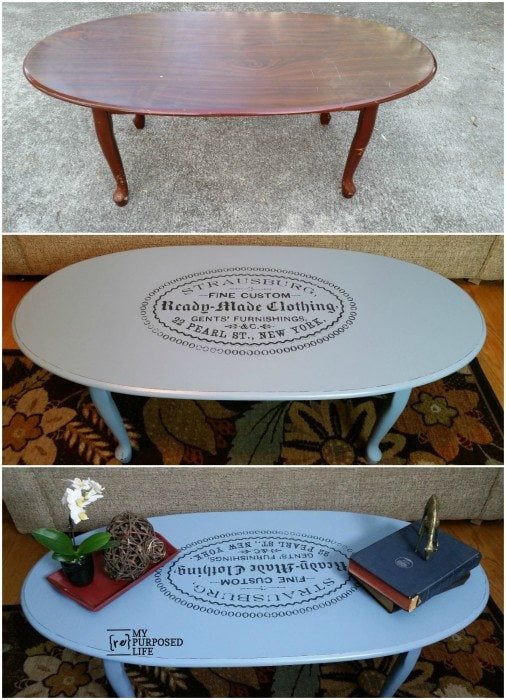 See how I did an easy image transfer on this cheap coffee table.
gail
disclaimer: I am happy to be a Homeright Brand Ambassador. I receive products to review, but you can be assured all thoughts, projects, and opinions are my own.
A spray shelter, what a great idea! It sure would make my projects easier to do.
Winning this awesome package would make all the projects that I need to get done closer to *getting* done!
With three oak trees hanging over my driveway, using the shelter would make the projects I have to do sooo much easier and cleaner!
I have 27 interior doors to paint, need this!!
I have a small telephone table that belonged to my Grandmother I would like to either refinish or paint. I remember her using it in the early sixties
I love how easy you make it look. I imagine a sprayer wound save tons of time….
Like most people, I paint outside. We live near the ocean and always seem to have a breeze. The spray shelter would be awesome!
Would love to win this prize package, have so many projects in the works, and this package would make life a breeze.
HomeRight has some amazing products.
I have some candlesticks that are quite intricate.
I could use these! I am constantly painting items and furniture and I’ve taken over my husband’s space in the garage. With these I could set up outside and the hubby could get back to his ‘Honey Do’ List!
I need this. I make such a mess when I paint.
Love this idea! Would love to have something like this and start painting!