How to update old sewing cabinets
As an Amazon Associate, I earn from qualifying purchases.
I’m going to show you how to easily update old sewing cabinets.

This is the one that was in Jamie’s room for several years —it held her t.v.

I picked this one up at Tickled Pink while Jamie was in town last month.

This one was a yard sale find, the only one that still had the machine in it. I removed the machine and put it to the curb for the scrap vultures.  Then, I removed the cut-out part of each cabinet and threw it in the Bagster. I haven’t always removed the cut-out part, I made one cabinet into a lap top storage table. Plus, I did another side table with storage.
Using an orbital sander to strip the finish

I got busy sanding the finish off the top of each of the cabinets. Of course, I could use stripper, but on flat surfaces, I prefer sanding with a 60, then a 100, then a 220 grit. You can see my mask there! Think safety, and use a 3M Tekk product!

One of the tops had some kind of veneer(ish) top coat. Do you see the pinkish area? I just sanded more and got down to the grained wood.

Paint with primer coat

These pieces were primed one at a time, then set on the pallet to dry.
Easy Finish Max Paint Sprayer projects
 I then gave them each a couple of coats of Crisp White Linen by Glidden. It’s one of my favorite “whites”. I used the HomeRight Finish Max Fine Finish Sprayer to do the primer and two coats of the Glidden.

One of the cabinets had corner brackets that made the top really easy to attach. (after removing that cut out section)

Another had some hinges (?)

On this one, the cut out portion was screwed directly to the top of the leg.
Meanwhile, I stained the three tops-two with Jacobean and one with Dark Walnut. (the one with dark walnut is to match Helena, which a nice lady bought from the shop) The two with Jacobean will be going in my new guest room. I then applied 3 coats of wipe on poly to each top. I didn’t take any pictures of these steps.
This post contains Affiliate Links
How to reattach sewing cabinet tops

I used the Kreg Jig to make pocket holes on the cabinet that didn’t have any hardware. You could use “L” brackets if you don’t have a Kreg Jig. But seriously, if you do NOT have a Kreg Jig, put it on your wish list! I use mine all the time, and it sells for less than $50.00.

To attach the tops, I place the top upside down on a t-shirt and used my adjustable square to make sure all the sides were equal.

I used my pocket hole screws to attach the top.
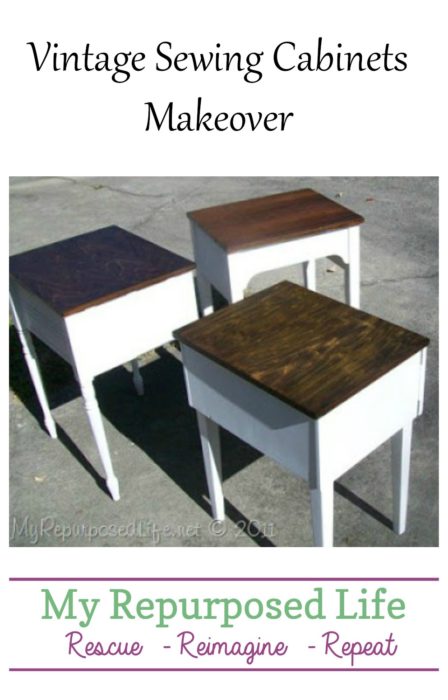
Repurposed Sewing Cabinets get a Makeover

This picture is actually before I attached the tops.

When I got finished with them it was late and I was in a rush to get them put away. I plan to glaze or distress the two I am keeping. The third one I did to match Helena, so it won’t be distressed. I love white with stained tops.
UPDATE:

I did sell the one on the right (above) to the lady who bought Helena. The other two I glazed for the guest room.
gail
Those tables look awesome Gail!! Love what you are able to do with pieces of ‘furniture’!! Congrats to Sue on the win!!
Wow, I was really amaze with those very creative style on making those tables. Very much like!
These all look great Gail!! I love all the different wood grains on the tables! So neat!
I’m loving the wood and white combo. I’ve been seeing it a lot around blog land lately. Great job here.
Beautiful Gail. I love the dark wooden tops. Great job.
Wahhhoooooo…..thank you so much Gail <3. Oh my, oh my, I so excited....I'll promise to keep you updated on my project with the Dremel. I just screamed really load, the boys probably thought their mom finally went over the top...THANK YOU GAIL!!!!
Big hugs,
Sue
They look great! I love painted bases with stained tops!
Wow, Gail these look great! I love the two tone(remember my coffee table makeover? I used the same colors).
You’re so productive! Very inspiring.
What beautiful triplets!
And… CONGRATULATIONS to Sue!!
favorite project in the video: how fast he painted that fence! Yowza!