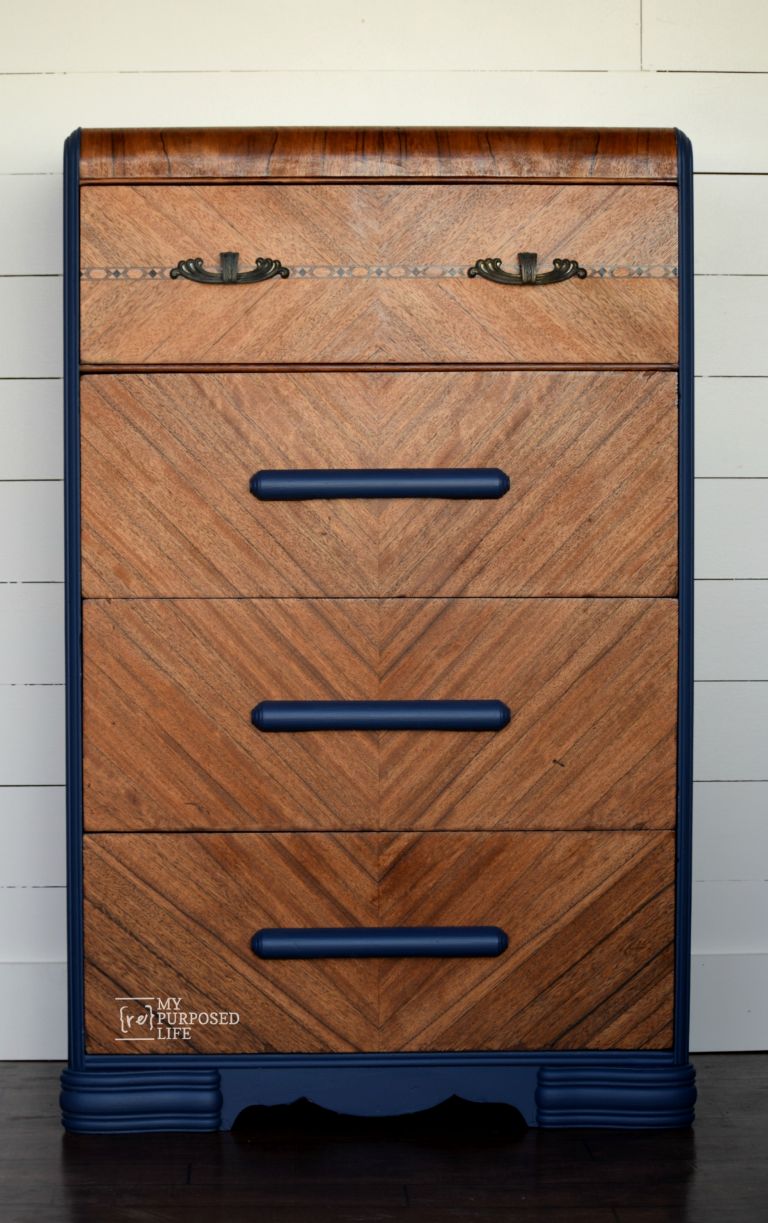
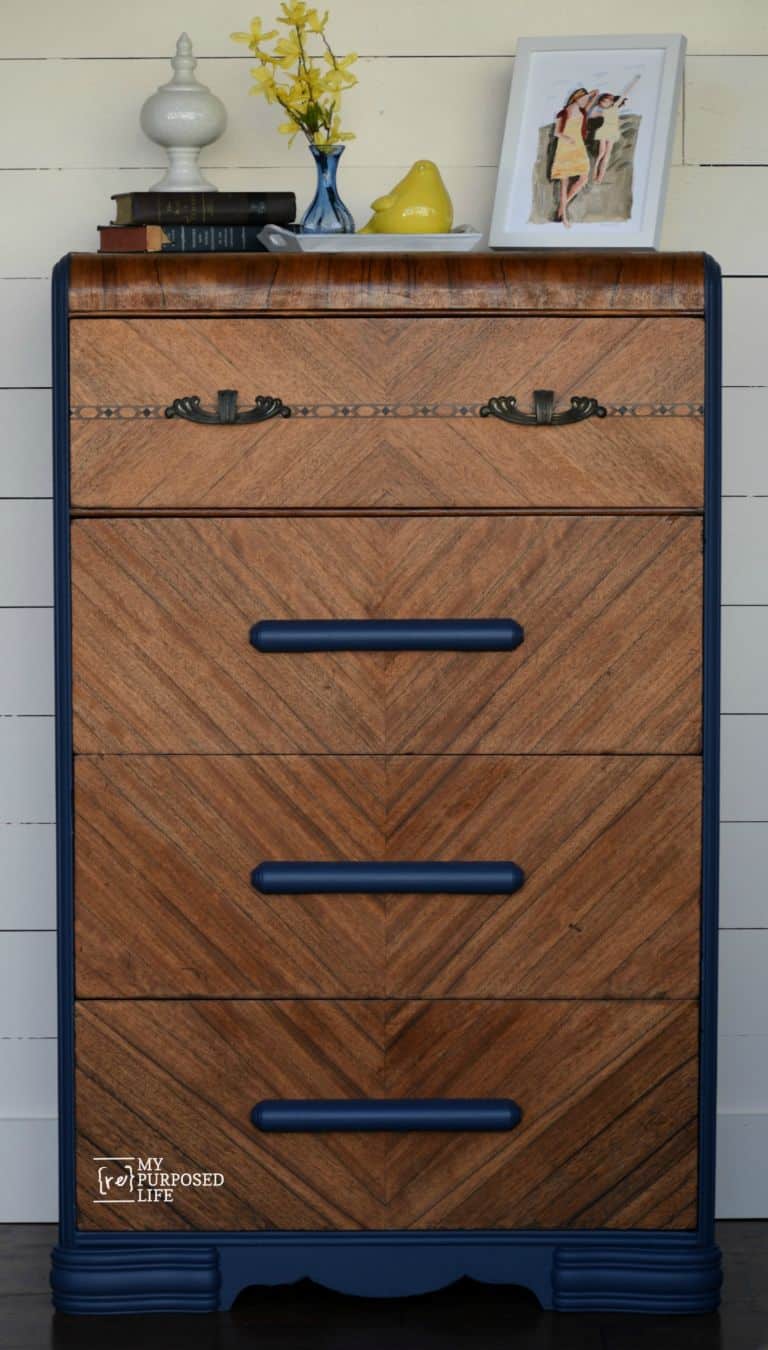
Amazing Waterfall Chest of Drawers Makeover
As an Amazon Associate, I earn from qualifying purchases.


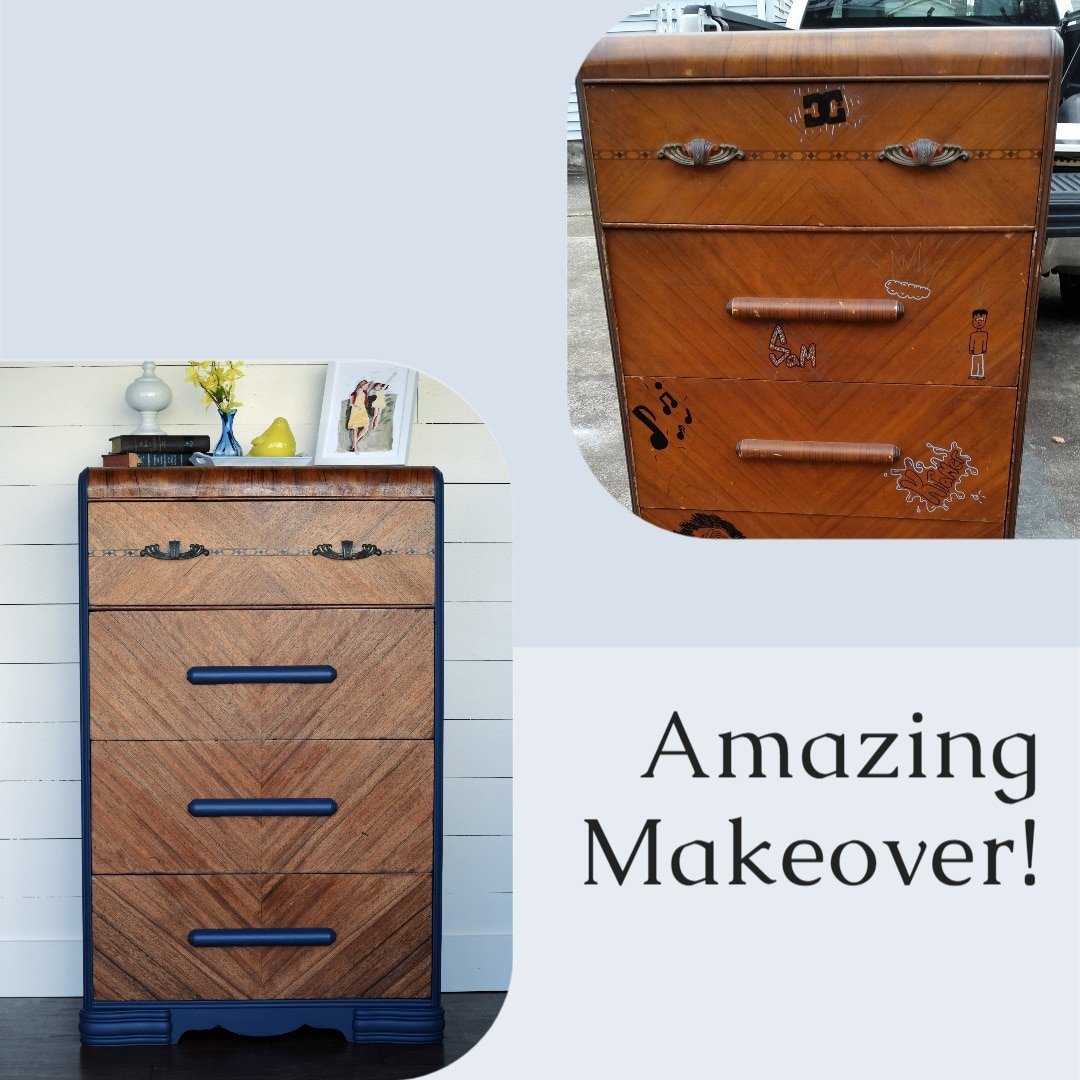
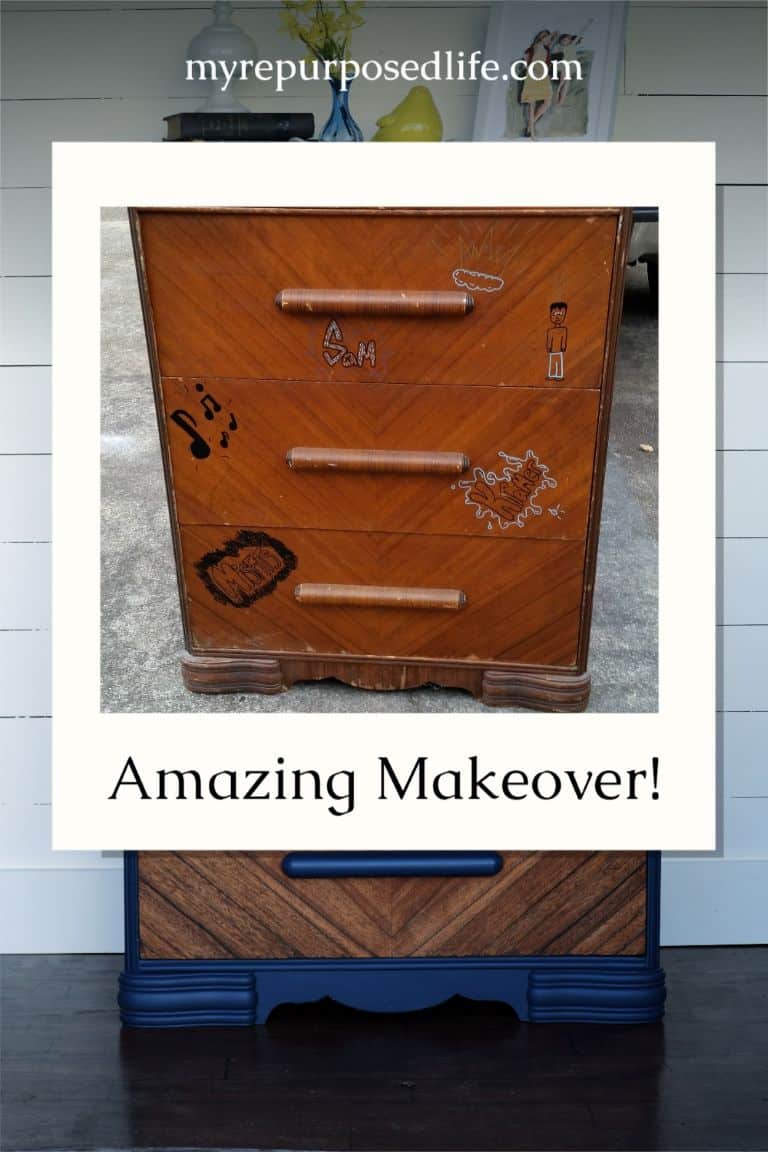
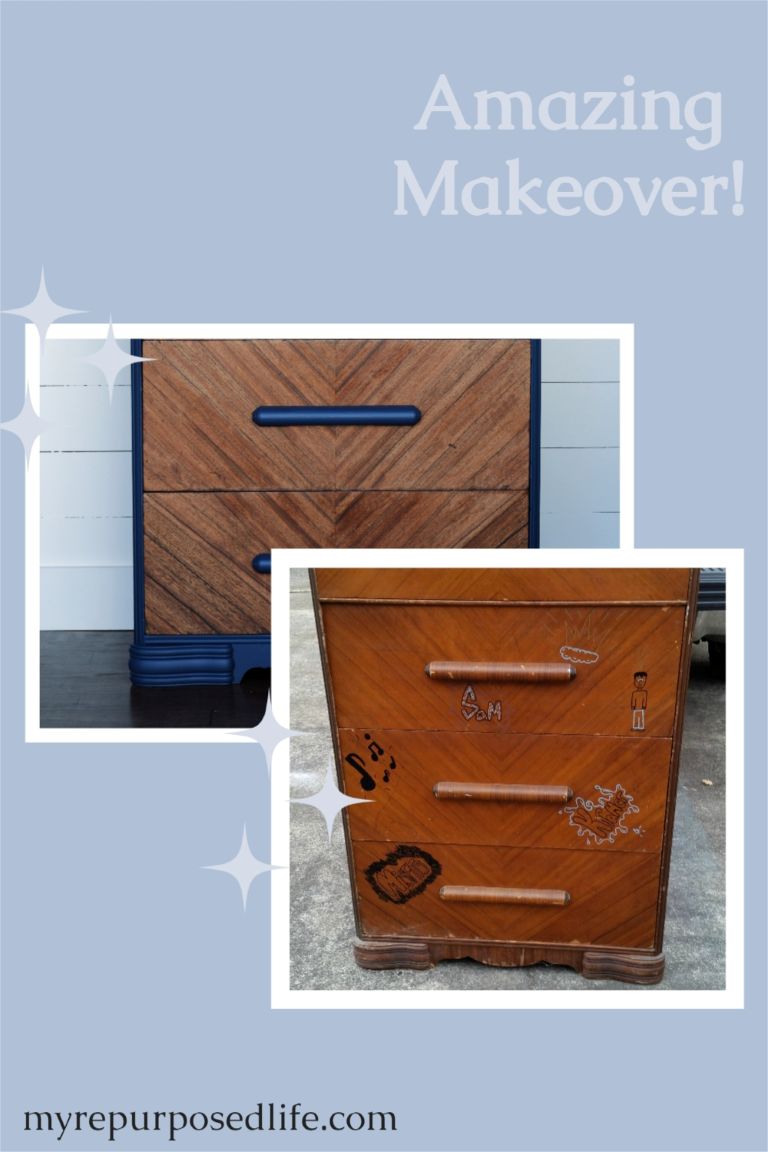
I’m excited to show you this fantastic waterfall chest of drawers (dresser) makeover! It was a free find right here in my neighborhood. This sad dresser was headed to the trash. This project was one of the quickest turnarounds I’ve done in a long time- only FOUR days!
Vintage Waterfall Chest of Drawers

This poor gal was headed to the dumpster, and I got it just in time. I didn’t want to paint it, but I didn’t know if I could remove all the “beautiful” artwork. Besides the graffiti, the dresser was in pretty good shape, with a few veneer issues. Even the drawers work really well.

It’s Furniture Fixer Upper Tour Day! Be sure to visit my friends’ projects at the bottom of this post.
How to Remove Graffiti From Furniture
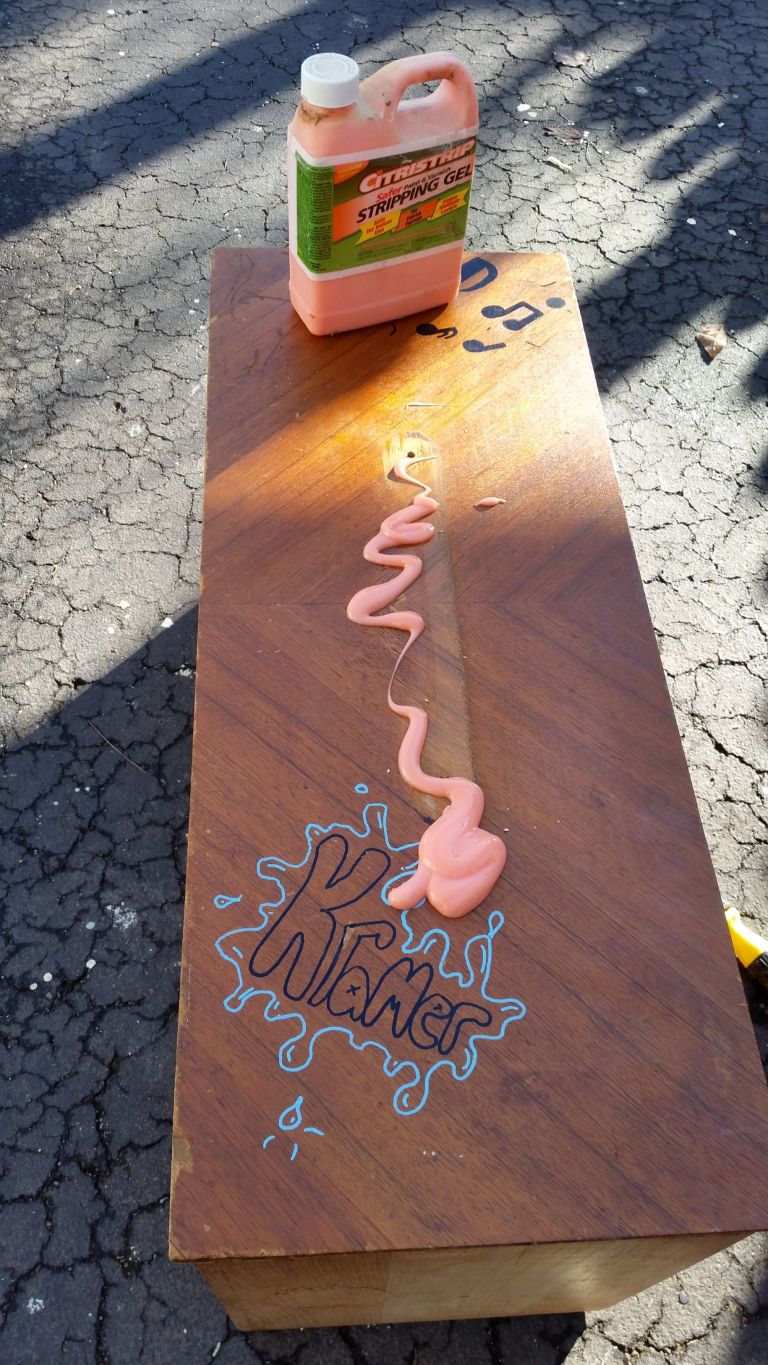
I don’t usually like stripping furniture, but I thought this might be a relatively easy job since there weren’t a lot of details on the drawers. I used Citristrip and a cheap chip brush to spread it around.
Visit the My Repurposed Life Amazon Store to shop my favorite items.
How to Strip a Waterfall Chest of Drawers

I paid extra attention to the portions of the drawer that had been drawn on with Sharpie markers.
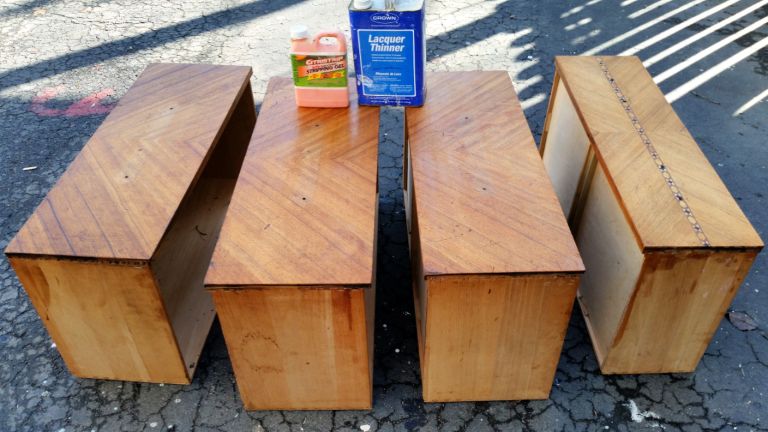
This is how the drawers looked after a coat of Citristrip, which was then wiped off with Lacquer Thinner.
Sanding vs Stripping
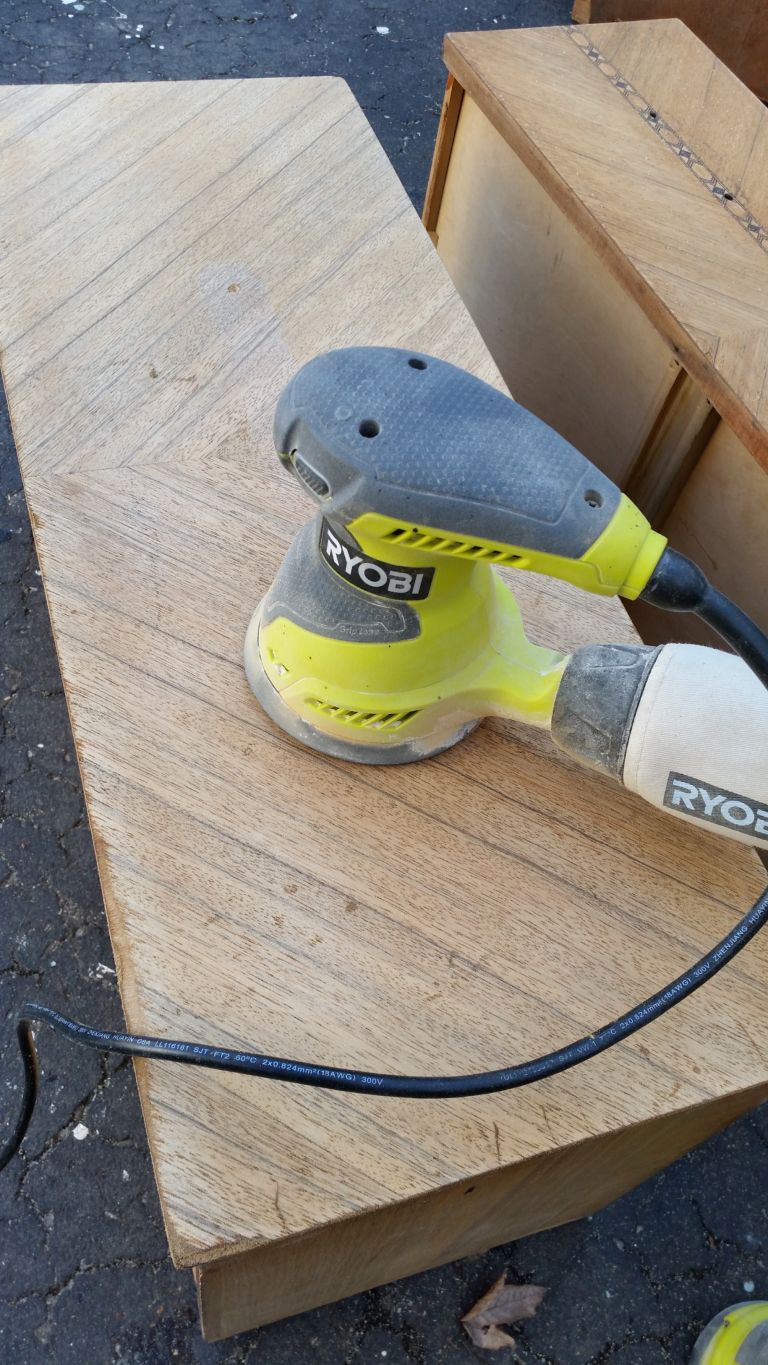
But that really wasn’t good enough. I had to sand each of the drawers, I probably should have left the Citristrip on longer, or done another application. Sometimes, I get impatient. Can you relate to me?

I used 60, 150, then 220 grit sandpaper. Buying these multipacks of sandpaper is much more economical if you do a lot of DIY projects.
Paint Sprayer for Furniture
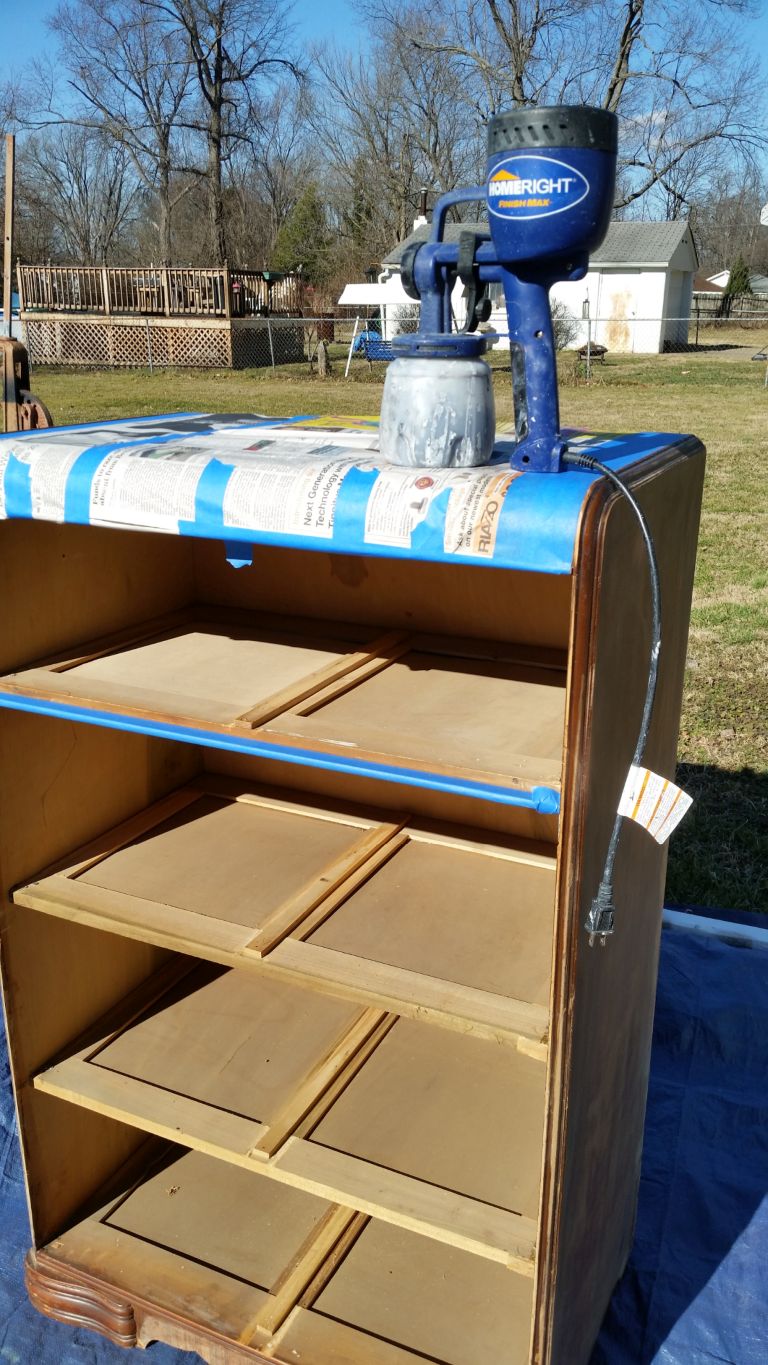
I used newspaper and painter’s tape to cover the top of the waterfall chest of drawers so I could use my Homeright Finish Max to paint the sides and the bottom front. I used the same blue oops paint that I used on my hall table.
This is after two very light coats of the diy chalky paint primer – latex mixed with Plaster of Paris. The next day, I did one more chalky paint primer light coat.
I will wax this project because this oops paint is a satin sheen.
Related Content: Navy Blue Furniture Projects
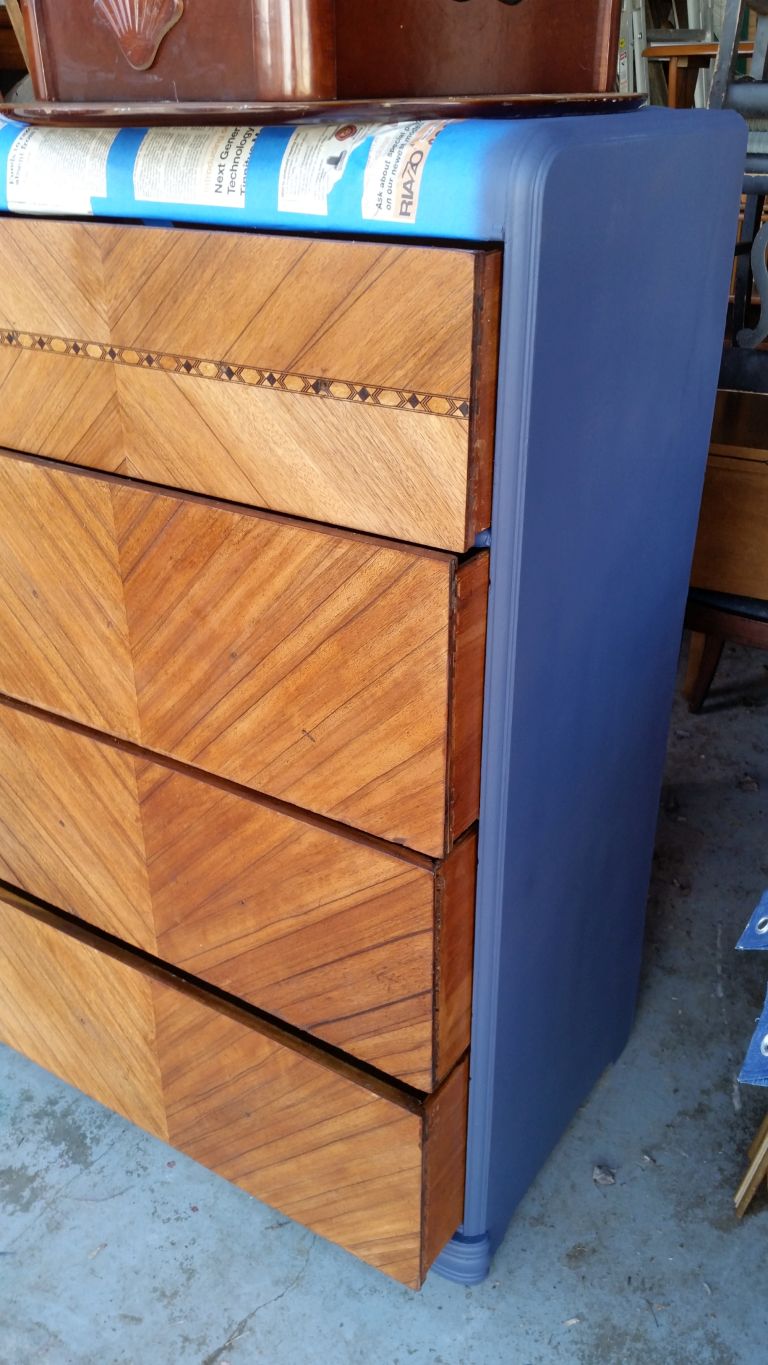
Stain Waterfall Chest of Drawers Top
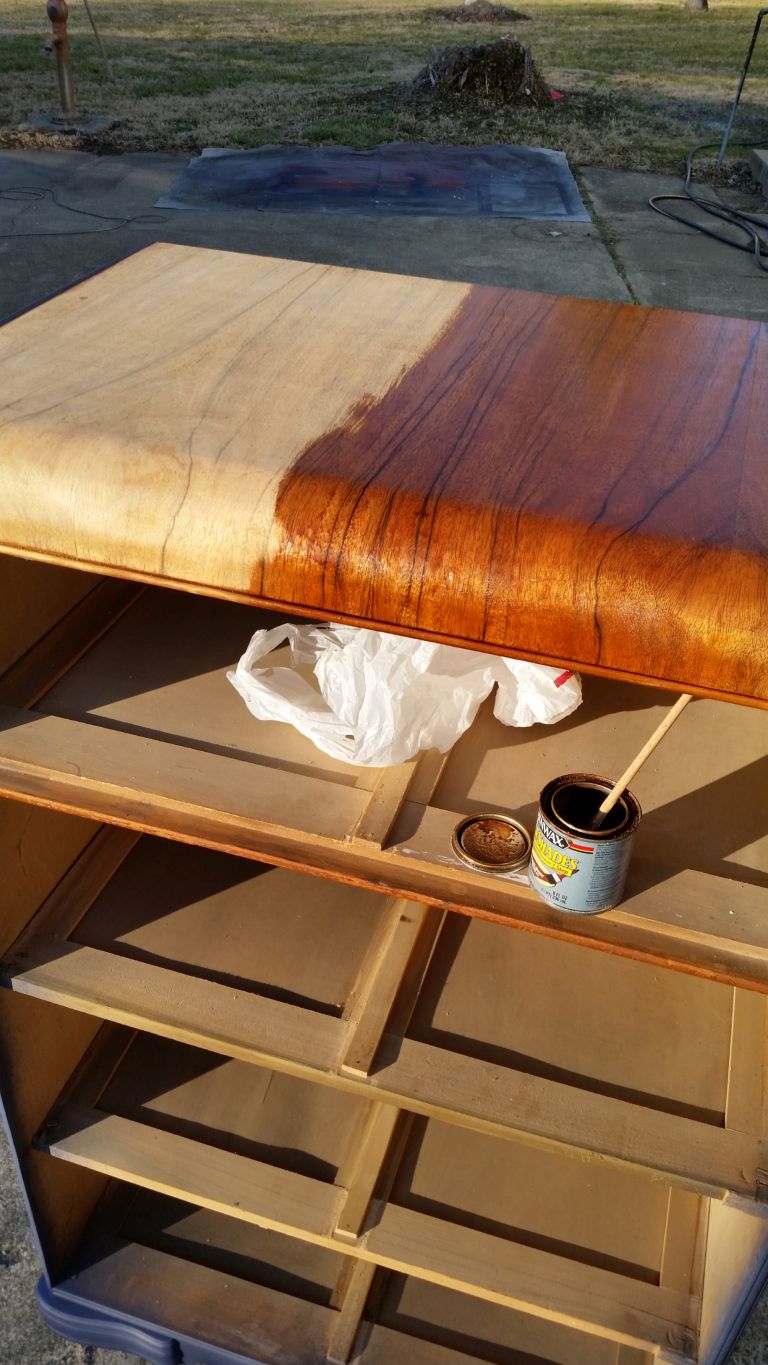
I used some Minwax PolyShades in Dark Walnut to stain the drawers and the top of this waterfall chest of drawers. I applied the stain with a small chip brush.
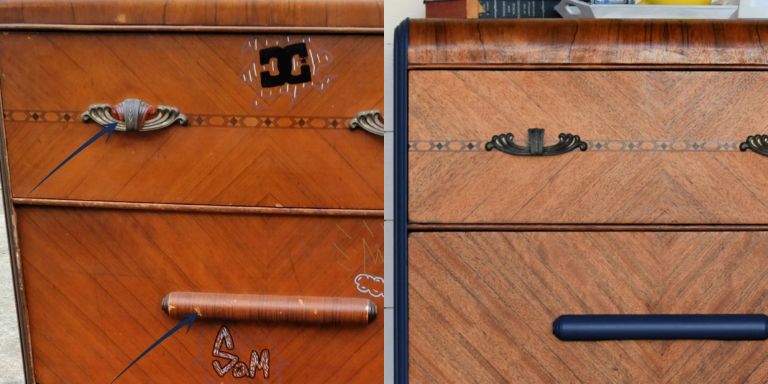
See the BLUE arrows? I had to make some changes to the dresser’s hardware. The metal hardware had some tortoiseshell (?) inserts. One of them was broken, and I didn’t think it looked good with the blue paint, so I removed them.
The long wooden drawer pulls were covered with paper. I applied stripper to them without even considering that fact. You can see the BLUE arrow pointing to where some of the paper had been scuffed off.
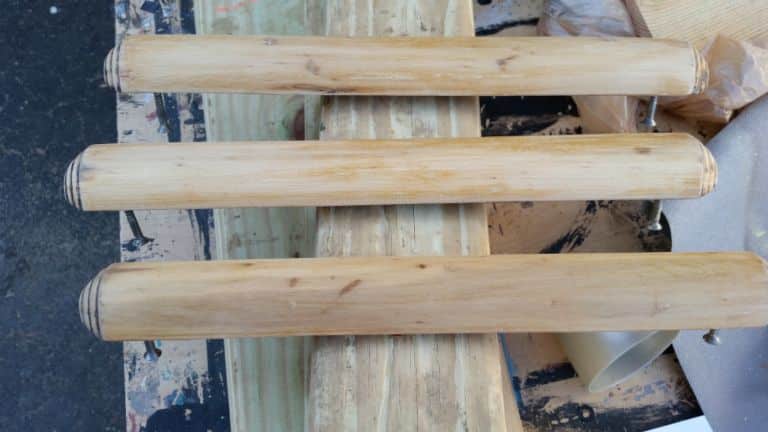
This is how the wooden pulls looked after they were stripped and sanded. I painted them with a few light coats of the chalky paint primer.
Use Packing Paper For Sanding

I sanded them in between coats with brown craft paper, the kind that comes in my packages from Amazon. Occasionally, the DIY Chalky Paint Primer leaves a rough residue.
Did you know? This furniture was named “Waterfall” due to its distinctive rounded drops at the edges of all horizontal surfaces, thought to resemble a flowing waterfall. Pieces in this style were usually finished with a blond veneer, though a small percentage were finished in a darker walnut finish.
At first, I thought I wouldn’t like the blue wooden drawer pulls, but they are growing on me.
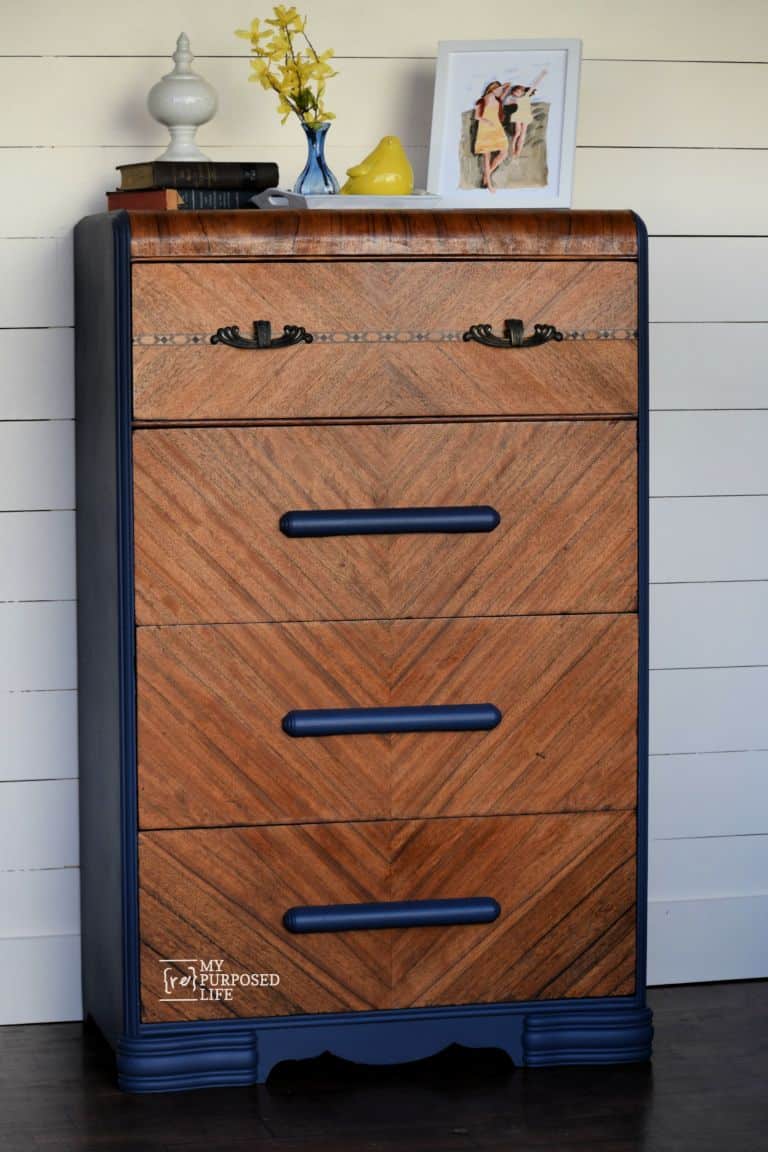
The white finial and the yellow bird were Christmas presents from Jamie and Andy. This picture is a good shot of the side of the dresser (which, in real life, I refer to as a chest of drawers).
The old gal still has some issues, but she looks a LOT better than she did. Do you agree?
Would you have saved it from the dumpster and dragged it home?
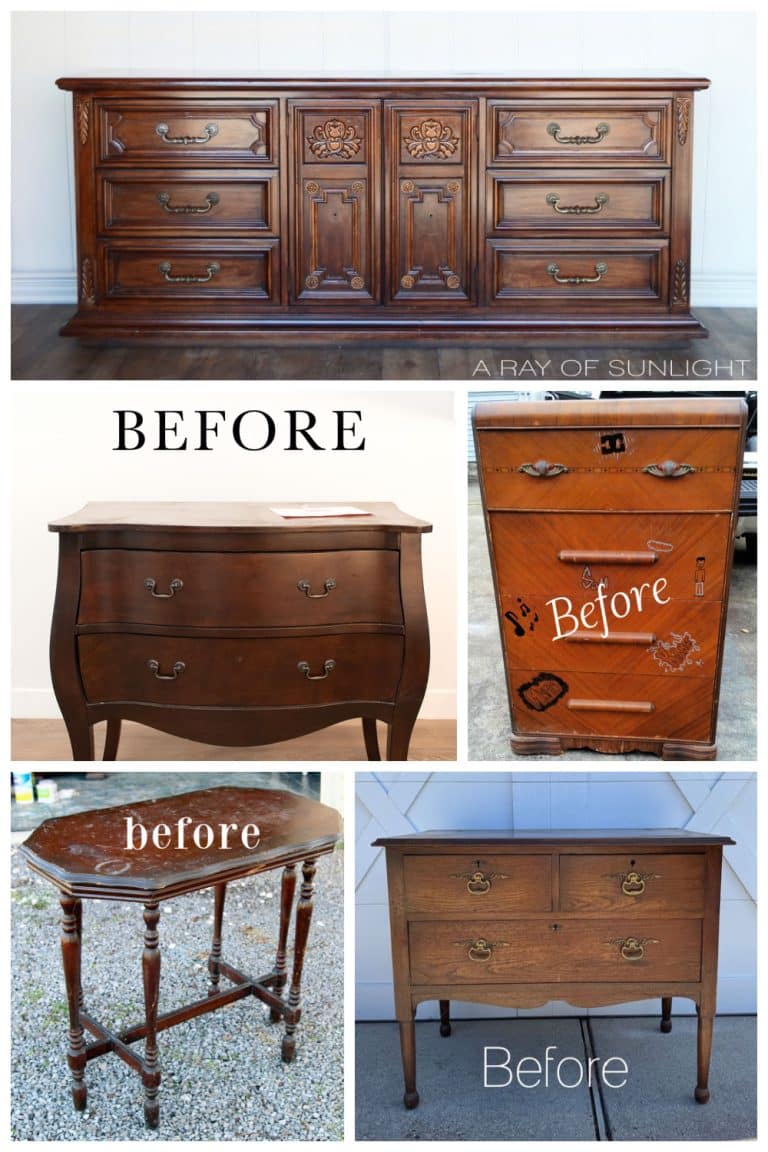
This is another Vintage Piece I saved from a fate worse than death!
Let’s see what the rest of the team has been working on:
- DIY Sideboard Buffet
- How to Blackwash Over Existing Furniture Finish
- The Amazing Waterfall Dresser Makeover (you are here)
- Small Table Makeover With Chock Paint
- Estate Sale Dresser With Transfer
Furniture Fixer Upper Tour Projects
If you love seeing old furniture get a second chance, be sure to visit more Furniture Fixer Upper Tour makeovers. Each project starts with good bones and ends with a fresh new story.
See more Furniture Fixer Upper makeovers here
You will find everything from small side tables to large statement pieces, all transformed by talented DIY bloggers who believe in saving furniture rather than replacing it.
Gail, obviously I have been under a rock this past week, and sick so I have missed a lot. I think your makeover is gorgeous! I know how much work stripping is and I am happy to see it worked on the sharpies! Good to know with kids. hee hee! I love the mix of stain and paint too! What a great save from the dumpster! Way to go!
I think it is amazing that you transform so many pieces and save them from landfill! It is a gift to be able to breathe new life into unwanted things. I think this chest of drawers looks so much better! I love when your posts pop into my Facebook feed – thanks for sharing.
I like it. Never would of thought of salvaging that without using paint.
I think you did a fabulous job on this piece, your choice of paint and stain is perfect.
For those who don’t like the handles… do people not know that (if it was their piece) they could always buy new handles, matching or not to make it less “robot-like” ???
And for those (on facebook mainly) who don’t like you painting it… did they not read it was HEADED TO THE DUMPSTER. I mean my goodness, it was going to be thrown out. So would they prefer you just let it go to a pile of garbage??
Thanks for having my back Julie! 🙂 I suppose most people think that it goes in my home, and that I’m “calling it done”. You are so right… I barely got it before it was tossed away. You know how it is… you can’t please everyone.
I would love to figure up how many pounds or projects I’ve saved from the landfill….
thanks for replying to MJ about the WEB FRAMES…. never heard of that before.
gail
Can you strip veneers? I have a dresser & vanity very similar, both are veneers. Thanks
Connie,
These drawer fronts and the top of this dresser are both veneers. Some of it had chipped off on a couple of the drawers, I sanded a little to make it a smoother transition. When stained, it looks slightly different, but okay.
When sanding veneer, you have to be very careful, because you can sand clear through it.
gail
I can’t disagree or challenge anything you’ve done. Great job, and love the shade of blue. I wouldn’t have changed anything Kate, but agree with the robot look, but I think that look gives it a unique look.
MJ, the drawers would look really great with a high gloss (glasslike), finish, but I don’t know why you don’t like this piece. It’s really a beautiful piece. Great job, Gail.
Ace:
Can’t recall that i said i didn’t like it. I don’t call it “beautiful” though. Gail has done some terrific work I’d grab in a minute. This one is not one of those. That’s all. Maybe when it’s polyed in the good weather I’ll think again.
Keep on keeping on, girl!
MJ
MJ, “Usually I love your work, but this one doesn’t appeal to me. It looks stripped and bare-naked to my eyes”. If that doesn’t say I don’t like it, nothing does.
Just disagreeing with you.
Ace of Clubs
Don’t you wonder what was going through the mind of the person with the Sharpie? Sheesh.
I like the waterfall style and definite would have taken that home. I do think your dresser fronts could use a bit of shine or gloss to really bring out the design. Would waxing do that? I would have changed out the top drawer pulls to something more simple to match the rest of the handles (the dresser sort of looks like a robot to me with the top “eyes” – maybe I have too much imagination!). Those are beautiful pulls, but they somehow don’t go with the rest of it. Maybe if you painted the end caps of the long handles the same color as the drawer pulls (as they were originally), it would unify the whole thing. Maybe that’s why the long handles were originally papered – to blend in more with the drawers and let the top handles stand out. I think there is some competition going on between the top drawers and the rest of the drawers – it’s like there are warring focal points. I think one think we have to consider is that when we paint something, it often shifts the overall design and we have to rethink those design elements. Did that make any sense at all?
Kate,
I should have mentioned in the post that I plan to do more poly on all the stain when the weather permits. 🙂
I appreciate you input, but I think you’re thinking too hard on this. hehehe Being a chest of drawers it will probably land in someone’s bedroom, rarely seen by anyone but the people who buy it.
So, to answer your question, it does make sense, but I’m not really sure I have the knowledge to make design decisions such as these. I would rather be sawing. 🙂
gail
So Glad you saved it! It turned out beautiful! Although it isn’t the type of furniture that appeals to me, you did a great job! Your work is beautiful and creative.
We recently inherited almost the exact same dresser. Only difference is the pulls are different. I wanted to do something to make it look nicer for our sons room (once again I say inherited). One of our drawers is missing a chunk of the veneer I would say roughly 4″ long by 1.5″ wide. How would I go about fixing this? The only thing I could thing of is taking that drawer out and cutting the bottom open and adding legs and making it an open shelf. Would that look right?or is there an easy fix for the missing veneer. Your post was a blessing for me, so thank you.
If you would be willing to paint some of it, you could patch the missing veneer. If you wanted to make a shelf unit, I would remove more than one drawer, or maybe the top drawer? I don’t think there is any need to add feet. Please know that on most of these pieces, the drawers are NOT interchangeable. If you would like to send me an email with some pictures, I could definitely give better advice.
gail
Amazing transformation, Gail! I’m so impressed! I paid particular attention to your sanding in this project. I see you had a picture of your Ryobi sander – can you tell me more about it and if you really like it? Do you use other sanders? Smaller – perhaps? I hate sanding, actually, but know how necessary it is, and I want to buy a great tool or tools. Thank you for your recommendations.
I also was amazed how you used the brown paper to sand between coats of paint on the drawer pulls. You’re amazing. Thanks for that tip!
Laurie,
I only use orbital sanders. I actually have THREE ryobi sanders. The old blue one, a new green (corded) orbital and a new green (battery) operated sander.
I only noticed a difference between the two green ones lately. The corded one seems to have a slightly more powerful and MORE random pattern to it. The corded one seems to vibrate more than it spins, which means that you shouldn’t apply as much pressure to it.
I really don’t like having to drag around an extension cord, and many times my piece is too far from an outlet, so the battery operated Ryobi is fabulous!
I did a lot of sanding on these dressers due to the fact that there was a lot of gunk left behind by the stripper. That is why I chose to use the corded Ryobi sander.
I also have a mouse sander and a palm sander, but they rarely see the light of day. If you only want to buy one, I would suggest either of the Ryobi (green ones) depending on what kind of projects you will be doing.
LOVE using the brown paper bags, a trick I learned from Refunk My Junk-her book is available on my sidebar for only $5 !! If you paint furniture, I highly recommend it.
gail
LOVE how you saved this piece, especially the wood parts. i would have drug it home for sure!
I would have grabbed that old boy in a New York second and drug him home some way especially a freebie. I love the oops color paint with the stain it turned out beautiful. Are you going to keep him? He looks right at home in the picture. Beautiful job Gail.