Wooden Slat Bench Plans | Rustic Bench with Back
As an Amazon Associate, I earn from qualifying purchases.
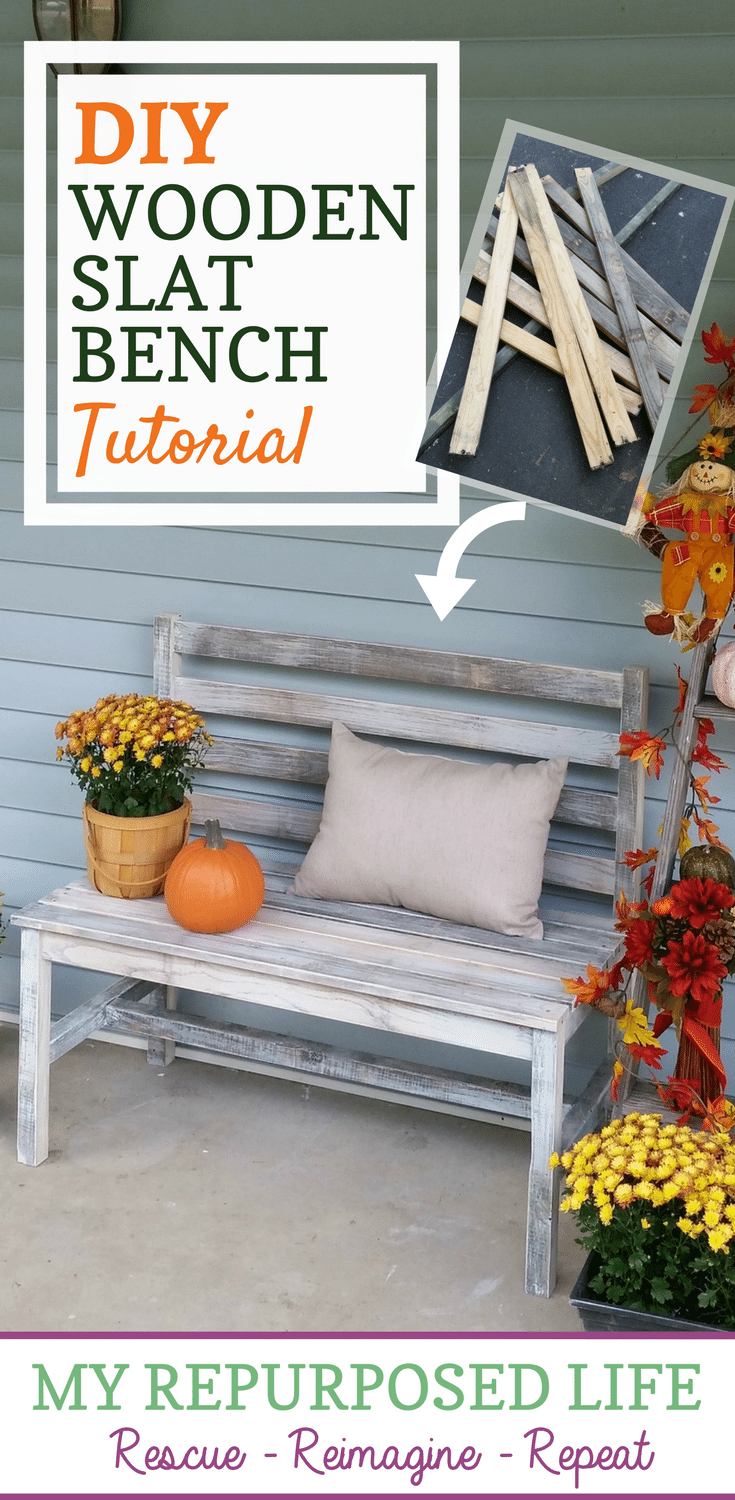
I can’t remember when I’ve been so excited to finish a project. This wooden slat bench with a back has been on my list for months. I pass a similar one every day on my walk with Lulu Mae. I had wanted to make one with repurposed chairs until I got this scrumptious reclaimed wood from a neighbor that I showed you in yesterday’s post Recent Finds September 2017.

*this post contains affiliate links, you can read more here*

I recently got these free bench slats from a neighbor. I’m not sure if they were from a glider, bench, or porch swing. They were already dismantled when I got them. In addition to the slats, I ripped some reclaimed 2×4’s down to 2×2 size.

Many of you have asked for dimensions on my projects. I asked Mindi to draw up wooden slat bench plans for us. I gave her the measurements of the finished bench. My slats were a little smaller than 1×3’s, but you can use these measurements using 1×3’s and 2×2’s from the store.
Cut List to make Wooden Slat Bench with Back
Begin with 1×3’s
- 14 5/8” (2) side skirt
- 35” (6) (4) for back of bench, and 2 for front and back skirt
- 38 3/4” (6) for seat
The following will all be 2×2’s
- 35” (2) for back legs (and back)
- 16 7/8” (2) for front legs
- 14 5/8” (2) side braces
- 35” (1) cross brace
- 15 3/8 (1) middle brace/seat support
Tools and Materials to make an Easy Wooden Slat Bench
- Drill (bits and screw head)
- Rubber Mallet
- Tape Measure
- Compound Miter Saw
- Kreg Jig
- Pocket Hole Screws 1 1/4”
- Wood Screws 1 5/8”
- Gorilla Wood Glue
- Sandpaper
- Paint (optional)
Step 1
Cut legs and skirt pieces

This image shows me getting ready to cut a reclaimed 2×2 for the back legs.
Step 2
Mark and Drill Pocket Holes on 4 skirt pieces

I chose to use the Kreg Micro Jig. It works the same as the regular Kreg Jig but uses a smaller bit and smaller screws. You can see I set it at 5/8”.
New to the Kreg Jig? check out my How To Use A Kreg Jig article.
Step 3
Assemble slatted bench frame

This was the design stage, because although I have a sketch later to show you, I never draw anything up. As soon as I set it up this way, I knew it was wrong. I used the full length of the slat for the front skirt. In other words, the other slats won’t fit from left to right-they will fall through. Back to the saw I went to trim the front skirt to 35”.
Assemble the entire frame, including the rear skirt piece (not shown here)
Step 4
Cut back wooden slats, drill pocket holes and assemble

The back slats are also cut at 35” because I wanted them to rest in between the back uprights. They are attached with pocket holes and pocket hole screws. I thought this would look more like my inspiration bench than if I had attached them to the front of the uprights.
I used Gorilla Wood Glue and pocket holes for most of the construction of the bench.
Step 5
Attach seat support

After getting all the back slats in place, I tested the seat slats and realized that I would need to add a brace in the middle. NOTE: I have the pocket holes on top, but because my slats are spaced, the pocket holes are visible. You may want to turn your brace upside down and have the pocket holes facing the ground.

Step 6
Drill pilot countersink holes

I pre-drilled countersink holes for the 1 5/8 wood screws and used my Kreg Multi-Mark tool to get the proper overhang of the slats.
Step 7
Attach seat slats with wood screws

For years I used drywall screws, but now I use exterior wood screws for projects like this.

My reclaimed wood slats were a little askew, but I like the character it adds. I used a scrap piece of wood to help me get consistent spacing between the slats.
Step 8
Install side braces and cross brace
 Then I used wood glue and my Ryobi Nail Gun to attach the side braces and cross brace.
Step 9
Sand rough edges of wooden slat bench

I sanded all of the rough edges and the blemishes with my orbital sander.

DIY Wooden Slat Bench Plans
Step 10
Paint to suit

Finally it was time to paint. I chose to use my white wash paint and a cheap chip brush. I always know which bucket is the white wash because of the green cansealid. The flexible lid makes it easy to reuse this paint can over and over.
NOTE: I always start painting my projects upside down. Raising the project up on a work table makes life easier.

I love, love, love the new wooden slat bench. I finally got that out of my system.

Please excuse the blurry picture of the inspiration wooden slat bench. While on a walk I snapped this picture on a day where it looked like nobody was home. I had already built the bench on the day I snuck this picture. ![]()
Oh, I looked on Pinterest, and I found another tutorial you might like from The Creative Mom. Her slatted wood bench has arms.

I’m so ready for Fall! I’ll be taking this sweet wood slat bench to Glendale in October. Rustic items are always the first things to sell.
I already want to make another! Will you make one?
gail

Thanks for linking my bench, Gail. I LOOVE your bench. You are amazing!!!
Natalie,
You’re welcome! Thanks for hopping over to check out my bench, and your very sweet comment.
gail
It is so darling!! I love the finish and your staging is perfect!! Great job!!
Thank you for your sweet comment Mindi, and for the Sketch Up plans! 🙂 We are enjoying some beautiful Fall weather and I’m loving it-taking advantage to get some real work done-clean out the garage.
Thanks for all you do!
gail
ms. gail this is the perfect porch bench i love it and your whitewash paint job xx
Thanks so much Chris! I am so pleased with how cute it turned out. Now when I pass by the neighbor’s porch I won’t have bench envy. (building one that is-this bench will be sold at my craft show)
gail
This is so darling! I love the slat bench and even more that it’s for outside. Cute staging and nice plans too! Pinned.
Awww, thanks Wendi! I appreciate you stopping by. I know how busy you’ve been.
I appreciate the PIN!
gail
I wish I had you by my side if/when I do something like this. I guess I need guidance, and I hope to find it locally when the time comes to do a few things.
I wish I had a helper Fonda! Some diy is just easier with an extra pair of hands. Is there something in particular I could write about that would help you in the guidance you need?
gail
There’s nothing in particular. I just need my hand held. Maybe when I’m ready to do something, I give you a holler, and you can hold my hand while I do my project.
One thing we CAN do is paint walls {and get a bit on the ceiling that needs to be “erased”}. We’re putting up artwork now. Soon, we’ll be getting our settee and two chairs back from the upholsterer. Then, we’ll have somewhat of a living room.
Thank you for your offer. I’ll let you know if something comes up that I need help with.
Awesome! Love the way it turned out. Thanks for including the plans/drawing/how to’s.
Thank you Nova!
Thanks to Mindi for being so patient with me when I ask for plans AFTER the fact. It’s difficult to add plans on my repurposed projects because I never know if someone else will have the same sized furniture. I hope to do this with most BUILDS going forward 🙂
gail