antique cane chair makeover with upholstered seat
As an Amazon Associate, I earn from qualifying purchases.
I wish I knew how to repair an antique cane chair, but I don’t. There are ways to fix a broken cane chair without learning the art of caning!

While shopping at Vendors’ Village in September, I stopped by John’s booth while he was working and he gave me some great deals on a few of his items including this broken antique cane chair. John labeled it as a u-fix-it old chair, but I saw possibilities because it really was in great shape except for the seat.
As I said above, I do NOT know how to cane, and there is a reason for that—I am too impatient.
*this post contains affiliate links*
Should You Paint Antique Furniture?
 John actually let me have this beaut for only $6. I was so torn on what to do with it. I really, really wanted to paint it. My general rule is—if it’s a family piece, refinish—if it’s a thrift store find, all bets are off. However, I knew that someone would appreciate her in all her beauty if I didn’t paint her. The board sitting in the seat area was very thin and definitely would not support anyone other than a very small child.
Replace Antique Chair Seat
 I have tried the “string” trick for tracing a circle before without a lot of success. I went for a different technique that I actually saw while watching a marathon of Flea Market Flip. One of the Master Craftsmen used this easy way to trace a circle and I filed it away in my brain!
How to trace a circle on a board
- Divide your circle diameter in half
- Use a scrap piece of wood (you could use a paint stirrer)
- Drill two holes the distance of half of your circle
- Secure one end of the thin wood in the center of your board with a small screw (do not over tighten)
- Use an ink pen in the other hole and direct the thin wood around to reveal a perfect circle shape
I was wanting a circle slightly larger than 15”. I found a scrap piece of thin wood and drilled two holes approximately 7 1/2 inches apart. Using a pen in the outer hole I drew the perfect circle! So much better than using a string and a pencil.
 You can see that I have two holes in my thin wood. The first circle was too large. The markings you see are to make sure I got the circle evenly distributed across the board. Pin this tip!
 I used my Ryobi jigsaw with a “clean cut” blade to cut out the circle. We don’t really get along very well, but I would call this cut pretty much a success. I believe that I usually try to cut too fast. But, I took this job nice, easy and slow.
 I used my rockwell jawhorse to hold the plywood, slightly shifting the plywood about halfway through so I wouldn’t have a lot of vibration.
 The difference between this wooden seat and the other one that came with this antique cane chair? My board is slightly larger resting on top of the outer board, in addition, it is thicker than the original board. I’m getting closer to a solution!
Not shown: I used a small rag and some lacquer thinner to wipe down all the wood to make sure there was no remaining furniture wax or other residue.
Touch up antique chair with Gel Stain
 I wanted to darken the wood slightly, so I chose to use some Minwax Hickory Gel Stain applied with a small cloth.
 After the gel stain-no poly used. I LOVE the new color, and I’m so happy I didn’t paint it, aren’t you? OR would you have painted it?
The new sat is ready for upholstery
 I used my new circle as a pattern to trace onto a piece of memory foam. Someone gave me this memory foam they no longer wanted to use on their bed. First, I traced it with a sharpie and cut it out with scissors. I believe the memory foam is 2” thick.
 Do you use drop cloth for upholstery? I love using drop cloths as upholstery fabric for chairs, pillows and benches. This piece of drop cloth has been laundered several times. I laid it over my circle to see if the placement of my IOD décor stamps (Louis) was going to work.
Decor Ink and Stamps
 I used Athens ink and the new décor ink applicator roller to complete the stamping process.
 An acrylic block is included in the package with the foam rollers. Simply squirt a tiny bit of the ink on the acrylic, then roll the foam roller into the ink.
 Apply the ink to the stamps that are placed on the large acrylic stamp block.
 Apply firm, even pressure to transfer ink from the stamps onto the drop cloth. I left mine resting just for a moment so the ink would be more vibrant.
 Fun and easy!
I’ll show you in a minute how I got that perfect fabric circle.
 But first, I wanted to show you how I cleaned up the stamps and blocks—with baby wipes! I always keep baby wipes in the shop for easy cleanups.
NOT SHOWN: I used the hose to clean up the roller. The foam is not permanently discolored, but the water ran clear, and the roller will work perfectly the next time I need it.
Cut Fabric to Fit Chair Seat
 This is how I got a perfect circle of fabric for covering the chair seat. First, I laid a sharpie end up against the wooden board, then rolled the tip down to make a small dot on the fabric. So, I worked my way all the way around the circle.
 I simply connected the dots to give myself a nice sized circle, then cut on that line.
 Then, I used spray adhesive to secure the foam to the plywood to keep it from shifting during the upholstery process. This stuff lasts forever, I’ve been using it since I covered a bench seat in my post upholstered twin headboard bench in 2012! (remember to turn it upside down and clear the nozzle after using.
 I didn’t take any pictures of the process of the stapling. I did 4 sides of the circle, opposite each other. Then I did 4 more sides, again opposite each other, and finally 4 more in between each of the last 4 I did.
 I have great news! It really is the simple things that make me happy. For years, I have stored my stanley staple gun and staples in a baggie. I have finally purchased 2 small stanley tool boxes, one to hold my staplers and the other to hold my Dremel. I can’t tell you how many times I have searched for these staplers. They finally have a home!
 I used my larger staple gun to attach the original thin plywood to the back of the new upholstered chair seat. It not only gives it a cleaner look, the small board rests on the inside rim of the original chair seat, while the board I cut is larger and rests on top of the original seat.
 To be honest, it looks a LOT better in real life than it does in pictures. As I write this post, the chair is in the corner of the living room and it makes me smile to look at it. It’s a little petite, but so darn pretty!


Pin it!
So, the seat is secure but not in any way permanent. Someone could easily remove it to re-do it, or even have it re-caned if they prefer. I’m very happy that I didn’t paint it, and hope it finds a new home soon.
UPDATE:
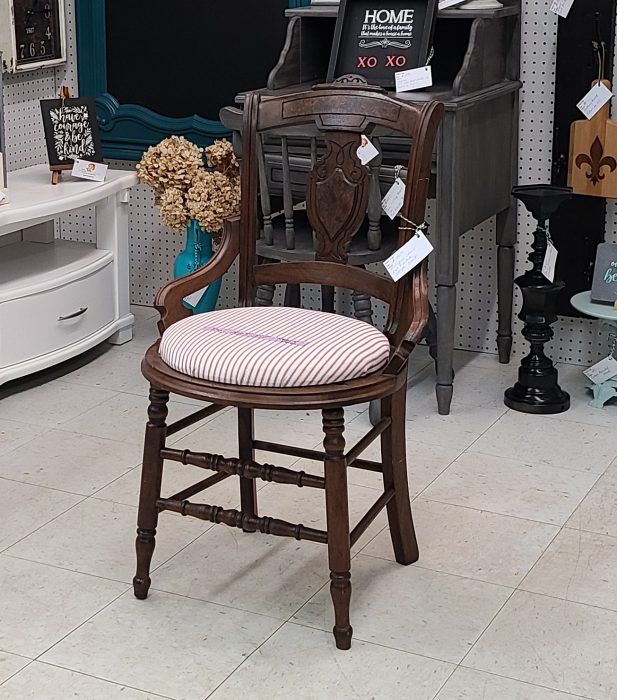
I recovered the seat with a red and white ticking fabric. I LOVE it, here is is for sale in my booth. On the seat, is a piece of tape asking people not to sit on it.
gail
See one of my first, and an all-time favorite chair projects here
Brilliant choice! I’m in the same state of mind when it comes to painting vs. restoration. I did however have a mild exception to that rule when I painted the backing of a family heirloom secretary desk. Sorry Ma, sometimes it’s purpose over sentimentality! Lol it showcased items better with a lighter background color. This chair you did is a nice respect to the possibilities it has no matter what the future holds!
Lisa,
I totally agree about the back of a secretary desk. A lighter color really makes a difference. Thanks for stopping by and taking the time to leave a comment.
gail
Beautiful!!!
The chair is beautiful! I have the same one, but in much worse shape. I painted it yellow and dropped in a wire planter where the seat used to be. It looks wonderful on my daughter’s porch with seasonal flowers and trailing plants in it!!
Look at those old Arrow staples! We love it. Thanks for sharing!
You did a nice job. I get my foam at Ollie’s it’s much cheaper than Joanne’s or hobby lobby Also using an electric carving knife makes the cutting much easier I have a bit of a chair issue so I appreciate a good makeover Also if you need any tips I’d love to help. Anything that sits still long enough gets reupholstered !
Susan,
Foam at Ollies? I don’t think our Ollies has it. I don’t do enough to invest in a carving knife. I have serated knives I use on thick pieces, but scissors did fine on this thinner foam.
I bow to you! I had upholstery projects. 🙂
gail
While I love the look of painted wood, I LOVE gel stain! It’s so pretty, and that color is perfect! Beautiful work!
Thanks! It hasn’t found it’s forever home yet…. I love the gel stain too!
gail
I have that same chair! I rescued it from a thrift store. The man who takes care of the furniture for the thrift store ladies, said they wanted to throw it out because of the missing seat, but he knew someone would love it and could still use it. I eventually want to do what you did with plywood, but in the meantime I found a charger/large plastic plate that fit in the hole perfectly. I spray painted the charger black and made a black cushion with German embroidered trim. It’s not a chair anyone large or rambunctious can sit in, but I love it’s shape.
That’s crazy Kate! I love the lines of this chair and hope that it finds a new home for the next phase of it’s long life. 🙂
Your solution sounds perfect for what you wanted for your chair.
gail
love how the gel stain brought out the color of the chair! so pretty.
the seat is neutral enough for any decor and would be easy to change out to match whatever you want!
Looks lovely, I agree that wood is too nice to paint. I thought gel stain always needed a topcoat though?
The gel stain on this chair and another project I just did feels pretty “sealed”. I may put a topcoat on the project I just finished when it warms up a little.
gail
Wow, I love it Gail! I don’t think I would have painted it either. I just received a large secretary/desk and I’m leaning towards not painting it but, that could change ;). I’ve never redone something like it before and it’s reeeeeaallly beat up with broken bits but, I know I can refer to your posts for help along the way! Thanks as always!
ohhh broken bits… that’s sad Angie. I really recommend the gel stain for trying to match wood and make it look better. Good luck!!
gail
Awesome! Thanks again!