Covering Popcorn Ceiling with Wood Planks
As an Amazon Associate, I earn from qualifying purchases.
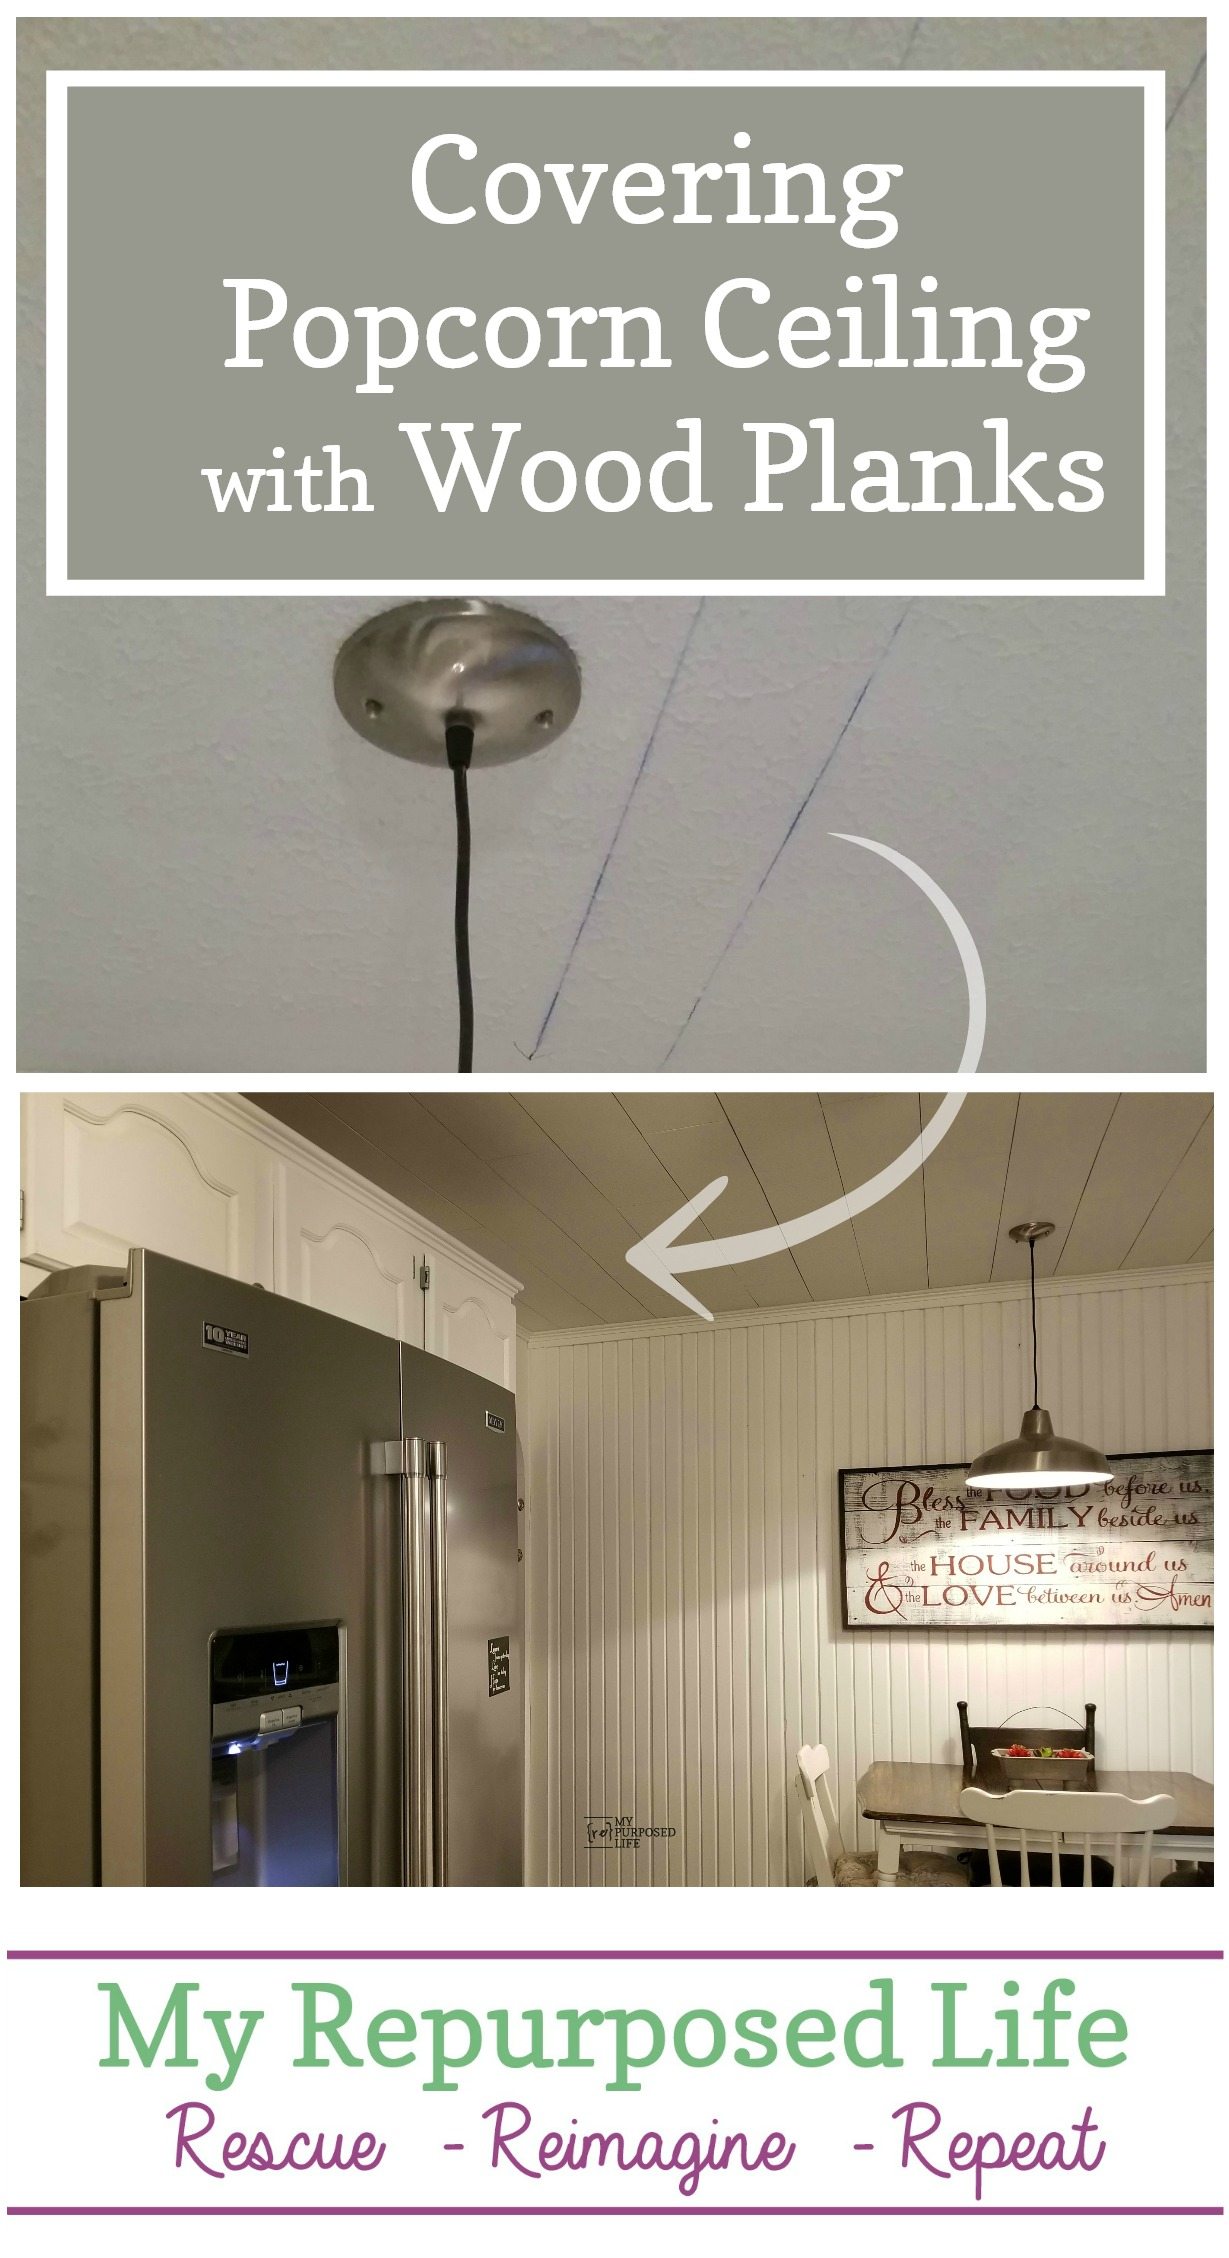
You say popcorn ceiling, I say ugh!
You may not know that I’ve lived in my home for over 42 years. Many of the renovations that have been done were not my choice. Adding a popcorn ceiling to every room in the house is one of those decisions that I regret. But in most rooms it was a necessity because the ceiling was in rough shape and the textured ceiling helped hide issues. But I’m so over the textured popcorn ceiling. I know a lot of people have been scraping their ceilings, but that really isn’t an option for me. Short of adding new drywall on all the ceilings I thought my options were very limited. Receiving my new Maytag appliances spurred and inspired a lot of home improvement projects, including this “cover up the ugly popcorn, plank ceiling project.
I have partnered with Maytag® to sponsor this post, but all thoughts and opinions are my own.
Thin plywood for ceiling planks

I decided to use thin plywood known as “underlayment” for my ceiling planks. I used six 4×8 sheets for this project.
Rip wood on the table saw

To begin, the 4×8 sheets were ripped in half, and then half again to make them easier to manage. The planks are around 6” wide.

The planks were stored in the garage until I could find the time to paint them.
Paint wood planks before putting on the popcorn ceiling

Using a small foam roller really worked well.

Finding a way to dry them was a little more challenging. I had the painted planks everywhere in the backyard.
Mark ceiling joists

Here is the lovely popcorn ceiling. Rodney helped me with this job. I originally thought I could do it by myself, but reconsidered. Boy, am I glad I did! This is NOT a one person job. We snapped a chalk line going north to south and east to west to find the center of the room. NOTE: snapping a chalk line indoors on the ceiling can be a little messy.
Secure wood planks

We staggered the boards, taking turns holding and shooting the brad nails. We shot nails on the studs.
As Rodney was taking the ceiling fan down, he noticed that it was not secured properly and told me I’m really lucky it hadn’t fallen on me. Yikes! You might notice the NEW FLOORS! I am loving the new laminate floating floors so much. In the background you can see the diy barn doors.

A view from the floor looking up. Ooops! Do you see a nickel? We used nickels to space all the boards. I think we had about 10 of them—we were constantly dropping them on the floor. ![]()
The nail holes were patched and I did a final coat of paint on the ceiling.
Patch nail holes

I am falling in love all over again with my kitchen thanks to my Maytag kitchen suite and recent updates. The fingerprint resistant stainless steel finish has been perfect for my post-kitchen renovation clean-up and I love that I only need water to clean it. Speaking of water, the refrigerator also has a PowerCold® feature, which has helped me stay hydrated by keeping everything nice and cool.
. There are several more projects I need to finish. I still plan to build a new kitchen table and a small console table to hold my small t.v. You can see how I made the Bless The Food Sign and one of my most recent projects, the loaf pan planter by clicking those links. By the way I painted the bead board wall—you may remember it was gray.

I currently have a board and batten back splash. When I did it, I liked it, but maybe I need something different? I also desperately need a new counter top and sink. Oh, and I plan do rework the kitchen island/craft station. I wonder if I’ll ever get it all done. ![]()
PIN IT!
I’d love to hear your thoughts about the upcoming projects.
Gail
related content: Kitchen Updates
Gail, I’ve been following you & subscribed for at least 4 yrs, thank you very much for the great upcycles. My home of 35 yrs has popcorn ceilings and I’m ready to pull my hair out. Thank you and ML
Sonya
Sonya,
Thank YOU for being a friend of My Repurposed Life! I still have popcorn ceiling in my other rooms. I have too many irons in the fire to deal with them at this time in my life. BUT, I’m soooo happy I covered them up in the kitchen.
good luck!
gail
Excellent job my ceiling is two years in holding strong. I did the exact same thing. Way to go thinking outside the box, sometimes I find people look at what others do just so they can rip it apart, take positive leave the rest in the rear view. Cheers it looks Great
I still love my plank ceiling! But, have popcorn in all the other rooms still. ugh!
gail
Did you use the plywood as your planks or did you buy lumber as your planks? Are the lumber planks installed and nailed to the plywood? Why would cut the plywood into 6” strips if you are going to nail lumber planks? Why not just use the lumber? Anyway I would like to do this but as you can read I am very confused.
Thanks,
Gaylene
I used the thin plywood as my planks. Wood (lumber) would have been too heavy. We nailed directly to the popcorn ceiling. I hope that clears things up for you Gaylene.
gail
Did you have to adjust for the thickness of the board when you replaced the lighting?
Lynne,
I really didn’t have to adjust for the thickness of the board for the ceiling fan or the light.
gail
I feel a bit nit picky, but if you rip a sheet of plywood in half (long ways), and then do it again, you have 12 inch wide planks (minus the kerf), not 6 inch. There is absolutely no way you “nailed them to the studs”, first off studs are something in the walls, on ceilings you’d be talking about the bottoms of rafters or floor joists of the floor above. Second, the joists or rafters would be 16-24 inch spacing so very, very few of your nails would line up with the joists and even if they did, 1 inch finishing nails or whatever you used would barely make it through the drywall to even connect to a floor joist. Long story short, my concern is that your planks are not very well attached to the ceiling at all. Six thin finishing nails (per board) punched into crumbly soft old drywall is not much to keep those things in the air. I’m sure it looks great now but I’m guessing its going to warp and the nails will pull out on you bit by bit over time, watch out for that. Perhaps if the boards had some construction adhesive smeared on the top side first and then got tacked up there with the nails… but there again, drywall is not a very solid material to adhere anything to. Assuming you scraped the ceiling first you’d be gluing boards to painted paper backing of the drywall… Just doesn’t seem good. I like how it looks I just don’t think those planks will stay up there flat without eventually having to put screws in them. Just my two cents maybe give us an update in another year or two to let us know how its holding up.
Thanks for stopping by and taking the time to leave a well thought out comment.
We found the joists and popped a chalk line. We didn’t with the joists, we went across them. They fell 16″ on center. So far so good, but I will keep you updated on the outcome.
We did use adhesive.
gail
I love this!!! I have scraped popcorn ceilings in all but 2 places in our new-to-us-home. The foyer and the living room. Both are super high, and I do not want to risk it. I recently thought about planking the ceiling, and LOVE how simple you made it work! Gonna share this with my hubby to see what he thinks! Could you stain the wood to get a different finish? I am not familiar with the underlayment (or whatever it was called), but saw someone else plank a wall with it in their house. I am not sure if I still want a white ceiling or possibly stained wood. What is the texture like? Stain worthy??? Or needs to be covered with paint??? Thanks for sharing! 🙂
Hannah,
Underlayment is thin plywood that people use under their flooring choice. It will stain. You would have to be selective of your boards, inspecting both sides. Sometimes the boards have some sort of patch material on them (it’s sort of pinkish) I like it because it is lightweight. The boards come fairly smooth, but you may want to sand them before you rip them.
kudos to YOU for scraping that stuff! Were the ceilings in good shape? My popcorn is there because the ceilings are rough.
gail
Hey! Thank you for the super fast response. Not only was it fast … it was soooo helpful too! Our ceilings are not in too bad of shape (the only rooms I was not able to scrape were a half-vaulted ceiling in our living room (which is the room I was looking at planking), and our foyer (it is open to the second level). Everywhere else, they were in pretty good shape, but I just wanted the popcorn gone. It is a pretty simple task IF the ceilings have not been painted. If it is just the popcorn, then the removal consists of spraying the ceiling with water (I used a 1-gallon garden sprayer with water from our sink) and scraping. You do not want it soaked, but somewhere between a light spray and dripping. 🙂 The wetter it is, the easier it is to come off. Then you scrape. I did scratch the sheetrock quite a bit before I got the hang of it (oooops!). Truthfully, it was a lot of fun (for me at least … hahaha!).
ohhh, I KNOW what my ceilings look like under that popcorn. Some cracks are even starting to show through the popcorn. I have a bad shoulder, and I can’t imagine scraping that stuff off, let alone enjoying it! hahahah
kudos to you Hanna!!!!
gail