Antique Radio Cabinet
As an Amazon Associate, I earn from qualifying purchases.
Antique Radio Cabinet into a portable bar


Sometimes I look for “easy” projects in between the larger ones—I thought this portable bar made from an old radio cabinet would be one of those projects. I’ve been sitting on this for a few months, and after cleaning out the garage recently, I decided it was time to start a makeover on this little gem. You can see the recent finds post on this piece in my post Recent Finds-Thrifting With Friends
 I’m a little out of my element when it comes to bars. I’m not a drinker, and I really didn’t know which direction to go with this piece. I did think it was too low, so the first step was to give it some height.
 I laid some boards on the top to try to figure out how much height to add. I went with a 1×6.
This post contains affiliate links
 I used my Kreg Jig to make the box to set atop of the original cabinet. The Right Angle Clamp is great as an extra pair of hands. I used Gorilla wood glue for a good tight hold. I drilled all of my pocket holes after marking them during the dry fit.
 The new look.
 I recently picked up some of this trim molding from the Peddler’s Mall for $5. I felt it was perfect to top off this box/skirt.
 I added the molding with my nail gun and Gorilla wood glue.
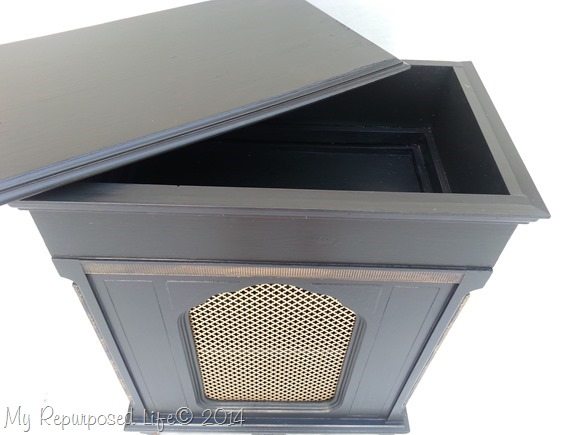
 The top of the bar will not be hinged, it will rest on top and be held in place with these placeholders. The small pieces will rest on the inside of the box/skirt to hold the top in place.
 I used some 1x’s to add a middle shelf. Not shown, I also used a small piece of thin plywood to cover up that bottom hole across the bottom.
 I used my DIY Chalky Paint as a primer to give it a base coat of flat paint. Once the piece was all one color, in this flat black, I really fell in love with it.
NOTE: I removed the knobs and filled the holes on the doors.
This is where it goes wrong. ![]()
 I did what I often do—putting semi-gloss paint over the diy chalky paint primer. As soon as I did that, I started not liking it. The flat paint hid the flaws, whereas the semi-gloss paint shows every single flaw.
 Looking at the underneath side, you can see that I broke one of my #1 rules. I always paint the bottom, but this piece is pretty heavy and awkward. I didn’t paint it first like I usually do, then it was difficult to do the bottom without messing up the back or the top.
I don’t like the way the wheels had to go in. I feel like I should have cut the bottom off to get the wheels into the corners. The wheels may or may not stay on. This is quickly becoming a least favorite of my projects.
 This piece is meant to roll away from the wall in order to get to the items inside, because the door area is so small. That is why there is no back on it.

I added this top skirt thinking it would be great to hold a large container of ice to chill drinks.
I’ll show you how we staged it, but I feel like it’s far from finished.
 This piece could be used as a liquor bar.

Do you think it’s more suitable for a small buffet to hold extra dishes, or maybe a dessert bar, or even a coffee bar?
UPDATE! I made some changes to this little cabinet. Check out the latest version in my post updated portable bar.
gail
Related Content: Black Radio Cabinet
sharing here:
What about a game cabinet? Boxed games on the shelves. Cards, dice,checker pieces, etc. in the space at the top. Maybe the top could be changed to open up bigger to hold the board games.
I dislike the flat black, I was wondering if there was a way that you could add a bolder color and maybe some decopague or something that would date it back to it’s original era with out being to gaudy.
really cute! i like it!
I love the new look. But you seem to want a fresher look. How about a quick change by striping a light beige on the door insets and the inset area surrounding the top. Vertical stripes would be great, maybe the width of painters tape (to make it easy). That would make it a very fun look. You could use any color actually. Just a suggestion. You have put a lot of work in it (and I am dying to learn to make pocket holes) 🙂
I love the top and would make it reversible as a tray with grooves in side for handles. Place to hang glasses on top and room for a few bottles. Cute. Black could be broke up with some pinstripe or gold trim.
I’d put mirrors on the doors, or glass. Something to lighten it up a bit. (Of course I have no idea how hard that is, so take my comments with a few grains of salt. Do they even make mirror paint?) I liked the pictures where the doors were open, but with the doors closed, it looks too monolithic.
Gail, I love how it looks! I think it looks nice in black, but some distressing, or putting knobs back on would break up the black a little, to help the beautiful design of it stand out.
I think I would have used a larger moulding and extended the top over the piece. Which would give it s larger top maybe by two inches all the way around. Maybe a decorative wood applique would be great for the front panel you put to cover the opening or a decorative stencil. I absolutely love the piece, you have such fantastic ideas!!
A little bit of work, but I think If you stenciled some colorful martini / wine glasses on it would seal the deal.
I would probably not use this as a bar due to access from the back. Maybe some shelf edge stoppers and you could use it for special dishes, glassware and linens. Try another color.
I think it looks great ! Coffee bar sounds perfect !!!
I do know what you mean as far as the paint goes- diy chalk paint is very forgiving to the piece if there are flaws.. My question is when you chalk paint black do you wax over it? I’m finding with pieces I do in black there is always a cloudy look to it after… Wondering what I’m doing wrong and if anyone else has the same issue. I did recently purchase the Annie Sloan wax brush and still found the same problem.
Love this piece !!!!
I have the same problem waxing black. I use several different brands of wax, and I will say the problem is less with the Annie Sloan brand. But would love to know the cause.
Linda,
I always seal my diy chalk paint with something. Sometimes it’s a poly product, or maybe latex paint (like this piece) my least favorite is waxing (because I have a bad shoulder) You’re not doing anything wrong with the paint–it just has to be sealed somehow. Love the Annie Sloan wax brush!
Thanks so much for taking the time to leave a comment
gail
I think as a small bar it is great. Seems to me though, you’re going to want to take a deep breath and reattack it. Get the flat paint back on there — Yep, it looked better, and you know it 🙂 Maybe add an accent color to the ‘depressions’ on the front surrounding the detail (I don’t know what it’s called) and also around the “door” opening. Maybe something subtle like charcoal grey, or white if you want that much contrast (very art deco). You’ll also want to flip it over before you repaint and finish off the bottom with paint if it bothers you. I wouldn’t bother, because, like you said, it’s HEAVY so who the heck is going to be tipping it over and peeking under it?! Don’t worry about the wheels, you don’t even see them, so let them be, unless you’re sure they will cause you problems, then decide if you’re going to fix that now, or just deal with it later. However, I would definitely remove/bang the top “cover” off and put some “C” hinges on it the kind that hold open to make the inside top box practical for storing *and* serving from. Just open and place bottles/serve from a mirror tray, or something (mirrors are very “bar like”, right??). Consider all of this “Portable Bar Project, Revisited” 🙂 I think you’ll be happier with it when you return to it, and give it the extra effort it needs to be amazing 🙂 I am always in awe of people like you who can look at something and say, “Hey! I think I’ll just totally remake that into something new! Radio? No, that’s my new bar!” I learn so much from your website and am learning how to look at cast offs differently. Good luck and thank you for the great blog!
Nicole,
Thank you so very much for your detailed suggestions! 🙂 I really appreciate the fresh look on my sad situation. lol The top is not attached, it is easily removable, and can even be used as a tray. Since I do my projects for resale, it’s difficult to know exactly what “purpose” the new owner will want.
Thank you for your kind words about what I do.
gail