Review-Giani Granite Paint for Countertops
As an Amazon Associate, I earn from qualifying purchases.
See the bottom of this post for another NEW update


If you’re new around here, I should show you how my kitchen looked this time last year:

 I painted my oak cabinets white, and I even painted my vinyl floor. Did you notice the utensil holder and knife block? I painted them with Krylon Stainless Steel paint.
 I also added a board and batten back splash. I wanted to update my countertops, but it wasn’t in the budget.
But Giani Granite BOMBAY changed all of that!
.
Bombay Black
Complete Kit:
- IronCoreTM Primer-Base Coat
- Pearl Mica Mineral
- Black Onyx Mineral
- Bronze Mineral
- Automotive Polyurethane Topcoat
- 6” GIANITM roller arm and two roller pads
- 4” GIANITM granite paint sponge
- 2” Foam Brush
- Black practice poster board
- Paint by Number DVD for beginners
- Illustrated Instructions

Let’s begin with Giani Granite Paint!
 The first thing I had to do was remove any silicone caulk, because it’s not paintable.
 The next step was to tape off everything with ScotchBlue painter’s tape. I used a large baggie for my faucet and small baggies for my handles.
 I started applying the primer with the roller.
 The coverage was really great!
 I did a light second coat. It only calls for one coat, but I’m a 2 coat primer girl.
 Looking good!
 I gathered all of the items from my kit. I cut the sponge into smaller pieces.
I practiced on the poster board, but I didn’t take any pictures of that.
 If you ever do anything like this, you know that sometimes you forget you’re a blogger. I didn’t snap many pictures, and the ones I did take are poor quality.
 In the DVD (which I watched twice) the lady tells you that you get more depth with more layering. It called for me to do the Pearl Mica Mineral first, then the Black Onyx Mineral, with the Bronze Mineral being last. I did that, but then I added a little more of the Black Onyx and then added a little of the Pearl Mica. I don’t think there is a wrong way to layer. It’s all a personal preference. I used VERY little of the Bronze Mineral.
You work in about 2 ft. sections, with all 3 colors before you move onto the next 2 ft. section. You do not do all one color, then the second, and third color.
 I believe this is after one coat of the topcoat.
 When I removed the tape I did have a little bleed, but I really believe it was operator error. When I added my board and batten backsplash there was quite a gap, which meant more than the usual amount of caulk.
Please ignore the toaster in the sink. I had not used my sink for a couple of days (had everything covered with tape and baggies) but I wanted some toast and couldn’t put the toaster on the countertop.
 The finish is perfect. I am not a real “glossy” person. I’m generally more of a matte finish girl. I applied 2 coats of the topcoat, then scored the tape and removed it.
 I will give my countertops a good deal of time to cure. Anytime I paint something, I let it cure really well, and this will be no exception.
 I have to tell you that I have had this kit for quite a while. I kept putting it off because I thought I wouldn’t be able to accomplish it with good results.
 It’s pretty difficult to take a picture of such a shiny surface!
 I LOVE the way it shows off my painted cabinets!
 Here you can see that I definitely need new appliances! My stove and fridge are so dated! This is a quickly staged photo because I need to wait a couple of days before I put my stuff back on the countertops.
 In these photos I have not re-caulked yet.
 I have caulked (late Sunday night) but haven’t taken any pics yet.
 Do you love them as well?
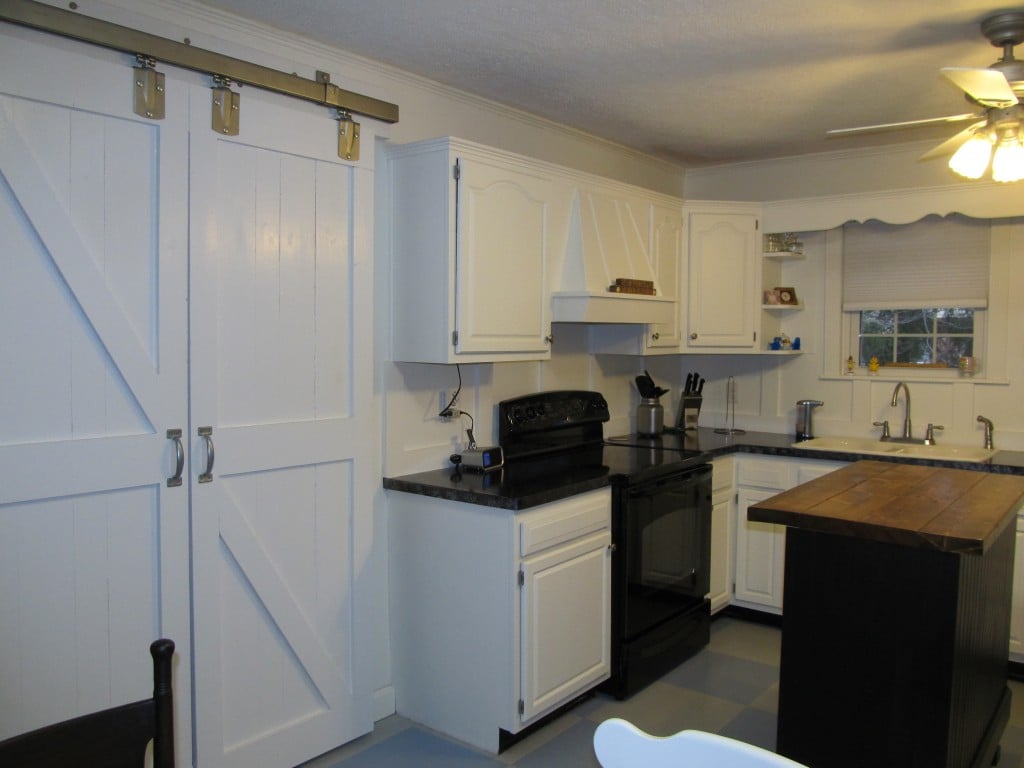
UPDATE: It’s been over 2 years since I painted my counter tops and I STILL love them! They’ve held up great, with only a little wear near the sink where I stand to wash dishes on a daily basis. 😉 I finally got new appliances, and you can also see I’ve added a DIY kitchen Island and Barn Doors. I’ve also updated the color of the floor.
After TEN years, I repainted my countertops, see that post here:
gail
Disclosure: Although Giani Granite supplied me with a kit to review, my opinions as always are my own. I received no compensation to write this post.
Thank you for the link to your DIY counter tops. I am now totally convinced that you are a “Die Hard” DIYer. Your
work is so well executed. The entire kitchen make-over is fantastic. You did so good girl. you are a pro.
LOVE how u did the counter tops… I totally have to do that to mine… where did u get the kit? and honestly, how difficult was it? I love everything you do…
Giani sent me the kit. I believe it is available at Walmart now, and of course online. I think the prices is around $80, a lot cheaper than the Rustoleum kit.
It was very easy. I was nervous about getting a good “pattern” because I had never done any painting like this, but they include a DVD and after watching it, I felt good about trying it.
They have held up great, I still love them, and will keep them until I get a new sink (someday) If you hate your counters like I did, what do you have to lose? 🙂
gail
It is amazing how different your kitchen looks just by painting cabinets and counters. It looks so modern and bright! Thanks for sharing your experiences. It gives us hope that we can do it too.
Hi Gail……your counter tops are fantastic! You always impress me with all you do!
I have been toying with an idea for my kitchen too. Simply waiting for money from heaven. You have done what I want to do. Paint the cabinets, and paint the counter tops. Good show. I am a older and I live alone, so I have to think carefully what I can accomplish. You make it look easy. I love the Island idea too.
Hello Gail,
I just discovered your diy website and love it. I am looking forward to jocking your style and repeating these projects. This is a great idea and since my family and I are moving into a home that does not have updated counter tops this will be an excellent alternative.
WOW! I love the countertops now! We live in a double wide trailer and all the countertops throughout the house are this ugly lavender/blue/grey color – yuck. We can’t afford to get new ones installed so I’ve just been living with them. But now I have hope that they can look gorgeous!! So glad I found this page today. ( :
This comment has been removed by a blog administrator.
What an inspiration. I always wanted to paint my counter tops, an inexpensive option to buying the real stuff. You make me want to forge ahead and take on the challenge.Awesome Job!!
Saundra
WOW! Truly amazing,Gail.I also have Oak Cabinets in my kitchen and I am tired of them.I had thought about painting them white a while ago and now that I have seen yours I will defnitely consider it more. I painted a wood bedroom set, white, quite a few years ago. I used Melamine Paint and it still looks like new with no scratches. Do you think Melamine Paint would work on my Oak cupboards?
Also I was wondering.Are you now going to paint the blue squares in your floor black??LOL
I’m so happy to know about this product and that you are still happy with it after a year. My kitchen counter is grand central station and I’m not sure I can be so gentle with it. Guess I’ll think about it after I find out the cost of the kit. Thanks again.
Howdy! I just did this to my counters as well. I’ve researched but I can’t find an answer…what do you clean your counters with? The Giani site says to not use abrasive cleaners(like Bleach spray) but I want to make sure my counters don’t have germs on them. Thanks! 🙂 Racheal