Tips for Sanding Vintage Hardwood Floors
As an Amazon Associate, I earn from qualifying purchases.
The following is from my cousin’s son Doug—he volunteered to help me sand the hardwood floors, and he even wrote up the blog post for me. Take it away Doug!
Doing hardwood floors was always something a little different to me. They’re by far the most visible feature of the room. When done right they can be beautiful and add warmth and character to a home. I feared that I didn’t have the attention to detail that was needed to make them look their best. This project was a chance to conquer that fear and to really help a home feel special.
General Impression
On the first few passes I realized my old fears of chewing through the hardwood or causing gouges were overblown. Even with 36 grit I had to be truly careless to cause problems like digging a valley. I quickly realized that I needed to lift the sanding drum a few inches before I reached the wall. Bumping the wall means stopping and if the sanding drum is still down it’ll keep on digging. Do not to expect to be able to do the entire length of the floor in one pass. It’s honestly a lot like vacuuming if you’re vacuuming a shag carpet with a really aggressive vacuum. Below are a few of the issues I came across and the tips I can pass along.
Grain

The first pass was on a diagonal to the grain. Frankly, unless you’re refinishing a relatively new hardwood floor that was prefinished don’t do this! Prefinished hardwood has baked in polyurethane that is incredibly hard to damage. I’ve spoken with hardwood professionals who say they roughly double the budget for sanding pads on these types of floors. They do this because the polyurethane will wear down even a 36 grit sandpaper fast.
On the project house the floors are from the 1920’s and hadn’t been refinished in a very long time. Therefore there wasn’t much polyurethane left. By going diagonal I scarred the grains and a room that should have taken less than 45 minutes took nearly 90 minutes. I had to go over it twice more with 36 grit and then twice with 80 grit. The effort to try it on the diagonal actually cost me more time and sanding pads than dealing with the room with glue mentioned below. So, the lesson learned was don’t do that without a very, very good reason.
Gumming

The biggest problem we had during the entire project was gumming the sanding pads with glue. In two of the rooms we were refinishing, carpet had been laid and instead of tacking the pad down. Carpet glue feels like a solid, but melts, turning into a gum like glop that clogs the sandpaper. In hindsight I wish I’d just used a large floor scraper to scrape the stuff up. This would have been easy with the help of glue solvent or mineral spirits. We didn’t go that route this time because of fears of gouging the floor. After seeing what the sanders do, it’s obvious now that unless you’re carving your initials, the sanding pads will erase it.
Edging

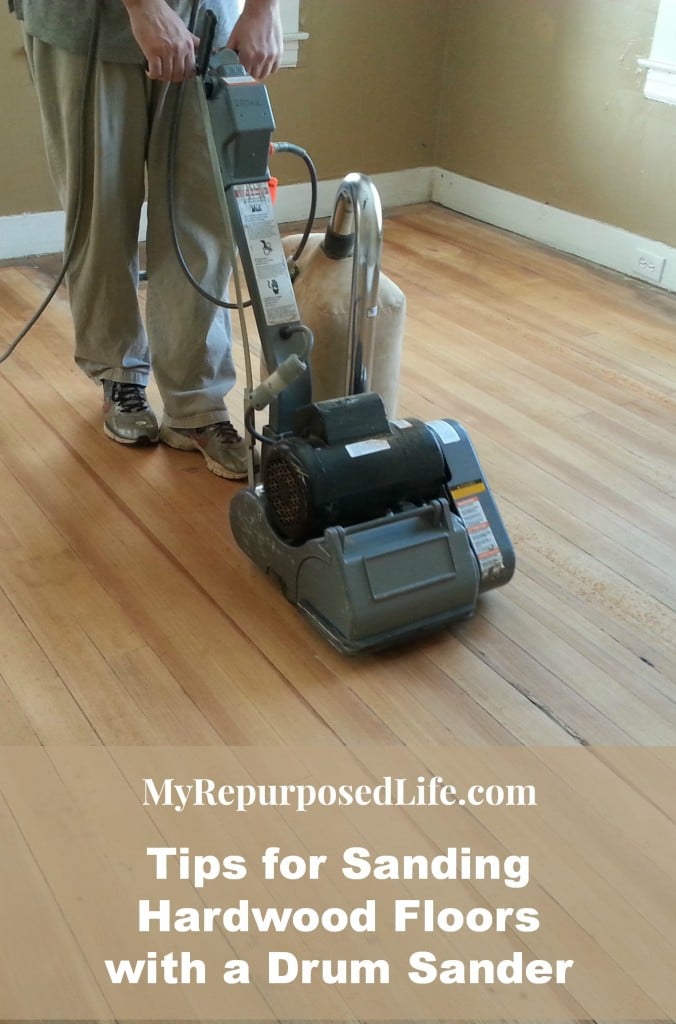
Drum sanders are wonderful, magical machines that do a great job of sanding off the old material. They are faster than you can imagine, they just don’t get close to the edges. After I finished with the drum sander I still had a solid eight to 12 inches of hardwood to sand at the edges of each room. On this, I can only give the slightest bit of advice, due to equipment problems. The linked video shows how to use one and frankly it is just about that easy. With a 30 grit sandpaper to start I was able to edge each room in about 30 minutes.

This heavy grit sandpaper left some swirling but nothing too extreme. Switching to a 60 grit sandpaper I ran into problems though. No matter what I tried or how hard (or not) I tightened the set screw the paper would come off center as soon as it touched the surface and it created more swirls. This isn’t a problem discussed a lot on the internet leading me to believe it was probably just rental equipment that had a worn pad that no one had reported before. In the end I worked with Gail to use a random orbital sander to feather out the edges as the last step before cleaning for staining. At this point I’d also like to note that oak flooring from the 1920’s is a lot harder than modern oak and will take more elbow grease to prepare.
Equipment
A brief word on equipment in general. Life is short, use the right tool for the job and you’ll save yourself time, frustration, and probably even some money. If the rental place you’re used to going to has worn out equipment and you’re constantly having to talk to them about why it’s broke or not working right, find another place to rent from. Saving a few dollars on a rental probably isn’t worth it if it takes hours longer to do the job because the equipment isn’t up to it. If $10 or $15 more for a better quality rental is a problem on a $1,000 job, you probably need to reevaluate the project.
Not all Drum Sanders Are Alike

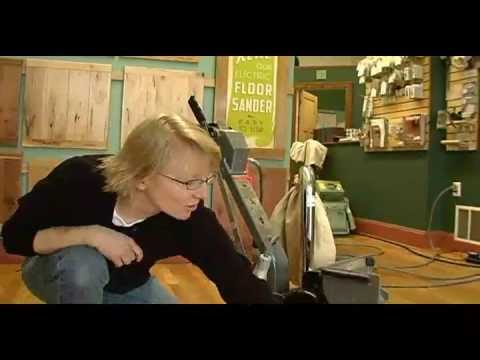
In the first attempt to prep the floors Gail tried a rental sander that used square sheets rolled around a drum that were then clipped in place. To say it was a horrible experience is an understatement. It was difficult and slow to load new sheets, and any glue on the floor from the carpet that was there previously gummed up the sheet and caused it to come off the drum. With two hours of work, maybe 10 square feet had been sanded down. In the end, a horrible piece of equipment and I can’t emphasize enough that life is too short for this.
 For the second try Gail picked up Clarke American Sanders drum sander. This sander features a true drum and uses pre rolled sand paper. To load a new sheet is as simple as unplugging the sander, opening the housing, slipping the new sheet on to the drum. The hardest part is to just keep the sand paper square to the drum so it’ll slide right over it. When you power up the sander the spinning drum actually gets slightly larger and holds the paper in place. ‘
The operation was as simple as the linked video made it look, with the lever up, flip the power switch to start. Once it spins up, you begin to move the sander in the direction you’ll be going and just ease the lever down and the sanding pad lowers to the floor and away goes your old polyurethane and stain (and a bit of wood floor). The only time I carved any valleys was when I first started out and didn’t have enough speed up when I flipped the lever and really just dropped the sanding drum too hard or when I walked into the wall. None of these valleys were significant though so no harm, no foul. To practice I’d suggest starting in a corner of a less important room, preferably in a place you know furniture will go in case you do screw up once or twice.
Closing thoughts
So who should do this project? It’s not the hardest project I’ve ever done on the DIY front. Compared to running a ditch digger or a tiller, the drum sander was a dream. The steel casters and raising/lowering handle actually made it pretty easy to maneuver and I was able to control it with just a light grip on the handle. At 125lbs the most difficult part was getting the drum sander out of the car in the snow and ice.
The edger was heavier and more aggressive than any sander I’d ever used before, but then I’d never used a 30 grit sand paper before either. It also had steel caster wheels on it to help with the weight but it’s still a very different beast than the drum sander because it’s trying to spin out. Overall, not that hard to control but because of the speed and fact it requires you to bend to the floor to operate, it was the most difficult part of the job. Since I wasn’t able to get it to work with the higher grit papers, I couldn’t give a fair assessment of how it would perform on anything but the 30 grit paper.
As with all power tools, read the manuals, never stick your fingers in them when they are plugged in, always use proper hearing and eye protection.
Who can do it?
It turns out not to take any really special skills to operate the sanders and get pretty good results. Due to the weight of the equipment and its power, you should have some decent upper body strength though. To operate the edger, which requires constant bending, a good back, shoulders and knees is pretty much a must. I probably wouldn’t try it in a McMansion where every detail matters, but for your average home it’s well within the scope of a handy homeowner.
–Doug
Thanks so much cuz for helping me out with this project, I couldn’t have done it without you.
Now for a few thoughts from me—I am getting too old to take on such big DIY projects. If my cousin Doug had not volunteered to help me, I never would have gotten this job completed.
 It was a dirty job, but not as bad as I thought it would be. Both sanders had great dust collection systems, which was definitely a plus. Even so, I wore a respirator and a shower cap to keep the dust at bay.
TIP: Turn off your HVAC system while sanding and cleaning up the dust.
 These kneepads were also very helpful. (look at that pretty floor)
 In addition to the big guns, I also used this mouse sander to get into tight spaces and corners, plus an orbital sander to help feather it all in.
All of these sanders are very noisy, remember to wear hearing protection.

 This is a portion of the sandpaper we used. Look closely at the round discs on the left and you can see how the glue gummed up on the sandpaper.
Let’s talk $$$
The drum sander rental was $55 for 24 hours, the sandpaper for the drum sander was $116
The edger sander rental runs about $49 for 24 hours, and the discs are about $2 each
If you need tips about removing carpet, check out my post Removing Carpet & Pad 101
Have you sanded hardwood floors? I really want to do them at my house, but it really is a lot of work for old ladies.
UPDATE! I didn’t refinish my floors, I put down laminate floors in the kitchen, living room, hall and two bedrooms. It’s been a year, and I couldn’t be happier. They still make me smile every day. The good part? Someday if someone WANTS to re-do the original floors, they are not damaged in any way. See the Laminate Floor Tutorial and Reveal HERE.
gail
Related Content: Staining Hardwood Floors
I have done about 3300 sq ft of hardwood flooring on an old school house for my boss (as well as the sanding portion of the basement-another 2000ish sq ft). It was a time consuming task as some of the flooring had rotted and needed to be replaced. The replaced portions werent the same height as the old parts and needed extra sanding to level out. I used a drum sander rented from Home depot and used an orbital for edges. I followed up with the orbital over the entire floor to get 70 years of scratches and gouges as smoth as possible. There were also gaps between many boards. The most difficult part is cleaning before staining and/of a coating. I vacuumed and used a putty knife to scrape between all of the boards then vacuumed again and again and again. Then a wash with clean water over and over until the water comes clean followed by a wash with methyl hydrate mixed with water. The end product was beautiful after 2 coats of finish.
Wow! I take my hat off to you for sure! That was a huge undertaking. I think I would have been so discouraged during the process, thinking it would never end.
Congrats on a job well done!!!
gail
We are looking to refinish our hardwood floors and are looking for tips on sanding. It is good to know that using the right tool for the job will save time and money. Thank you for informing me that not all drum sanders are alike. We will be sure to find a quality sander when we get to that point, thanks.
Happy to be of some help! It’s a tough job, but totally worth it if you’re able to complete your own hardwood floor redo.
gail
So glad to see this, Gail. I’ve been thinking about doing my own floors since they’re in good condition, overall, but need sprucing up, and perhaps, a more modern stain. Thanks for the tips!
It’s a lot of work…. I need to do it in my own home Serena!
gail