Tractor Supply Barn Door Hardware
As an Amazon Associate, I earn from qualifying purchases.
I showed you in an earlier post How to: DIY Faux Barn Doors how I built my barn doors. This post will tell you how not to install barn door hardware. Just kidding-but I felt like these doors were never going to be up.
These box rails and hangers are now available to purchase online.

Materials Needed to Hang DIY Barn Doors
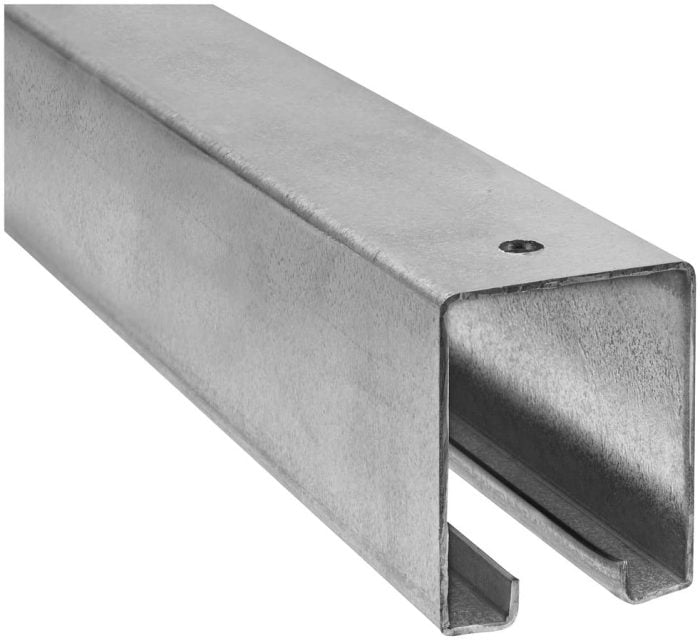
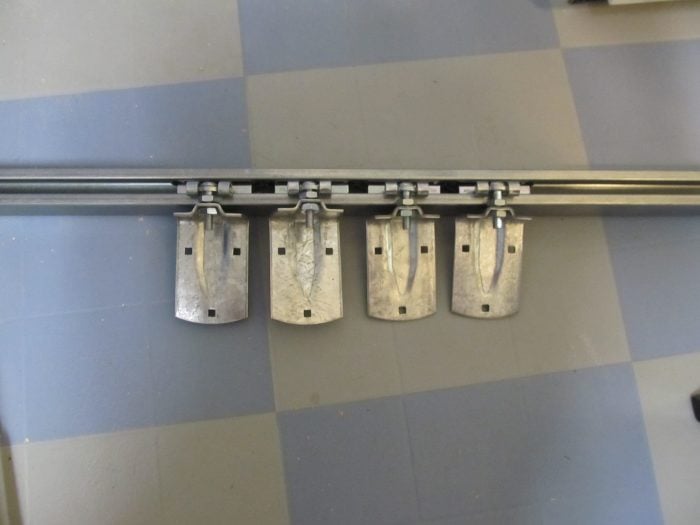
I purchased one of these Box Rails.
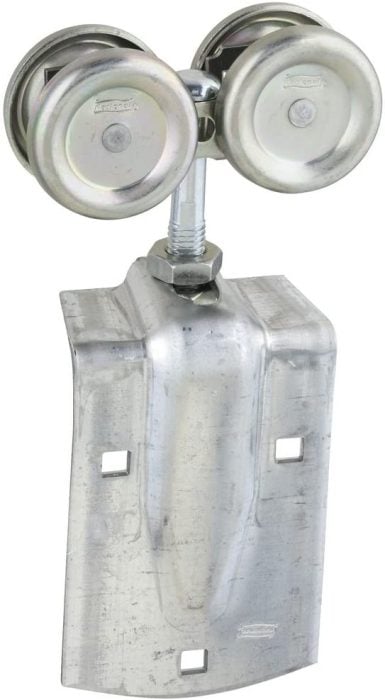
Because I have two doors, I had to purchase two sets of these flexible hangers are now available on Amazon.
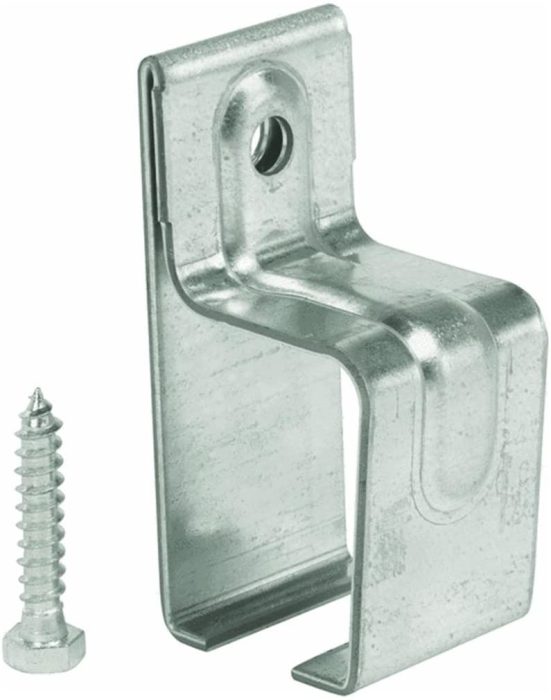
I purchased 2 of these Brackets to hold the box rail on the wall.
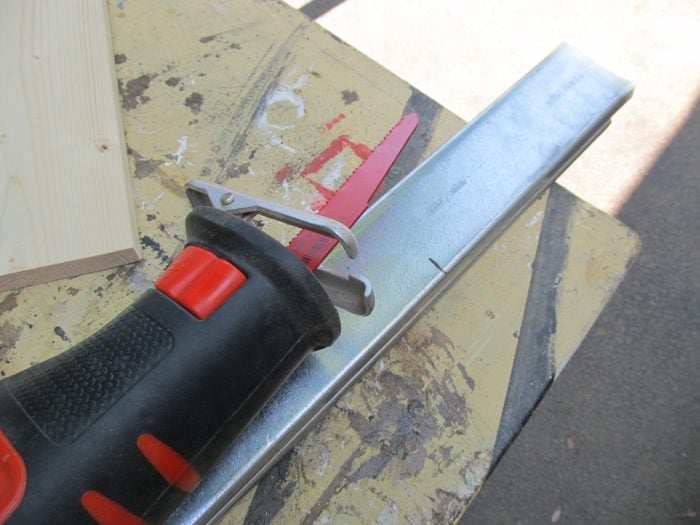
The box rail was too long. I cut it off with my reciprocating saw.
Can You Paint Barn Door Hardware?
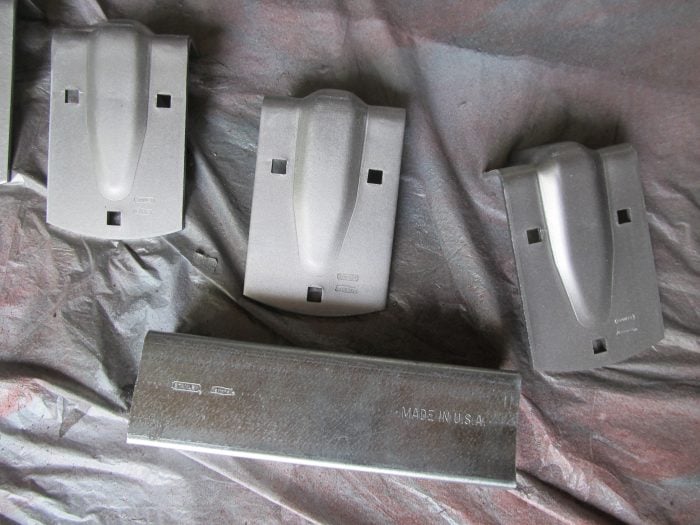
The pieces are galvanized, I wanted them to be stainless to match other items in my kitchen—ceiling fan, kitchen accessories, and hinges. I used Krylon Stainless Steel spray paint. You can see the difference between the brackets and the box rail part I cut off.
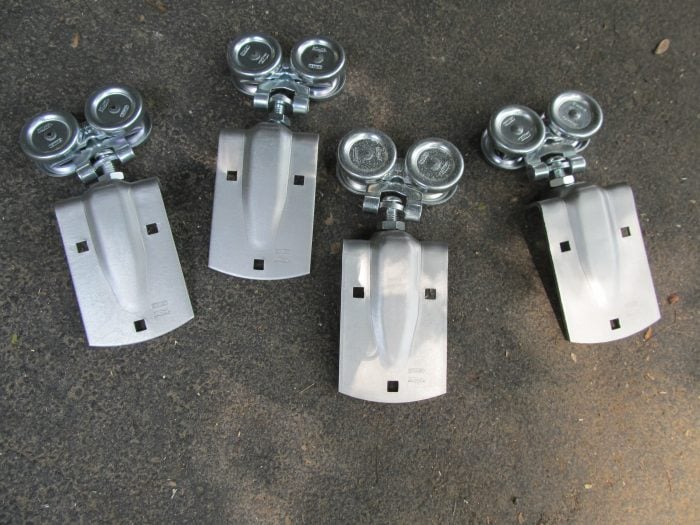
I didn’t paint the hangers (rollers).
Install Barn Door Hardware
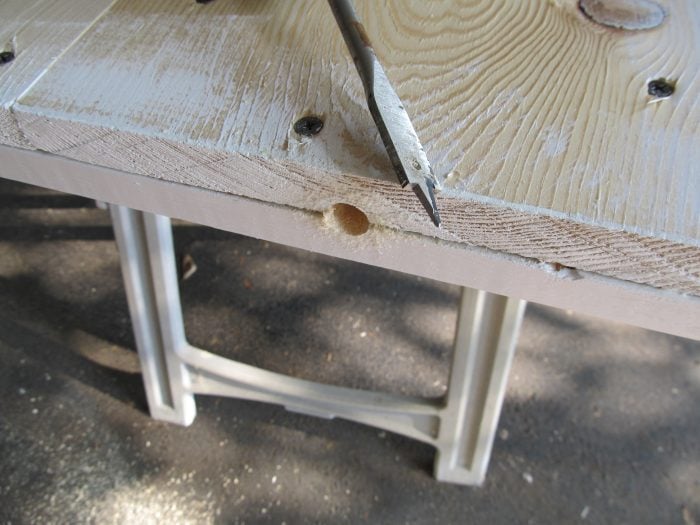
To install the hangers, I needed to drill a hole in the top of the door for each bracket/hanger.
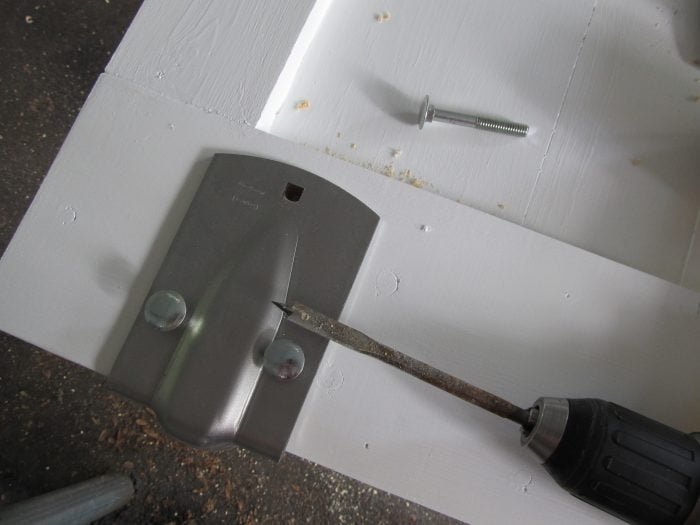
To do the holes, I used a bracket to mark the three bolt holes and the large hole in the top for the hanger bolt.
I used a 3/4 inch paddle bit to drill the hole in the top of the door.

I placed the bracket 3 inches from the edge of the door.
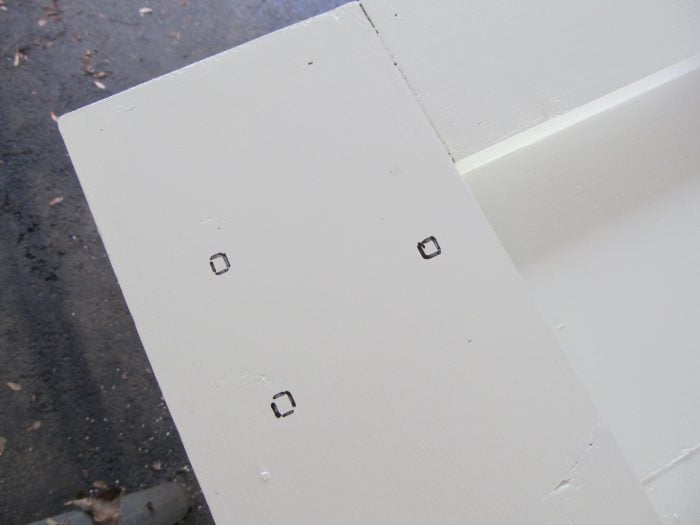
The holes were marked with a Sharpie, then used a 3/8 inch paddle bit to drill them.
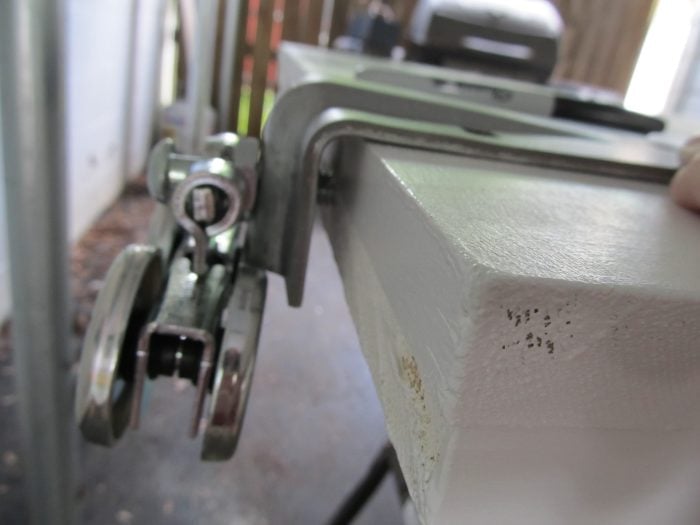
You can see with the bracket on the door, the large bolt in the hanger fits in the hole in the top of the door.
Prepare your space for the barn door hardware installation
This is where things got really rough. The Accent Piece used two 2×4’s for their box rail. I decided to go with a 2×6 instead. I initially used deck screws to attach it to the wall.
When I brought the doors in. . .
. . . and measured it to the 2×6, it was clearly too low on the wall. I knew this was going to be a challenge for me when I started. It was really difficult wrapping my brain around the (dead space) from the top of the bracket (door) to where the box rail would actually go.
What follows is NOT pretty folks.
DIY almost failure
I don’t even have pictures of all the things that went wrong. I removed the 2×6 and decided to use lag screws instead of the deck screws. Pilot and countersink holes were driled. I put the 2×6 back up.
The reason I don’t have pictures of the next few steps is because I was having a meltdown. MAJOR meltdown. I felt like this was never going to work at this point.
So, I had to take the 2×6 down. I drilled the countersink holes big enough for the head of the lag screw, but didn’t take in account the size of the socket that I was using on my drill to drive them in.
When I purchased the lag screws, I also picked up a 2×8 because lo and behold that is what the directions called for. I cut and painted the 2×8 and asked begged for some help. Two hands are not enough to handle and install a 7 ft 2×8.
While the paint dries on the 2×8 . . .
Old homes are full of surprises
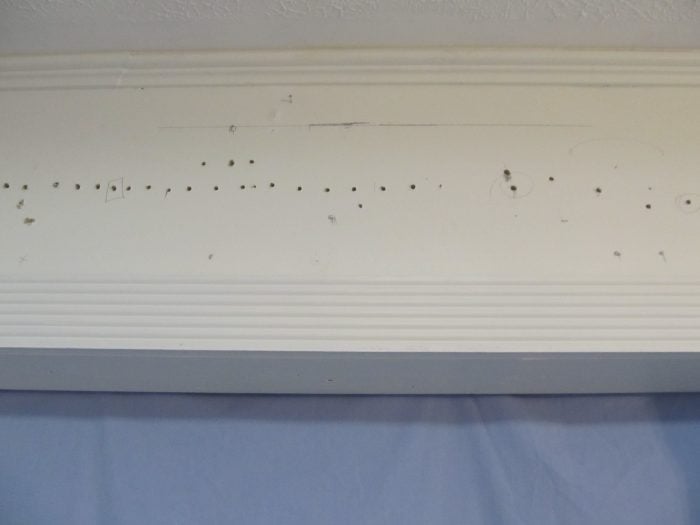
whoa! who shot up my wall with a machine gun? LOL I used a nail to find the studs, that didn’t work. Then I tried a stud finder, and it was giving a false reading. I used my drill. I feel like I need to give a little history of this wall. Back in the day, before I moved here, this was a doorway to the outside, then to a breezeway. Finally someone enclosed the breezeway and made a room on the other side of this doorway.
I used a piece of wire to push into each of the holes to see if it went all the way in, or if it hit a 2×4. I know 16 inch centers, sometimes 24 inch centers. NONE of that was working. The good news is, this will all be covered up with the new 2×8.
Persistence pays off
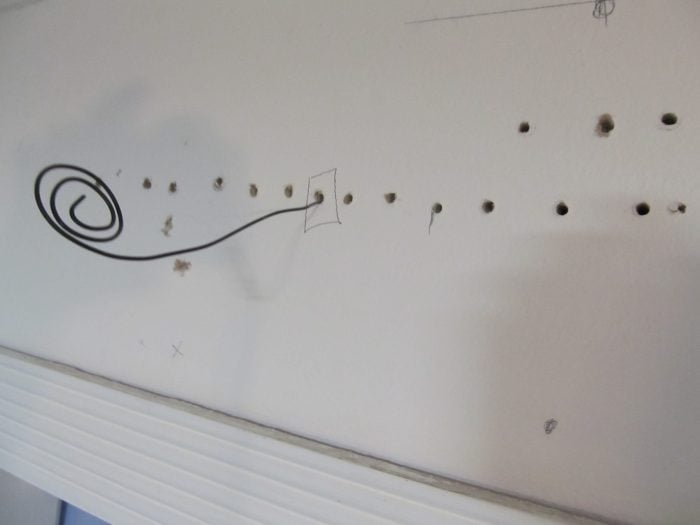
I marked the holes that hit lumber. It appears there is some sort of beam going across.
Typical installation would be to put the box rail up, then attach the brackets to the doors, then slide the doors into the box rail. But, remember where this door is going, it is blocked off on both sides. I had to put the flexible hangers in the box rail before I attached it to the 2×8.
How to Hang a Box Rail
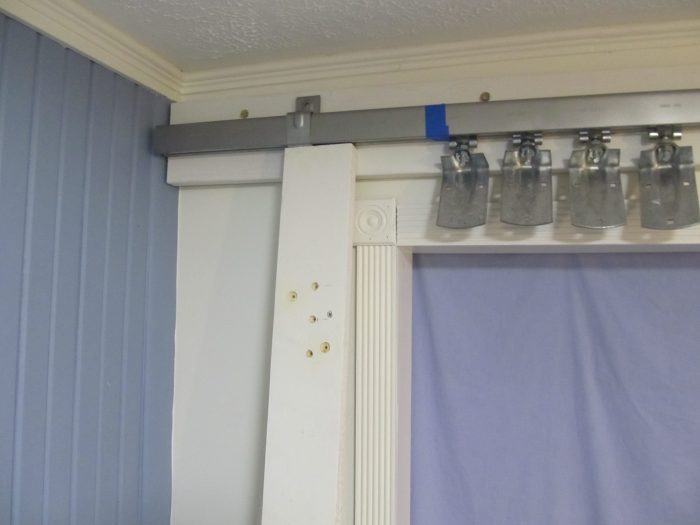
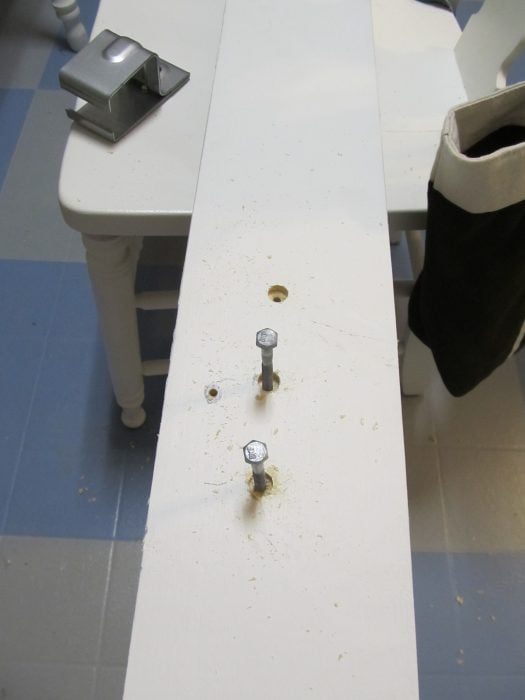
No pictures of the new 2×8 in progress. I did learn from my mistakes. I drilled a pilot hole and a large countersink hole so the socket would easily drive the lag screws all the way in. In this picture you can see that I used painter’s tape to keep the hangers from rolling around during this step. On the right, you can see that the bracket has been attached to the 2×8 to hold the box rail. On the left you can see that the box rail is being supported by the messed up 2×6 to give tired arms a break.
While the 2×6 is holding up the box rail, I used the level on the box rail. (I also used the level on the 2×8) After making sure the box rail is level, I drilled a pilot hole and inserted at 3/8 2” lag screw to the 2×8. (I used a ratcheting socket for this lag screw)
Attach diy barn doors to box rail
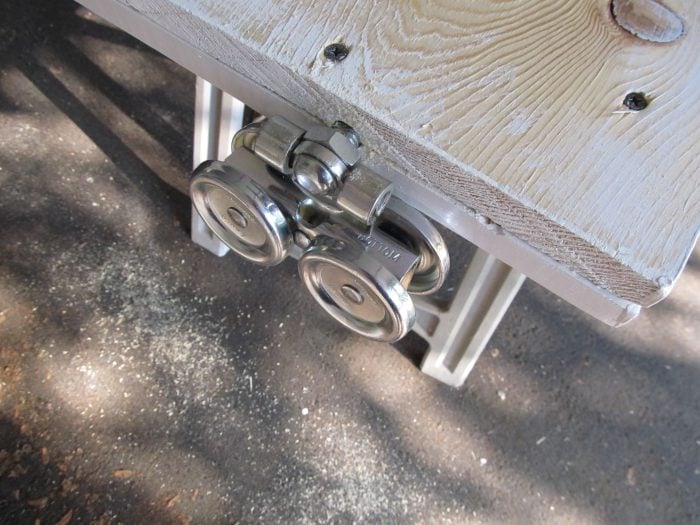
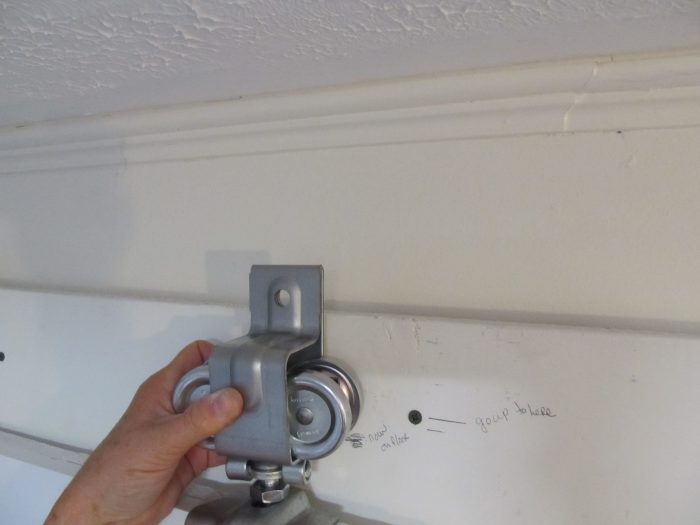
Remember this earlier picture? The flexible hangers pivot, allowing the doors to be swung up off the floor, allowing me to get to the bolts.
These flexible hangers can be adjusted to raise/lower your door, and to set your door closer, or further away from your 2×8 or door frame.
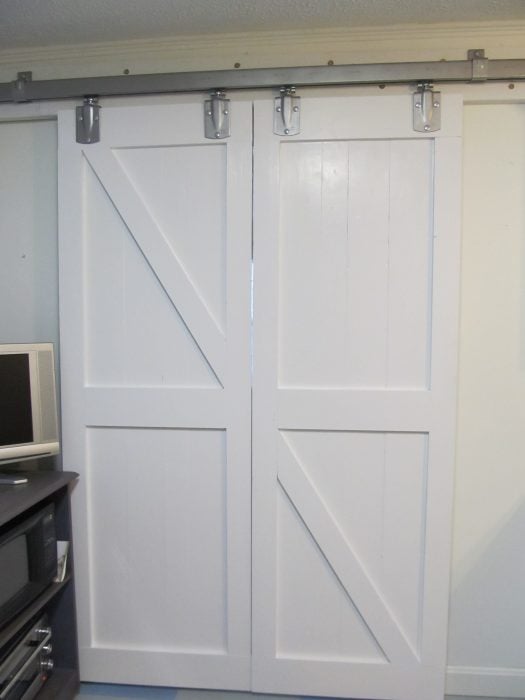
This is how the door was installed. The bottom bolt was inserted on both brackets, and the nut attached. This allowed the door to be swung up off the floor slightly in order for me to get to the other four bolts (that are normally restricted by the door frame).
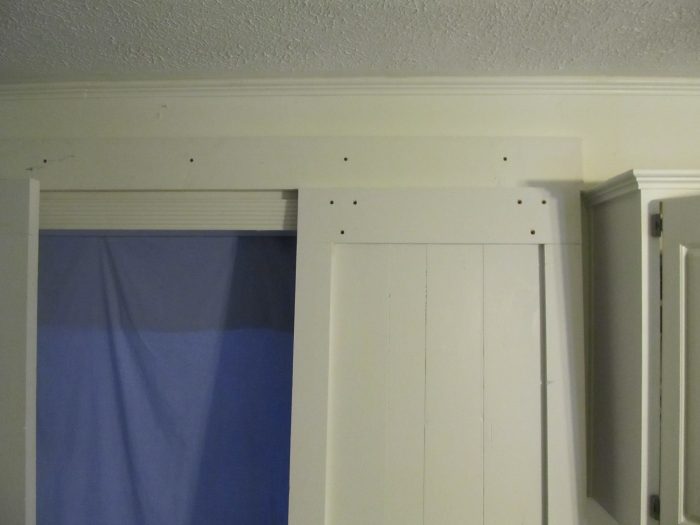
You can see that I didn’t fill the holes where the lag screws are. I may or may not leave them industrial looking.
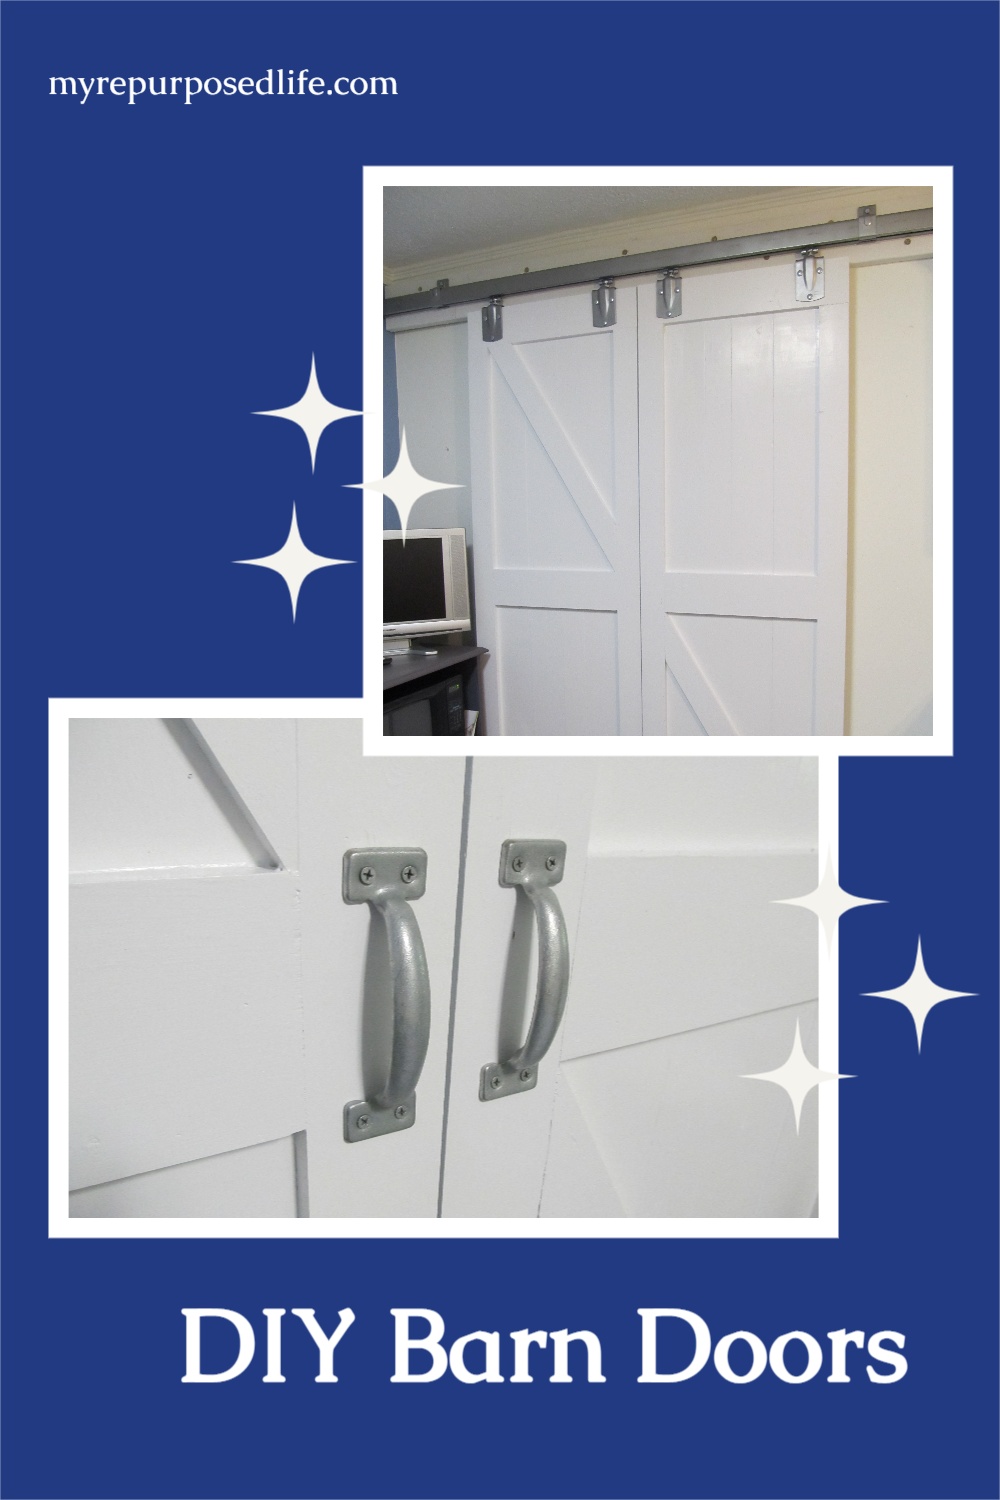
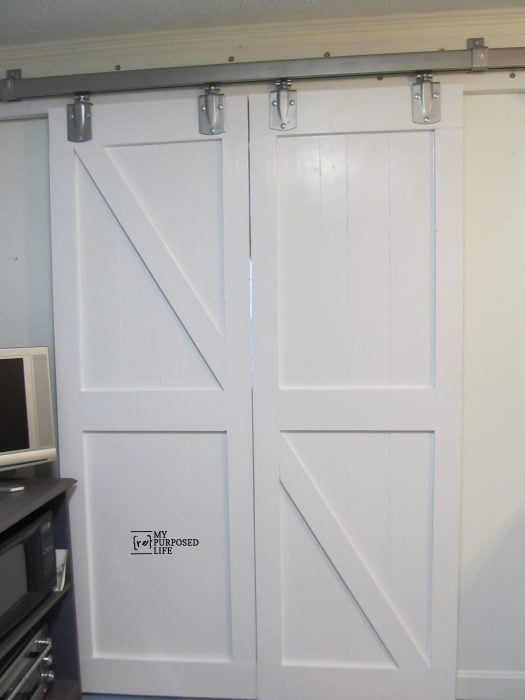
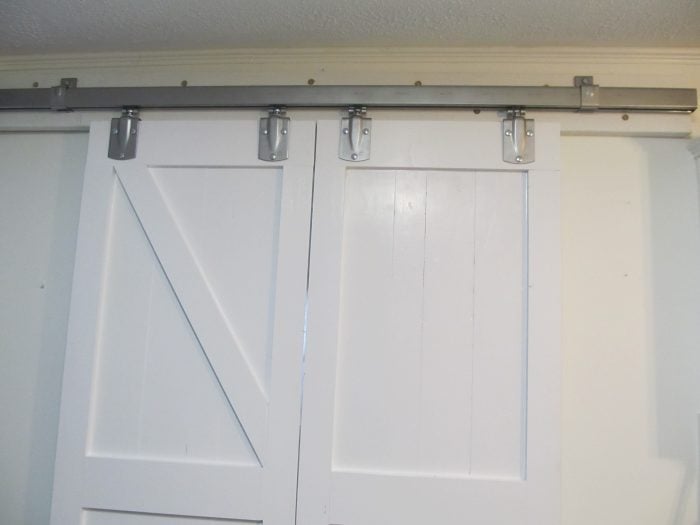
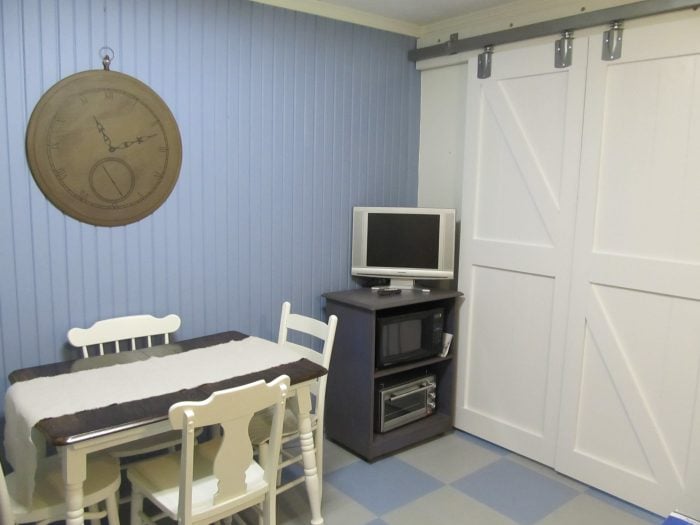
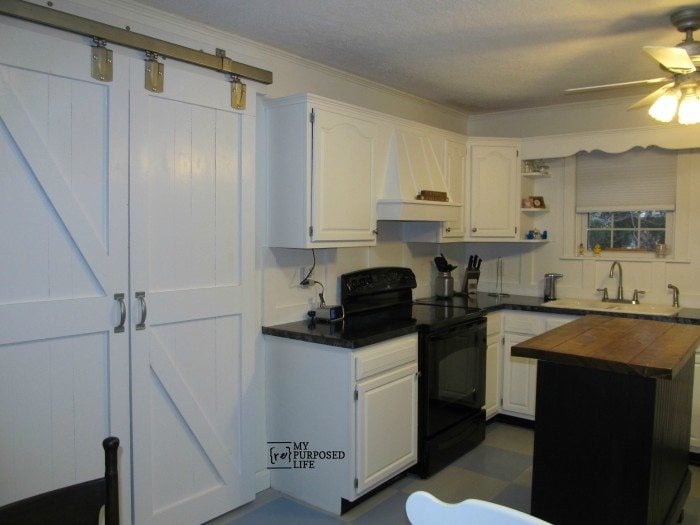
DIY Barn Doors installed
You can see the difference in the color of the door and the walls.
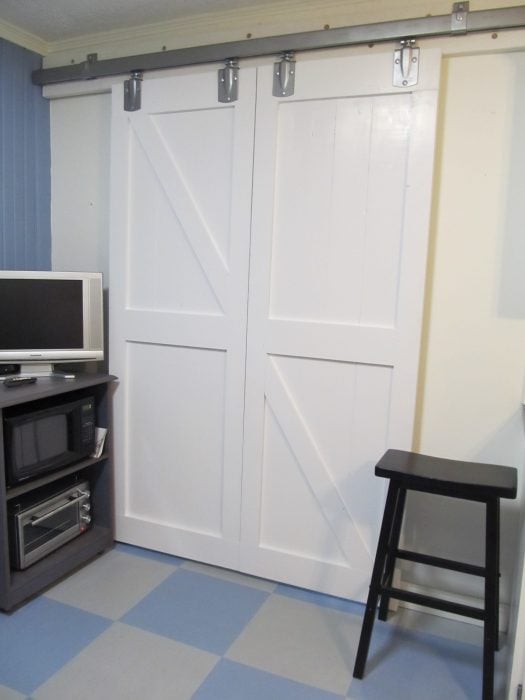
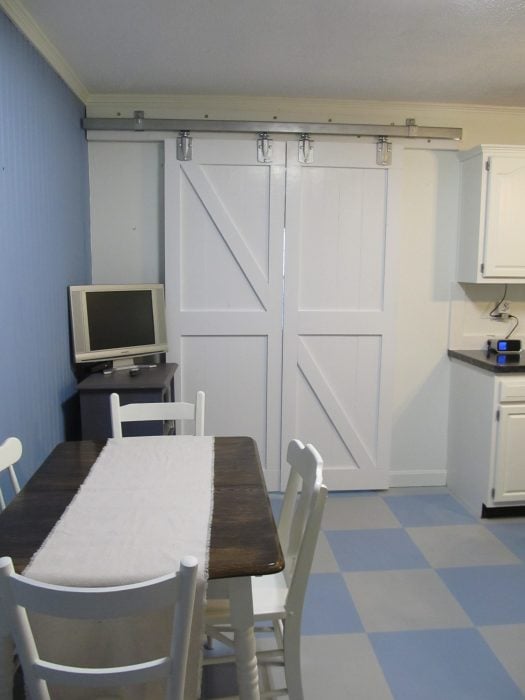
I am however thrilled with my new Do It Yourself Barn Doors! The left slides to the left, the right slides to the right, and that leaves about a 32 inch opening.
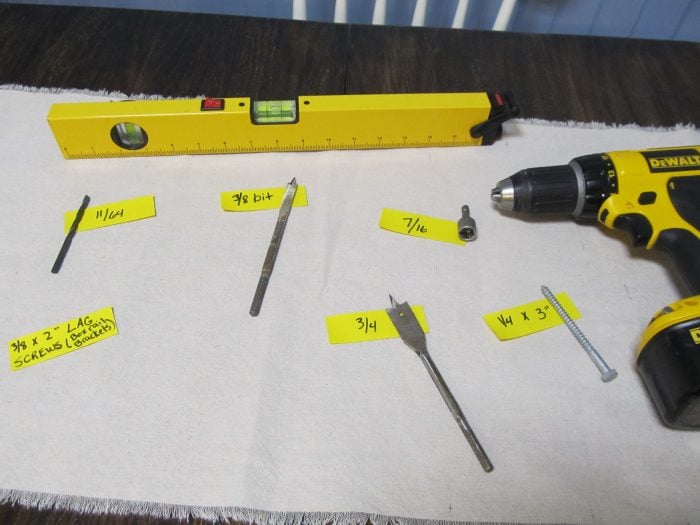
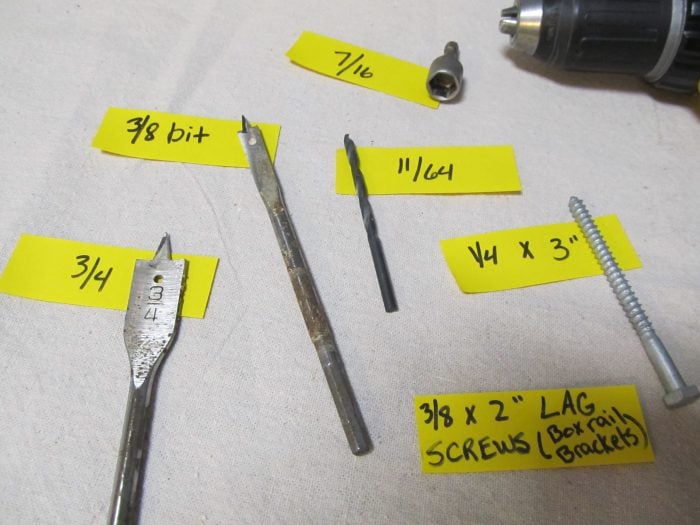
Tools needed to install your own barn doors
Tools I used:
- Reciprocating Saw (to shorten box rail)
- Drill
- bits
- Hammer
- 7/8 inch socket (for the large nuts on the flexible hangers used for adjusting the door height etc)
- open ended wrench for 12 bolts holding the door on the bracket.
-
Level-self explanatory
-
11/64 bit for pilot holes (lag screws)
-
3/8 paddle bit for 12 holes in top of the door (brackets)
-
7/16 socket to drive lag screws through 2×8 into the wall
-
3/4 paddle bit for holes in the top of each door (for large hanger bolt)
-
3/4 paddle bit was also used to drill countersink holes in 2×8 so I could use the 7/16 socket.
-
1/4 x 3” lag screws (hold 2×8 on the wall)
Not included in the Tractor supply hardware-
-
3/8 x 2” lag screws for box rail hanger (2) (not pictured)
-
1/4 x 3” lag screws (I used 12 for 7 ft)
More Details
Here are the details about the specs of this space:
The width when I started was 89″ from left (wall) to right (cabinets)
The doorway is 47.75″
When Closed the doors are 55.5″ wide
The area that is exposed when doors are fully open is 32″ (about the width of a standard door)
UPDATE: I have had to remove the doors twice, once to move in new living room furniture, and once to bring in the new fridge and stove.
I love my new barn door hardware and doors! It was an expensive project, my most costly DIY by far! But, if you shop around online, the hardware alone can cost more than that. (real barn door hardware can run upwards of $500, not counting doors)
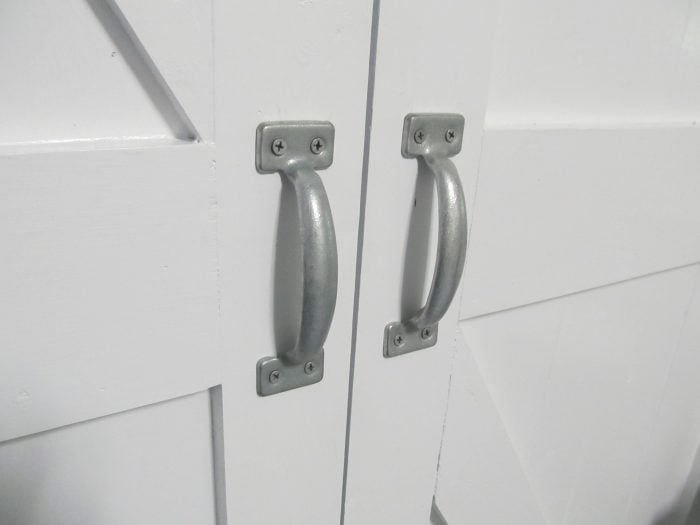
I found some great handles at The Home Depot. Love them! You can get similar barn door handles online.
What’s behind the doors? That non-purpose room that needs to be updated. It’s where the cats eat and sleep. They do have the run of the house, but mostly prefer that room because the blinds are always open and they have a great window seat that is heated in the winter time. I now have to keep the doors cracked open so they can go in and out of the room. Initially I planned to put in a little “mouse hole” at the bottom left of the left door. Any thoughts on that?
EDITED TO ADD: I updated the door on the left to allow the cats to have access to their room.
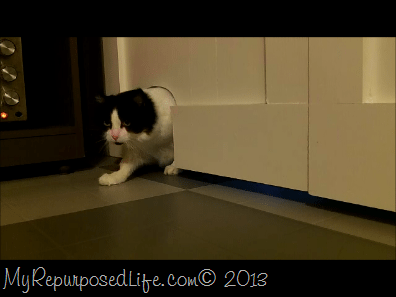
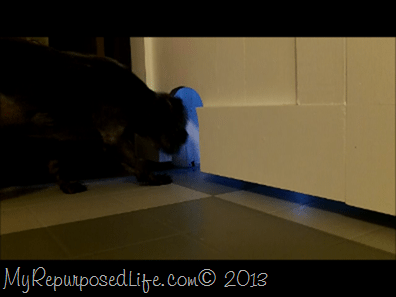
My goal is to keep this little guy out of their room. 🙂
If you want the details see my post: A Mouse Hole for the Cats
gail
UPDATE:
How it looks now:
Check out other door projects here
If you LOVE this project and would like to get regular updates PLUS a free eBook of my best tips, sign up here.
Gloria,
It sounds like you might be facing the same issue I ran into when I did a door for my friend. Check out this post: https://www.myrepurposedlife.com/installing-real-carriage-barn-door/
Let me know if that helps, or if you still have questions.
gail
Gloria,
It sounds like you might be facing the same issue I ran into when I did a door for my friend. Check out this post: https://www.myrepurposedlife.com/installing-real-carriage-barn-door/
Let me know if that helps, or if you still have questions.
gail
Gloria,
It sounds like you might be facing the same issue I ran into when I did a door for my friend. Check out this post: https://www.myrepurposedlife.com/installing-real-carriage-barn-door/
Let me know if that helps, or if you still have questions.
gail
Gloria,
It sounds like you might be facing the same issue I ran into when I did a door for my friend. Check out this post: https://www.myrepurposedlife.com/installing-real-carriage-barn-door/
Let me know if that helps, or if you still have questions.
gail
Gloria,
It sounds like you might be facing the same issue I ran into when I did a door for my friend. Check out this post: https://www.myrepurposedlife.com/installing-real-carriage-barn-door/
Let me know if that helps, or if you still have questions.
gail
Gloria,
It sounds like you might be facing the same issue I ran into when I did a door for my friend. Check out this post: https://www.myrepurposedlife.com/installing-real-carriage-barn-door/
Let me know if that helps, or if you still have questions.
gail
Gloria,
It sounds like you might be facing the same issue I ran into when I did a door for my friend. Check out this post: https://www.myrepurposedlife.com/installing-real-carriage-barn-door/
Let me know if that helps, or if you still have questions.
gail
Gloria,
It sounds like you might be facing the same issue I ran into when I did a door for my friend. Check out this post: https://www.myrepurposedlife.com/installing-real-carriage-barn-door/
Let me know if that helps, or if you still have questions.
gail
Gloria,
It sounds like you might be facing the same issue I ran into when I did a door for my friend. Check out this post: https://www.myrepurposedlife.com/installing-real-carriage-barn-door/
Let me know if that helps, or if you still have questions.
gail