Double Column Console Table
As an Amazon Associate, I earn from qualifying purchases.
I made a double pedestal sofa table out of bed legs, and now I’ve made a double column console table out of more bed parts. I love all repurposed furniture projects.
Double Column Console Table


I got these free headboard parts from my neighbor Rodney at the end of the year. I’ve used one of the headboards to make a What I Love Most About My Home sign/coatrack. I’ve really been struggling with what to do with the smaller columns or pedestals. There were two short ones and two very tall ones. I chose the shorter ones for this double pedestal table.

I had gotten out one of the large column bed posts to make into a plant stand. A table I saw in a store inspired me to make these columns into a table. I’ll take you through the design process.
Design DIY console table

I used two of the plywood pieces from my June Haul. I chose two that were the same size for the top and the bottom of the double column console table. The trick would be to hide the raw edges of the plywood.

Enter the picture frame molding from my July Haul! I knew I’d find a use for some of it, but I was surprised that I found the perfect project so soon.
*this post contains affiliate links for your convenience, you can read more here*
Add trim to console table

Another picture showing the dry fit and how the picture frame molding as table trim will work on this pedestal table.

To raise the table off the floor, I used some 2x’s. To get them spaced properly I used my Kreg MulitMark tool. You’ll see later that I needed to add additional 2x’s for stabilization of the table.
Attach bottom base

This set of images show the underneath side of the table base. After drawing the outline of the 2×6 on the underneath side of the plywood (bottom shelf) I added Gorilla Wood Glue and temporarily secured the board with my nail gun. Bottom left image shows where I pre-drilled holes to secure the 2×6, the plywood AND the octagon shaped column.
I took great care to make sure the left and right column were placed at the same distance from the side, front and back. I used 3 inch wood screws through the 2×6, plywood, INTO the oak column. Because the 2×6 is soft material, I was able to countersink all the screws so the base will rest on the floor. Later I’ll show you the double pedestal table upside down and hopefully it will all make sense.
Secure table top and bottom to pedestals

I used shorter (1 5/8) screws to secure the double pedestal table top to the column. In addition, I used Gorilla Wood Glue to secure the table top and bottom. At this point, the table is getting quite heavy.

While I was putting the top on the table, I noticed it was a little tipsy. This was probably because the base boards (2×6) weren’t near enough to the front and back edge. I added a 2×2 along each end using wood glue and the nail gun.

Oh, I also added a middle brace. I took all of these smaller pieces all the way to the front. Having these extra boards will give me extra strength and material to attach the bottom trim (picture frame molding). More wood glue and nail gunning.
I cut all the picture frame molding on the compound miter saw.
Work smarter not harder

Because the double pedestal table is made to butt up against a wall (or sofa) there is no trim along the back of the top or bottom shelf. To make it easier to attach the trim, I laid the table down on the driveway instead of needing three or four hands to try and hold it in place while using the nail gun. Work smarter not harder. ![]()

Basically I did the same thing underneath the table top. For this step I used 1×4 scraps. Again, bringing them all the way to the front and side edge to help secure the molding/trim. The scraps were secured with wood glue and the nail gun.
Add trim to front and sides

I laid the table down again to add the trim to the front and sides of the double column console table using wood glue and the nail gun.

This is the point where I always get so anxious to get paint on my project. I don’t like all of the mismatched wood colors.
Paint new DIY double console table

I made some diy chalky paint primer with plaster of paris and Behr paint.

This is a great view of the bottom so you can see how all the extra pieces were added to the double column console table. I used my new favorite Finish Max Super to give a quick coat of primer to the table. FYI There is no need to thin your paint with the NEW model.
 After painting the table laying down, I set it upright to finish painting. Looking at the time stamp on these photos, I started at 5:48 pm and you can see I’m finished, and already have the Finish Max Super cleaned up at 6:09. It doesn’t get any easier than this folks! Some of that time was waiting for the bottom of the table to dry so I could set it upright.
I let it dry overnight.

Brown craft paper is handy to “sand” in between coats when I use the chalky paint primer.
Plan B

I purposely painted a brown primer coat to make all of the wood tones match. The top coat is white. Hopefully if the table gets nicked or distressed, brown paint will show through, not the orange color of the original headboard column (posts).
oops! No pictures after the table was painted off white.

You may have noticed gaps in the base when the table was brown (above). Painter’s caulk to the rescue—gaps gone.

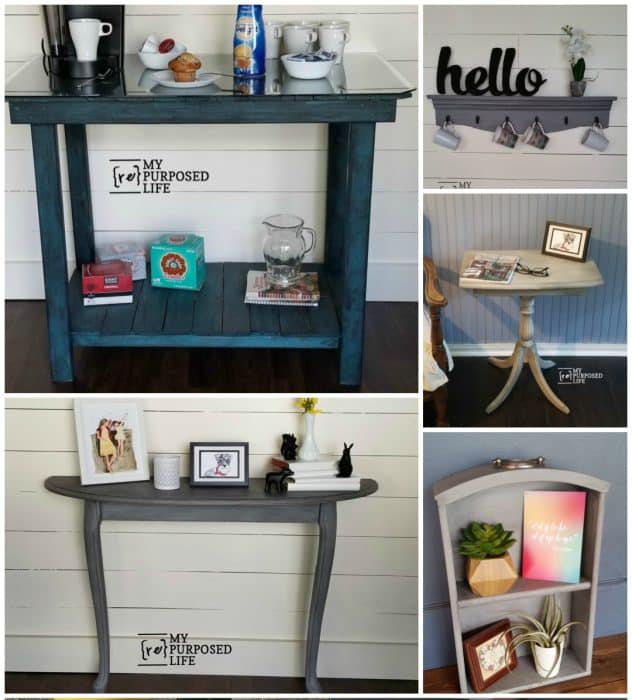
You may recall that I’m obsessed with Chalked Smoked Glaze – which is black, but changes this white paint to shades of gray. These four projects all started out with this same white paint, and each got the smoked glaze treatment. The glaze is very versatile giving several different looks. Old Oak Table Gray Glazed Shelves Console Table Made from Table Legs Repurposed Kitchen Drawer Shelf.
While shopping on Amazon, I found another glaze from Rustoleum.

This Aged Glaze is brown in the can. It reminds of of projects that I used in my Glazing 101 post. Therefore instead of gray highlights, it’s more of an aged highlight—a lot like my mom used to do in the early 70’s.
Project ideas and a video of “how to glaze painted furniture and more”
Antiqued Glazed Sofa Table

It’s very difficult to take pictures while I was doing the glazing process. (see the link at the bottom for a great video) I brushed it on with a cheap chip brush, and wiped it off with a soft rag, just like I did on the console table made from table legs. I wear latex gloves and get a little messy. Full disclosure, the painter’s caulk takes the glaze a little different than the paint does. Hindsight 20/20 I should have done another coat of paint over the caulking. Do you get impatient like I do?

Although I think I prefer the gray glazed topcoat, I do like how nice this console table looks with the picture frame molding and the antique glaze. The small Kentucky sign was a gift from Suesan at FrouFrugal.

Do you remember the pedestal piece from yesterday’s Recent Finds August 2017? I love the art hanging on the wall, it is a piece my daughter Jamie painted for me YEARS ago. The small blue canvas “there are always flowers for those who wish to see them” was a gift from Jamie and Andy for Mother’s day 2017.

The double pedestal console table is a little taller than normal sofa tables, but it would look great in a large hallway or entryway. The pedestal table would also work great at a wedding to display pictures and a guest book, making it easier for people to sign in due to it’s height. This table is 48” long and 12 1/4” deep, standing 35” tall.
Do you have a preference of the glaze? The antique or the smoked?
Watch my video of How To Glaze Painted Furniture
gail
You done good!!! This is a great piece. I’m glad you could see the Gestalt in the pieces.
i really like the brown glaze on this piece but in general i like the other glaze, and this table is gorgeous xx
Thank you Chris! I feel exactly the same way. I can’t really imagine what this table would look like with the gray glaze. I think it was meant to look like this.
gail
This table looks so perfect. You have designed it well. CREATIVE!!
Thank you so much Stephanie!
I like both finishes. The table is really a neat way to use the columns.